The Fabric Hat – Tutorial is your gateway to creating a stylish, practical, and personalized accessory that stands out in any season. Whether you are looking to shield yourself from the sun or simply want to add a unique flair to your outfit, learning to craft your own headwear is a rewarding skill. This guide is designed to take you from a simple piece of textile to a high-quality finished product that rivals boutique store finds.
In this comprehensive Fabric Hat – Tutorial, we will explore the essential steps of garment construction, focusing on accuracy, sewing techniques, and material selection. Creating a hat requires a blend of patience and precision, especially when dealing with curved seams and structural integrity. By following this structured approach, even those who are relatively new to the world of DIY fashion can achieve professional-looking results with minimal stress.
Understanding the fundamentals of a Fabric Hat – Tutorial allows you to experiment with various fabric types, such as sturdy cotton canvas, breathable linen, or even upcycled denim. The beauty of this project lies in its versatility; once you master the basic hat pattern, you can scale it for different sizes or modify the brim width to suit your personal style. Let’s dive into the detailed process of bringing your vision to life through the art of sewing.
1. Selecting the Right Materials for Your Fabric Hat – Tutorial
Choosing the right foundation is the most critical part of this Fabric Hat – Tutorial because the fabric weight determines how the hat sits on your head. For a classic bucket hat or sun hat, medium-weight woven fabrics like cotton twill or denim are ideal because they offer enough body to hold their shape without being too stiff to sew. If you prefer a softer, packable version, lighter materials can be used, but they may require additional support.
To ensure your hat doesn’t go limp, you must incorporate fusible interfacing. This is a hidden layer that bonds to the back of your fabric using heat, providing the necessary stiffness for the hat brim. In this Fabric Hat – Tutorial, we recommend a mid-weight interfacing for the brim and a lighter version for the crown to maintain a balance between structure and comfort. Don’t skip this step, as it distinguishes a “homemade” look from a “handmade” masterpiece.
Aside from the main exterior fabric, you will also need a lining fabric. Choosing a soft, moisture-wicking material like cotton poplin or silk can make the hat much more comfortable to wear for extended periods. The lining also hides the raw edges of your internal seams, giving the inside of your hat a clean, professional finish. It is a great opportunity to use a contrasting color or a fun print that only you know is there.
Your toolkit for this Fabric Hat – Tutorial should include standard sewing notions such as high-quality polyester thread, sharp fabric shears, and a rotary cutter for precision. Because hats involve many curves, using clover clips instead of pins can prevent the fabric from shifting or puckering. A sharp denim needle or a size 90/14 needle is usually best if you are working with thicker materials to avoid skipped stitches.
Preparation is key to a successful DIY project. Before you begin cutting, always pre-wash your fabric. Natural fibers like cotton tend to shrink during the first wash, and you wouldn’t want your perfectly fitted hat to become too small after its first cleaning. Dry and iron your fabric thoroughly to remove any wrinkles, ensuring that your pattern pieces lay perfectly flat during the layout process.
Finally, consider the aesthetic details like matching or contrasting threads. For this Fabric Hat – Tutorial, topstitching is a major design element, especially on the brim. Selecting a thread that complements your color palette will enhance the final look. Once you have your fabric, interfacing, lining, and notions ready, you are prepared to move on to the technical phase of cutting and assembly.
2. Mastering the Pattern and Cutting Process
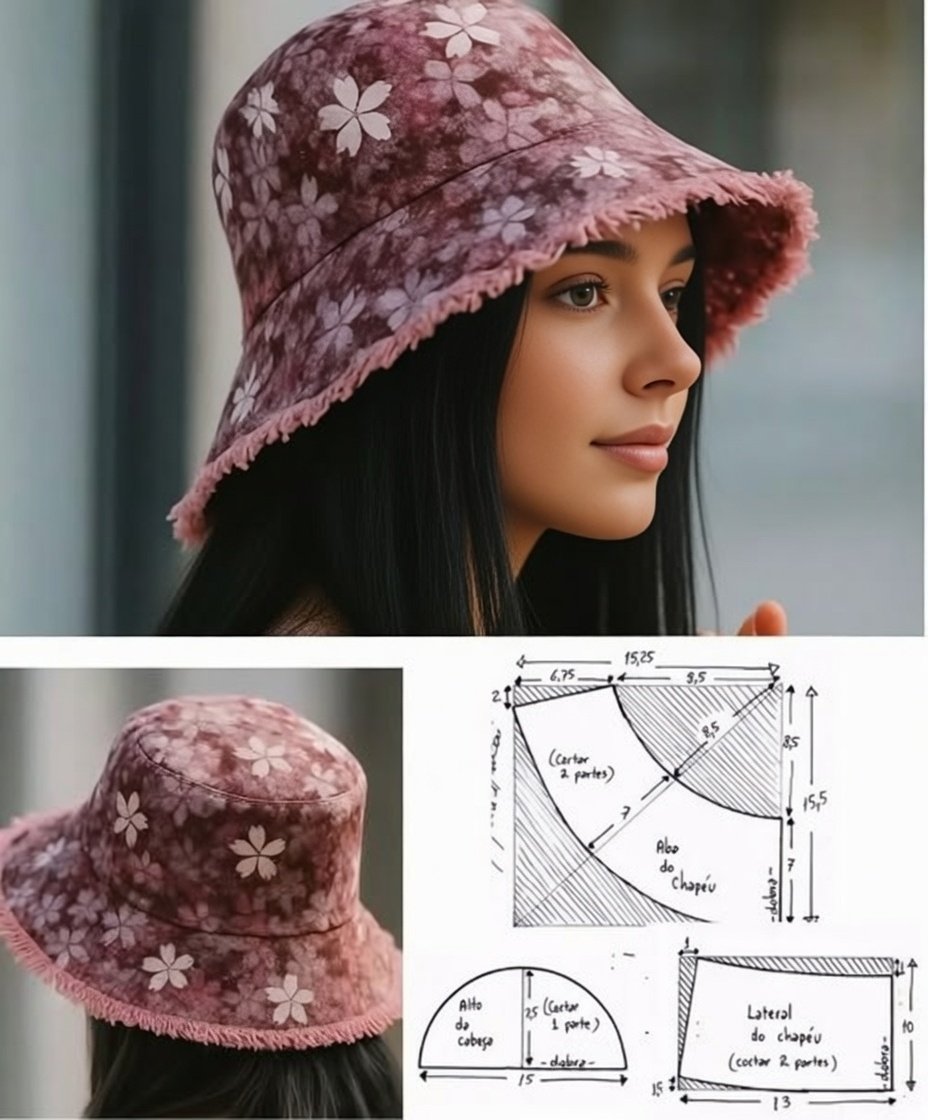
The first technical step in our Fabric Hat – Tutorial involves the pattern layout. A standard hat usually consists of three main parts: the top circle (crown), the side panel (wall), and the brim. You will need to cut two sets of these pieces—one from your main fabric and one from your lining—plus the interfacing pieces for the brim. Accuracy during this stage ensures that all components fit together perfectly during assembly.
When placing your pattern templates on the material, pay close attention to the fabric grainline. The grainline should typically run vertically through your pieces to ensure the hat has the correct amount of stretch and stability. In this Fabric Hat – Tutorial, we emphasize marking all notches and center points with a fabric marker. These small marks act as guideposts, helping you align the circular pieces without creating uneven bunches or twists.
Cutting curves requires a steady hand. Using a rotary cutter and a cutting mat often yields smoother edges than traditional scissors when navigating the circular shape of the hat crown. If you are using scissors, take long, slow snips to avoid “choppy” edges. Remember that in garment sewing, a clean cut leads to a clean seam, which is vital for the circular geometry found in this Fabric Hat – Tutorial.
Once the fabric is cut, it is time to apply the fusible interfacing. Place the glue side of the interfacing against the wrong side of your brim pieces. Use a dry iron and a pressing cloth to apply firm, even pressure for about 10 to 15 seconds. This step of the Fabric Hat – Tutorial ensures the brim is sturdy enough to stand out from the face and protect you from the sun, rather than flopping over your eyes.
Organization is vital when dealing with multiple similar-looking pieces. In this Fabric Hat – Tutorial, we suggest labeling your lining pieces and your exterior pieces so they don’t get swapped. It is easy to accidentally sew a lining side panel to an exterior brim, which would require the tedious task of using a seam ripper. Keeping your workspace tidy and your pieces stacked in sets will save you significant time and frustration.
Before moving to the sewing machine, do a quick “dry fit” by pinning the side panels to the crown. This allows you to verify that the circumferences match up. If there is a slight discrepancy, it is much easier to trim a millimeter off a flat piece now than to try and ease in excess fabric while sewing a curve. This attention to detail is what makes this Fabric Hat – Tutorial an effective guide for high-quality handmade apparel.
3. Sewing the Crown and Side Panels
Now we reach the assembly phase of the Fabric Hat – Tutorial. Start by sewing the short ends of your side panels together to create a continuous loop. Do this for both the exterior fabric and the lining. Press the seams open to reduce bulk. Reducing bulk is essential in hat-making because multiple layers of fabric meet at specific junctions, and thick seams can become uncomfortable against the head.
Next, you will pin the crown circle to the top of the side panel loop. This is the most challenging curve in the Fabric Hat – Tutorial. Align your center notches first, then pin the four quadrants. Use plenty of pins or clips to “ease” the flat circle into the circular wall. Sewing slowly is the secret here; stop with the needle down frequently to pivot the fabric and ensure you aren’t creating any small folds or “tucks” in the seam.
Repeat this process for the lining pieces. Once both the exterior “bucket” and the lining “bucket” are sewn, you should have two identical fabric caps. In this Fabric Hat – Tutorial, we recommend trimming the seam allowance to about 0.5 cm or using pinking shears. This allows the curved seam to lay flat and smooth once the hat is turned right side out, preventing the top of the hat from looking boxy or distorted.
Pressing is just as important as sewing. Use a tailor’s ham or a rolled-up towel to press the circular seam of the crown. By pressing the seam toward the side panel, you create a crisp edge that defines the shape of the hat. A good steam iron is a seamstress’s best friend in this Fabric Hat – Tutorial, as it helps mold the fabric fibers into the desired three-dimensional shape of the headwear.
At this point, you can add a personalized label or a small loop to the interior of the exterior crown. This adds a “boutique” touch to your sewing project. If you want your hat to be reversible, ensure that both the lining and exterior are finished with equal care. This Fabric Hat – Tutorial focuses on a single-sided hat with a hidden lining, but the techniques remain the same if you choose to make it two-sided.
Check your stitching for any gaps or loose threads. The structural integrity of the crown is what holds the entire hat together. If you notice any puckers, it is worth using the seam ripper to fix them now. As we progress through this Fabric Hat – Tutorial, you will see how these individual components come together to form a cohesive and durable piece of custom headgear.
4. Attaching the Brim and Finishing Touches
The final major assembly step in our Fabric Hat – Tutorial is creating and attaching the brim. Sew your two brim pieces (which should now be interfaced) together along the outer edge, with right sides facing. After sewing, turn the brim right side out and press the edge flat. To get a professional look, perform topstitching in concentric circles around the brim. This not only looks great but adds significant rigidity and durability.
Now, align the open inner edge of the brim with the bottom edge of your exterior crown. Match the side seams and center points carefully. In this Fabric Hat – Tutorial, we sew the brim to the exterior first, then attach the lining. This “sandwich” method ensures that all raw edges are encased inside the hat, leaving you with a clean finish on both the inside and the outside.
Leave a small opening of about 10 cm in the lining seam when joining it to the brim/exterior assembly. This hole is used to “birth” the hat, pulling the entire structure through the opening so the right sides are facing out. It feels like magic every time! Once the hat is turned, tuck the lining inside and press the bottom edge thoroughly. This is a pivotal moment in the Fabric Hat – Tutorial where your project finally looks like a real hat.
Close the opening in the lining using a ladder stitch (an invisible hand-stitch) or by topstitching very close to the edge with your machine. For the ultimate professional finish, add one final row of topstitching around the base of the crown where it meets the brim. This keeps the lining from rolling outward and provides an extra layer of reinforcement to the most handled part of the fabric hat.
Take a moment to trim any remaining stray threads and give the entire hat a final steam press. If your fabric allows, you can use a bit of fabric stiffener spray to give it extra “crunch,” but usually, the interfacing and topstitching are enough. This Fabric Hat – Tutorial emphasizes that the quality of your finish is what determines the longevity of the garment. A well-pressed hat looks expensive and well-made.
Congratulations, you have completed the Fabric Hat – Tutorial! You now possess a custom-made accessory that fits your head perfectly and matches your unique style. Whether you chose a bold floral print or a classic neutral tone, the skills you’ve learned—from curved seam assembly to interfacing application—can be applied to many other sewing tutorials and apparel design projects in the future.
FAQ – Frequently Asked Questions
1. What is the best fabric for a beginner starting this Fabric Hat – Tutorial?
For beginners, 100% cotton quilting fabric or light canvas is the best choice. These fabrics are “stable,” meaning they don’t stretch or slip while you are trying to sew the tricky curves of the crown. Avoid slippery fabrics like silk or stretchy knits until you are more comfortable with the construction process.
2. Why does my hat brim feel too floppy?
If your brim doesn’t hold its shape, you likely skipped the interfacing or used a version that was too light. In this Fabric Hat – Tutorial, we recommend using firm fusible interfacing. Additionally, adding more rows of concentric topstitching on the brim can mechanically stiffen the fabric, giving it more “snap.”
3. How do I measure my head for the correct hat size?
To find your size, wrap a soft measuring tape around your head where the hat would normally sit (usually about 1 cm above the ears). Keep the tape snug but not tight. Most hat patterns come in small, medium, and large; choose the one that most closely matches your measurement in centimeters to ensure a comfortable fit.
4. Can I make this Fabric Hat – Tutorial without a sewing machine?
While a sewing machine makes the process much faster and provides stronger seams, you can sew a hat by hand using a backstitch. It requires a great deal of patience, especially for the topstitching on the brim, but it is entirely possible for a dedicated crafter.
5. How do I wash my handmade fabric hat?
Most fabric hats can be hand-washed in cool water with a mild detergent. Avoid wringing the hat, as this can distort the interfacing. Instead, reshape it while damp and let it air dry over a bowl or a hat form to maintain its circular shape. Check your specific fabric care instructions before washing.
6. Is it possible to make the hat reversible?
Yes! To make it reversible, simply treat the lining as a second “exterior.” Use a high-quality fabric for both sides and ensure your hand-stitching at the closing gap is completely invisible. This Fabric Hat – Tutorial technique essentially gives you two hats in one, making it perfect for travel.
Conclusion
In this Fabric Hat – Tutorial, we have covered everything from initial material selection to the final topstitching details. You learned the importance of fusible interfacing for structure, the technicality of sewing curved seams, and the professional “sandwich” method for hidden linings.
By following these steps, you’ve transformed simple yardage into a functional piece of wearable art. Sewing your own accessories is not just about saving money; it’s about the freedom to choose your own colors, patterns, and fit.