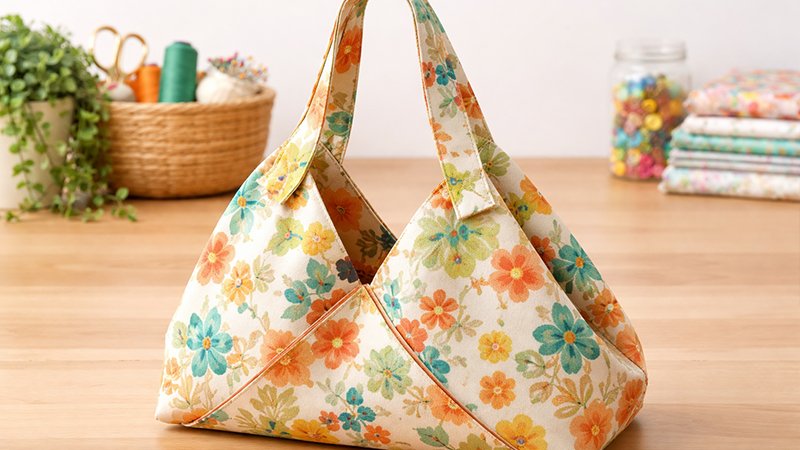
Crafting a Fabric Hobo-Style Bag – Tutorial is a rewarding project that combines functionality with a relaxed, bohemian aesthetic that never goes out of style. If you are looking for a practical accessory that offers plenty of room while maintaining a soft, slouchy silhouette, this Fabric Hobo-Style Bag – Tutorial is exactly what you need to elevate your sewing skills. This specific style is beloved by many because it transitions perfectly from a casual day at the farmer’s market to a busy afternoon running errands, proving that handmade fashion is both beautiful and versatile.
Creating your own Fabric Hobo-Style Bag allows for endless personalization, from choosing a vibrant cotton print to opting for a more rugged upcycled denim look. Many crafters enjoy this sewing project because the construction is straightforward, yet the results look professionally made. By following this step-by-step guide, you will learn how to handle curved seams and create a comfortable, integrated strap that sits perfectly on the shoulder.
Before we dive into the details of the Fabric Hobo-Style Bag – Tutorial, it is important to gather high-quality materials to ensure your bag is durable. Using a medium-weight fabric like canvas, linen, or duck cloth will provide the necessary structure without making the bag too stiff. Let’s explore the essential elements of this project, ensuring your DIY fashion journey is successful, SEO-friendly, and, most importantly, fun to create.
1. Choosing the Right Materials for Your Fabric Hobo-Style Bag – Tutorial
Selecting the perfect textile is the first critical step in any Fabric Hobo-Style Bag – Tutorial. Since the hobo style relies on a “slouchy” look, you want a fabric that has some drape but is strong enough to hold your daily essentials. Cotton canvas is a top choice for beginners because it is easy to sew and comes in various patterns.
For the lining, a lighter cotton poplin or quilting cotton works beautifully to keep the interior smooth. If you are interested in sustainable sewing, consider using upcycled fabrics from old curtains or sturdy garments. This not only saves money but also gives your Fabric Hobo-Style Bag a unique story and a vintage feel.
Don’t forget the importance of interfacing. Using a lightweight fusible interfacing on your exterior panels helps the bag maintain its shape over time without losing that signature hobo curve. If you plan on carrying heavier items, a reinforced bottom or double-stitched seams are highly recommended for added longevity.
Hardware is another element to consider, though many hobo bags are purely fabric-based. You might want to add a magnetic snap or a heavy-duty zipper to keep your belongings secure. For this Fabric Hobo-Style Bag – Tutorial, we focus on a clean, minimalist design that emphasizes the beauty of the fabric itself.
Thread selection should not be overlooked when preparing your DIY bag. A high-quality all-purpose polyester thread is usually best for its strength and resistance to fraying. Matching the thread color to your fabric provides a seamless look, while a contrasting color can create a bold, decorative topstitching effect.
Lastly, make sure you have sharp fabric shears or a rotary cutter and a cutting mat ready. Precise cutting is the secret to a professional-looking Fabric Hobo-Style Bag. When you have all your materials organized, you will find that the sewing process flows much more smoothly and enjoyably.
2. Cutting and Preparing Your Pattern Pieces Correctly
The heart of any Fabric Hobo-Style Bag – Tutorial is the pattern. A classic hobo bag usually features a crescent shape or a rounded “U” shape. You can draw your own bag pattern on craft paper or use a digital template, ensuring you include a seam allowance of at least 1/2 inch for all edges.
You will typically need to cut two exterior pieces and two lining pieces for the main body. If your design includes an integrated strap, make sure the “arms” of the pattern are long enough to meet at your desired shoulder height. This seamless strap design is a hallmark of the Fabric Hobo-Style Bag aesthetic.
Once your pieces are cut, it is time to apply the fusible interfacing. Place the adhesive side of the interfacing against the wrong side of your exterior fabric and press with a hot iron. This step is vital in our Fabric Hobo-Style Bag – Tutorial because it prevents the fabric from stretching out of shape during assembly.
If you want to add internal pockets, now is the time to prepare them. Small rectangles of fabric can be hemmed and sewn onto the lining pieces. Pockets are essential for keeping your keys and phone accessible within the deep, spacious interior of a hobo-style bag.
Marking your notches and center points with tailor’s chalk will save you a lot of frustration later. These marks help you align the curves perfectly when you begin pinning. In this Fabric Hobo-Style Bag – Tutorial, we emphasize that preparation is 90% of the work for a high-quality finish.
Finally, give all your pieces a good press with the iron before moving to the sewing machine. Flat, crisp fabric is much easier to manipulate under the needle. Having your pieces organized and labeled ensures that the assembly phase of your handmade bag goes off without a hitch.
3. Sewing the Main Body and Creating the Slouchy Shape
Now we reach the most exciting part of the Fabric Hobo-Style Bag – Tutorial: the actual construction. Start by placing your exterior pieces right sides together. Sew around the bottom and sides, leaving the top open. Use a backstitch at the beginning and end of your seam to secure the thread.
To achieve the rounded bottom that defines a Fabric Hobo-Style Bag, you may need to clip the curves. Small V-shaped snips in the seam allowance allow the fabric to lay flat once turned right side out. Be careful not to cut through your stitching line during this delicate process.
Repeat the same process for the lining pieces, but remember to leave a 4-inch gap at the bottom. This “turning hole” is essential for pulling the bag through at the end. A Fabric Hobo-Style Bag – Tutorial isn’t complete without teaching you how to hide your raw edges inside the lining.
The integrated straps are sewn next. If your pattern has two strap halves, join them at the top with a sturdy seam. If you prefer a contrast strap, you can sew a separate piece of webbing or fabric and attach it to the side seams of the bag body.
Once the exterior and lining are ready, place the exterior bag inside the lining bag so that the right sides are touching. Align the top edges and the straps, pinning them carefully. Sew around the entire top perimeter, ensuring the straps are tucked inside correctly as you go.
The “magic” happens when you pull the exterior through the hole in the lining. Suddenly, your Fabric Hobo-Style Bag appears! Close the hole in the lining with a ladder stitch or a quick machine stitch, then tuck the lining inside the bag and press the top edge flat for a crisp finish.
4. Finishing Touches and Customizing Your Handmade Bag
The final stage of the Fabric Hobo-Style Bag – Tutorial involves topstitching and adding personal flair. Topstitching around the top edge not only looks professional but also keeps the lining from rolling outward. Use a slightly longer stitch length for a clean, decorative look.
You can customize your Fabric Hobo-Style Bag by adding embellishments like fabric flowers, tassels, or embroidery. Since the hobo bag is often a large canvas of fabric, it is the perfect place to show off your creative stitching or even some patchwork details.
If you find that the strap is too long, you can tie it in a stylish knot at the shoulder, which adds to the bohemian vibe. For those who prefer a more secure closure, sewing a button and loop or a magnetic snap at the center top will give you peace of mind while traveling.
Consider the environment by using eco-friendly materials throughout your project. Many people following this Fabric Hobo-Style Bag – Tutorial choose organic cotton or recycled hardware. This makes your bag not only a fashion statement but also a step toward sustainable living.
The versatility of the hobo bag means you can make several versions for different seasons. A dark, corduroy hobo bag is perfect for winter, while a light, floral linen bag is ideal for summer. The skills you learned in this Fabric Hobo-Style Bag – Tutorial apply to almost any fabric type.
Now that your bag is finished, give it one last steam press to set the seams. Your handmade accessory is ready to be used and admired. Creating a Fabric Hobo-Style Bag is a journey of patience and creativity, and you should be proud of the functional art you have produced.
Frequently Asked Questions (FAQ)
What is the best fabric for a hobo bag?
The best fabrics are those with a medium weight and a bit of drape, such as canvas, denim, or heavy linen. These materials allow the bag to “slouch” naturally while remaining durable for everyday use.
Do I need a sewing machine to make this bag?
While a sewing machine makes the process much faster and ensures stronger seams, you can technically sew a Fabric Hobo-Style Bag by hand using a backstitch. However, for longevity, a machine is recommended.
How do I make the strap adjustable?
To make an adjustable strap, you can incorporate metal sliders and rings. Alternatively, sewing a very long strap and tying it in a knot allows for easy adjustment to different lengths.
Is this project suitable for beginners?
Yes! The Fabric Hobo-Style Bag – Tutorial is a fantastic beginner project because it doesn’t require complex zippers or difficult tailoring. It’s a great way to practice sewing curves.
Can I wash my handmade hobo bag?
If you used washable fabrics like cotton or linen and pre-shrunk them before sewing, your bag should be machine washable on a gentle cycle. Always air dry to maintain the shape.
How much fabric do I need?
Generally, one yard of exterior fabric and one yard of lining fabric is plenty for a standard-sized hobo bag. If you are making a mini version, half a yard of each may suffice.
Conclusion
In this Fabric Hobo-Style Bag – Tutorial, we have covered everything from selecting the right durable fabrics to the final topstitching techniques. You have learned how to prepare a pattern, apply interfacing for structure, and assemble a professional-looking bag with a hidden lining. This project is a wonderful way to express your personal style while creating something truly useful for your daily life.
By mastering the hobo-style construction, you now have the skills to experiment with different sizes, colors, and textures. Whether you are making this for yourself or as a thoughtful handmade gift, the effort you put into your Fabric Hobo-Style Bag will certainly show.