Creating a Crochet Hair Elastic Tutorial is one of the most rewarding projects for beginners and seasoned crafters alike because it combines utility with creativity. If you are looking for a quick way to use up your yarn stash while making something stylish, this Crochet Hair Elastic Tutorial will guide you through every loop and stitch. Accessories made by hand have a unique charm that store-bought items simply can’t match, and learning how to customize your own hair accessories allows you to coordinate with any outfit perfectly.
In this comprehensive Crochet Hair Elastic Tutorial, we will explore the best materials, techniques, and finishing touches to ensure your handmade scrunchies are both durable and beautiful. The beauty of the crochet technique is its versatility; you can use cotton yarn, velvet yarn, or even metallic threads to create different textures. Whether you are making these for yourself, as a gift, or to sell in your handmade craft business, mastering the crochet hair tie is a fundamental skill that yields professional results with minimal effort.
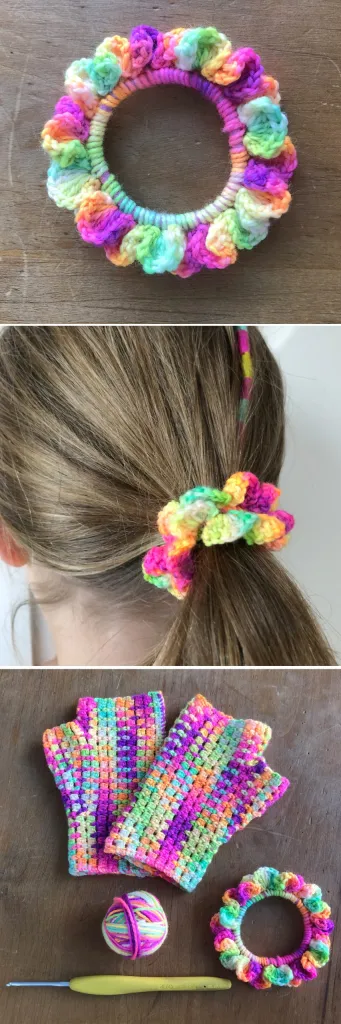
As we dive into this Crochet Hair Elastic Tutorial, remember that the goal is to create a seamless finish around a standard elastic hair band. By the end of this guide, you will understand how to manipulate double crochet stitches, manage your yarn tension, and select the right hook size for your specific project. Let’s get started on this creative journey to transform simple supplies into a stunning crochet fashion accessory that reflects your personal style and craftsmanship.
1 Understanding the Basics of a Crochet Hair Elastic Tutorial
To begin this Crochet Hair Elastic Tutorial, you first need to understand the core concept of working around a foundation. Unlike traditional flat projects, a crochet scrunchie uses a standard elastic band as the “magic ring,” allowing the fabric to stretch along with the elastic. This ensures that your hair accessory remains functional while looking intricate and professionally made.
Selecting the right yarn weight is the next crucial step in any Crochet Hair Elastic Tutorial. For a classic look, mercerized cotton is highly recommended because it provides excellent stitch definition and does not pill over time. If you prefer a 90s retro vibe, using chenille or velvet yarn will result in a plush, oversized crochet hair elastic that is very popular in current fashion trends.
The crochet hook size should generally match the recommendation on your yarn label, though some artists prefer to go down half a size. Using a slightly smaller ergonomic hook helps keep the stitches tight, ensuring that the inner elastic band is completely hidden from view. This attention to detail is what separates a beginner project from a high-quality boutique accessory.
In our Crochet Hair Elastic Tutorial, we emphasize the importance of the slip knot and the initial attachment. You must secure your yarn to the elastic firmly before you begin your first round of single crochet. This foundation row is the “anchor” for all the decorative stitches that will follow, providing the necessary structure for the entire piece.
Consistency in stitch count is another vital element we cover in this Crochet Hair Elastic Tutorial. While you don’t need to be mathematically perfect, the more stitches you crowd onto the elastic, the more “ruffled” and voluminous your handmade scrunchie will appear. For a flatter look, fewer stitches are required; for a dramatic ruffle, you will want to double or triple the density.
Finally, understanding the tension control is vital for a successful Crochet Hair Elastic Tutorial. If your tension is too tight, the elastic won’t stretch properly, making it difficult to wrap around a ponytail. If it is too loose, the stitches may look messy. Finding that “sweet spot” ensures your crochet project is both beautiful and highly practical for daily use.
2 Essential Materials for Your Crochet Hair Elastic Tutorial
Every successful Crochet Hair Elastic Tutorial starts with a well-prepared workspace and the right tools. You will need a pack of no-metal hair elastics, as these are gentler on the hair and provide a smooth surface for your crochet stitches. Avoid elastics with metal joiners, as they can snag the yarn and eventually break the delicate fibers of your handmade work.
The star of the show in this Crochet Hair Elastic Tutorial is undoubtedly the yarn. For beginners, a Category 4 medium-weight cotton yarn is the best choice because it is easy to handle and clearly shows the stitch anatomy. As you become more comfortable, you can experiment with variegated yarn to create colorful patterns without needing to change yarn cakes manually.
A high-quality crochet hook is your best friend during this Crochet Hair Elastic Tutorial. Many crafters prefer aluminum hooks for their smoothness, which allows the yarn to glide effortlessly. Make sure you have a tapestry needle nearby as well; this tool is essential for weaving in ends securely so that your crochet hair tie doesn’t unravel after a few uses.
Sharp craft scissors are a must-have for any Crochet Hair Elastic Tutorial to ensure clean cuts. Frayed ends can make the final assembly look unprofessional, so keeping your tools sharp is a simple but effective SEO-friendly DIY tip. Additionally, using stitch markers can help you keep track of the beginning of your rounds, especially if you are working in a continuous spiral.
In this Crochet Hair Elastic Tutorial, we also suggest having a small amount of fabric glue or “fray check” on hand. While not strictly necessary, a tiny drop on the final knot can provide extra security, especially if the hair elastic will be subjected to heavy use or frequent washing. This ensures the longevity of your crochet creation and adds a professional touch.
Lastly, consider the aesthetic appeal of your materials. Choosing colors that are currently “in season” or matching them to specific holidays can turn a simple Crochet Hair Elastic Tutorial into a profitable venture. Thinking about the color theory behind your yarn choices will help you create fashionable hair accessories that stand out in any collection or gift basket.
3 Step-by-Step Instructions for the Crochet Hair Elastic Tutorial
The first active step in this Crochet Hair Elastic Tutorial is to create a slip knot and place it on your hook. Hold the elastic band in your non-dominant hand and insert the hook through the center of the ring. Yarn over and pull up a loop, then yarn over again and pull through both loops to create your first single crochet (sc) around the elastic.
Continue working single crochet stitches all the way around the ring as part of this Crochet Hair Elastic Tutorial. As you work, occasionally push the stitches together to bunch them up. This “scrunching” technique ensures that when the elastic is stretched, the black or brown rubber of the band doesn’t peek through the yarn fibers, maintaining a solid color look.
Once the elastic is fully covered, join the round with a slip stitch (sl st) into the first crochet stitch. For the next phase of our Crochet Hair Elastic Tutorial, chain two or three (depending on the height you want). Now, work two or three double crochet (dc) stitches into every single stitch from the previous row. This rapid increase is what creates the iconic ruffled scrunchie effect.
As you progress through this Crochet Hair Elastic Tutorial, you might notice the piece becoming very wavy. This is exactly what you want! The increase pattern is the secret to a voluminous crochet hair accessory. If you want an even larger ruffle, you can add a third row of half-double crochet (hdc) or even treble crochet for a truly dramatic and bold fashion statement.
To finish the technical portion of the Crochet Hair Elastic Tutorial, cut your yarn, leaving a 6-inch tail. Pull the tail through the last loop on your hook to fasten off. Use your tapestry needle to carefully weave the tail back through the stitches. For maximum durability, weave in multiple directions—this “Z-technique” prevents the yarn from slipping out during hair styling.
The final step in our Crochet Hair Elastic Tutorial is the “stretch test.” Gently pull the crochet scrunchie to its full extension to ensure the stitches move freely along the elastic. If everything looks uniform and the yarn stays in place, you have successfully completed your DIY crochet project. Congratulations on creating a functional piece of handmade art!
4 Customizing and Styling Your Crochet Hair Elastic Tutorial
Now that you’ve mastered the basic Crochet Hair Elastic Tutorial, it’s time to explore customization. You can add a picot border to the final round to give your scrunchie a lacy, delicate edge. This is done by chaining three and slipping into the first chain between regular stitches, adding a touch of elegance to your crochet hair accessory that looks great for formal events.
Another variation to consider in this Crochet Hair Elastic Tutorial is the “two-tone” look. By changing colors between the foundation row and the ruffle row, you can create a striking contrast. This colorwork technique is a great way to use up scrap yarn while making a bold statement. Just remember to carry your yarn neatly or weave in the extra ends securely.
For those who love a bit of sparkle, this Crochet Hair Elastic Tutorial can be adapted by using yarn with metallic thread or even stringing small beads onto your yarn before you start. As you crochet, you can slide a bead into every fifth or tenth stitch. This creates a shimmering beaded crochet scrunchie that is perfect for festive occasions or as a unique gift.
Size variations are also a key part of an advanced Crochet Hair Elastic Tutorial. You can make “mini” versions for kids using thinner fingering weight yarn and smaller elastics, or “jumbo” versions using blanket yarn and a large 10mm hook. The Jumbo scrunchie trend is huge on social media platforms like TikTok and Instagram, making it a great SEO keyword focus.
In terms of styling, the results of this Crochet Hair Elastic Tutorial are incredibly versatile. They can be worn around a high bun, at the end of a braid, or even on the wrist as a chic bracelet. Because they are made of soft yarn, they cause significantly less “ponytail crease” and hair breakage than standard rubber bands, making them a healthy hair choice.
To conclude this part of the Crochet Hair Elastic Tutorial, think about packaging. If you are gifting these, placing them on a custom cardstock holder with your “Handmade with Love” stamp adds a professional layer. Learning the craft is just the beginning; how you present and style your crochet creations is where your unique personality as a maker truly shines through.
FAQ – Frequently Asked Questions
1. What is the best yarn for a Crochet Hair Elastic Tutorial?
The best yarn is generally 100% cotton or a cotton blend. Cotton is durable, washable, and holds the ruffle shape well. However, for a softer feel, velvet or chenille yarn is also very popular and trendy.
2. Can I wash my crochet hair elastic?
Yes! Most crochet scrunchies can be hand-washed in cool water with a mild detergent. Lay them flat to dry to maintain the shape of the yarn stitches and the elasticity of the internal band.
3. How many stitches do I need for a ruffled look?
There is no set number, but a good rule of thumb is to work at least 2 to 3 stitches into every foundation stitch. This “increase” method is what creates the beautiful, wavy ruffle texture seen in professional tutorials.
4. Will the crochet stitches damage my hair?
Actually, the opposite is true! A crochet hair elastic provides a soft barrier between the rubber band and your hair, which helps reduce friction, prevents snapping, and minimizes the “dent” often left by tight elastics.
5. How long does it take to finish this Crochet Hair Elastic Tutorial?
For a beginner, it might take 20 to 30 minutes. Once you are familiar with the pattern, you can easily whip one up in under 15 minutes, making it a perfect “instant gratification” project.
6. Can I sell the items I make from this tutorial?
Absolutely! Handmade crochet scrunchies are a staple at craft fairs and on platforms like Etsy. They are low-cost to make and have a high perceived value due to the artisanal craftsmanship involved.
Conclusion
This Crochet Hair Elastic Tutorial has provided you with all the necessary steps, from choosing the right cotton yarn to mastering the ruffle increase technique. By following these instructions, you’ve learned how to transform a simple elastic band into a stylish, functional, and hair-friendly accessory.
Whether you’re a hobbyist or looking to expand your crochet business, the skills learned here serve as a foundation for countless future projects. We hope this guide inspires you to experiment with different colors, textures, and sizes.