
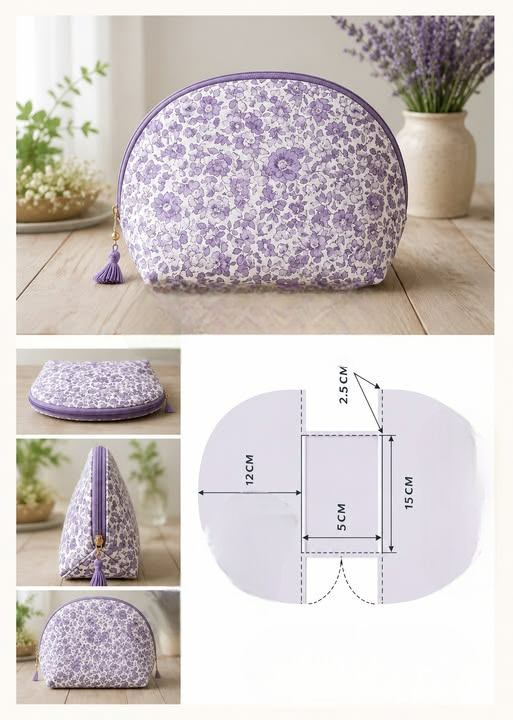
The fabric toiletry bag – tutorial you are about to read will guide you through the rewarding process of creating your own personalized travel companion. Whether you are an experienced sewist or a complete beginner looking for a practical weekend project, making a custom pouch is the perfect way to blend functionality with personal style. Organizing your cosmetics, skincare products, or daily essentials becomes much easier when you have a durable, beautifully crafted bag designed specifically for your needs.
In this comprehensive guide, we will explore everything from selecting the right textiles to mastering the zipper installation. Crafting a DIY fabric toiletry bag allows you to repurpose fabric scraps, practice essential sewing techniques, and create thoughtful, handmade gifts for friends and family. By the end of this article, you will have all the knowledge required to construct a professional-looking pouch that stands up to daily wear and tear.
Investing your time in a handmade makeup bag project is both economical and environmentally friendly. Instead of purchasing mass-produced plastic organizers, you can choose sustainable, breathable cotton fabrics that are easy to wash and maintain. Let’s dive deep into the materials, step-by-step instructions, and expert tips that will ensure your sewing project turns out absolutely flawless.
1. Choosing the Best Materials for Your Fabric Toiletry Bag
Selecting the right components is the foundation of any successful fabric toiletry bag – tutorial because the contents of a wash bag require durable protection. For the exterior, heavy-duty fabrics like cotton canvas, denim, or linen are excellent choices because they provide structure and longevity. If you want a more delicate look, standard quilting cotton works beautifully as long as it is paired with the right stabilizing elements.
The interior lining of your travel toiletry pouch deserves just as much attention as the outside. Since cosmetics and liquid soaps can spill, using a waterproof or water-resistant fabric like laminated cotton or nylon ripstop is highly recommended. If you prefer to stick with natural fibers, a dark-colored cotton fabric lining will help conceal accidental makeup stains over time.
To give your zippered cosmetic bag that professional, sturdy feel, you must not skip the interfacing. Fusible fleece or heavy interfacing attached to the outer fabric panels will prevent the bag from collapsing when it is empty. This structure not only protects your fragile glass bottles but also makes it much easier to zip and unzip the bag with one hand.
In addition to the main textiles, you will need a high-quality nylon zipper that matches or beautifully contrasts with your fabric selection. A size 3 or size 5 zipper that is slightly longer than the width of your bag is ideal, as it allows for easy manipulation during the construction process. Don’t forget matching polyester thread, which offers the strength needed for items that travel frequently.
Before cutting into your precious material, always pre-wash your cotton canvas or quilting fabrics to prevent shrinking later on. Ironing your textiles flat before cutting ensures precise measurements, which is the secret to perfectly aligned corners. Gather your fabric shears, rotary cutter, cutting mat, quilting ruler, and sewing pins before moving on to the next phase.
Having the right tools on hand will make the entire assembly process smooth and enjoyable. A standard sewing machine equipped with a zipper foot and a universal needle (size 80/12 or 90/14) is all you need to achieve clean, straight lines. Once your pieces are cut to your desired dimensions, you are ready to start transforming these simple raw materials into a beautiful accessory.
2. Step-by-Step Assembly and Zipper Installation
The core of this fabric toiletry bag – tutorial revolves around properly sandwiching the zipper between your outer and lining fabrics. Lay one outer fabric panel right side up on your work surface, then place the zipper right side down along the top edge. Next, place one lining fabric panel right side down on top, aligning the raw upper edges perfectly.
Pin or clip these three layers together securely along the top edge to prevent shifting while you sew. Attach the zipper foot to your sewing machine, adjust your needle position, and stitch down the edge using a quarter-inch seam allowance. Take your time as you approach the zipper slider, lifting the presser foot with the needle down to slide the pull out of the way.
Once the first side is stitched, flip the fabric panels away from the zipper so their wrong sides are facing each other. Press the fabric gently away from the zipper teeth with an iron, being careful not to melt the nylon zipper if it is synthetic. Topstitch along the fabric edge close to the zipper to keep the lining from catching in the teeth later.
Repeat this exact same sandwiching process for the remaining outer and lining panels on the other side of the zipper tape. Ensuring that your fabric patterns are oriented correctly during this step will guarantee a symmetrical DIY fabric toiletry bag. Once both sides are attached and topstitched, you will have a flat piece with a zipper running down the center.
Now comes a crucial step that many beginners forget: open the zipper at least halfway before moving forward. Bring the two outer fabric panels right sides together, and bring the two lining fabric panels right sides together. Pin all the way around the perimeter, matching up the zipper seams perfectly to create clean finishes on the outside.
Sew around the outer edges, leaving a three-inch opening at the bottom of the lining fabric so you can turn the bag right side out later. Use a standard straight stitch and backstitch securely at the beginning and end of your sewing lines. Avoid stitching over the metal stops of the zipper to protect your sewing machine needle from breaking.
3. Creating Boxed Corners for Added Volume
To transform your flat pouch into a spacious travel toiletry pouch that can stand upright on a bathroom counter, you need to box the corners. While the bag is still wrong side out, flatten one of the bottom corners by pulling the front and back fabrics apart. Align the bottom seam line directly with the side seam line to form a sharp triangle point.
Mark a straight line perpendicular to the seam line, measuring about one to two inches from the tip of the triangle. The length of this line will dictate the ultimate depth and stability of your finished handmade makeup bag. A longer line creates a wider base but reduces the overall height of the finished project.
Stitch carefully along the marked line, backstitching at both ends to reinforce the corner seam against future heavy use. Repeat this exact process for the other bottom corner of the outer fabric, ensuring the measurements are perfectly identical. Consistency here ensures that your completed pouch sits perfectly level on flat surfaces.
Move over to the lining fabric and repeat the boxed corner technique on both of its bottom corners as well. Since the lining lives on the inside, keeping these seams clean prevents bunched-up fabric from reducing your interior storage space. Once all four corners are stitched, trim away the excess triangle tips, leaving a quarter-inch seam allowance.
Now, reach through the opening you left in the lining fabric and gently pull the entire bag through the gap to turn it right side out. Use a blunt tool, like a chopstick or a turning tool, to gently push out the boxed corners of the outer fabric. You will immediately see the three-dimensional shape of your new fabric toiletry bag – tutorial project come to life.
Tuck the raw edges of the lining opening inward by a quarter of an inch and press them flat with your iron. You can close this hole by hand using a blind ladder stitch, or simply run a neat line of machine stitches very close to the edge. Push the completed lining down into the outer shell, giving the entire pouch a final, crisp press.
4. Customizing and Caring for Your Handmade Pouch
The beauty of completing a fabric toiletry bag – tutorial is that you can easily adapt the dimensions for future projects. If you want a small coin purse, a medium zippered cosmetic bag, or a large travel organizer, simply scale your initial fabric rectangles up or down. You can also add interior slip pockets to the lining panels before assembly to keep small items organized.
Adding a small fabric loop or a piece of cotton webbing to one side of the zipper allows for easy carrying or hanging on bathroom hooks. You can personalize the exterior of your cotton canvas bag with embroidery, iron-on vinyl designs, or unique quilting patterns. These custom additions make the sewing process incredibly fulfilling and yield highly unique results.
Maintaining your handmade items correctly will ensure they look pristine through years of vacations and daily routines. If you used premium quilting cotton and cotton interfacing, your bag can be safely washed on a gentle machine cycle. Always air dry your fabric pouches instead of throwing them into a hot dryer to preserve the structure of the internal stabilizers.
For bags with waterproof linings, simply wiping the interior down with a damp cloth and mild soap is usually enough to clean up spills. Avoid ironing directly onto waterproof materials, as the intense heat can melt the protective coating and ruin your hard work. Taking care of your materials ensures that your handmade creations remain beautiful and functional for a long time.
If you plan on selling these items at local craft fairs or on digital platforms, consider adding your own custom woven brand label into the side seam. Buyers appreciate the care and detail that goes into a high-quality handmade makeup bag, making them excellent best-sellers. Mastering this construction method opens up a world of creative entrepreneurial opportunities in the crafting community.
Now that you understand the mechanics of zipper installation and boxing corners, you can confidently experiment with different colors and textures. This sewing project bridges the gap between utility and artistry, proving that practical items can also be beautiful. Happy sewing, and enjoy utilizing your stylish new organizer wherever your travels take you next.
Frequently Asked Questions
What is the best fabric for a beginner making a toiletry bag?
For beginners, medium-weight cotton canvas or standard quilting cotton paired with fusible interfacing is the absolute best option. These textiles do not slip or stretch excessively while sewing, making it much easier to maintain straight lines and perfect alignment during zipper installation.
Can I make this toiletry bag waterproof?
Yes, you can easily make your travel toiletry pouch water-resistant by using laminated cotton, oilcloth, or nylon ripstop for the interior lining. This choice ensures that any accidental liquid cosmetics leaks will not seep through to the outer fabric layer.
What size zipper should I use for a standard makeup bag?
A standard size 3 or size 5 nylon zipper that is 10 to 12 inches long is ideal for most medium-sized bags. It is always safer to use a zipper that is slightly longer than your fabric width, as you can easily cut away the excess tape after sewing.
Do I really need to use interfacing for this project?
Using stabilizer or fusible interfacing is highly recommended if you want your fabric toiletry bag – tutorial project to hold its shape. Without it, standard cotton fabrics will collapse, offering less protection for your delicate personal care items inside.
How do I wash my finished fabric cosmetic pouch?
If you used machine-washable fabrics like cotton, you can wash the bag on a cold, gentle cycle inside a mesh laundry bag. Always reshape the pouch and let it air dry completely to protect the internal structure and zipper teeth.
Conclusion
This fabric toiletry bag – tutorial provided you with a clear, step-by-step framework to design, sew, and finish your own sturdy organizer pouch. We covered the essential aspects of textile selection, utilizing heavy cotton canvas and structured interfacing, as well as mastering the art of the boxed corner. With these techniques, you can create a wide range of gorgeous, functional storage solutions for your travel adventures.
We would absolutely love to hear your thoughts on this sewing guide! Please leave your sincere opinion, share your personal experience with zipper installations, or drop any creative suggestions you have for future variations in the comments below.