Fabric Tulip Keychains – Tutorial are the ultimate blend of charm, utility, and creative expression for anyone who loves handmade crafts. In a world full of mass-produced accessories, a personalized, handcrafted item stands out by adding a touch of warmth and personality to your everyday essentials. Whether you want to jazz up your house keys, decorate a backpack, or give a thoughtful, handmade gift to a loved one, mastering a fabric tulip keychains – tutorial is a fantastic project to dive into. It requires minimal materials, offers endless color combinations, and allows you to transform scraps of fabric into beautiful, blooming works of art.
Crafters of all skill levels will find this project incredibly rewarding because it is fast, budget-friendly, and highly customizable. If you have been looking for a productive way to clear out your fabric scrap bin or want a quick sewing project that yields instant gratification, creating diy fabric tulips is the perfect solution. You do not need an expensive sewing machine or advanced technical skills to achieve stunning results; in fact, a simple hand-stitching technique is often all it takes to bring these beautiful fabric flowers to life.
In this comprehensive guide, we will walk you through every single step required to design, sew, and assemble your own beautiful accessories. This detailed fabric tulip keychains – tutorial will cover everything from choosing the best materials to mastering the stitching techniques that give the petals their signature realistic shape. By the end of this reading, you will have all the knowledge and confidence needed to produce professional-looking handmade keychain gifts that your friends, family, or online customers will absolutely adore.
1. Gathering Essential Materials for Fabric Tulip Keychains
Before diving into the creative process, you need to collect the right supplies to ensure your crafting experience is smooth and successful. Selecting high-quality, vibrant cotton fabrics will give your finished tulips a crisp and beautiful appearance that holds its shape over time. You will want a mix of colorful patterns for the flower buds and complementary green fabrics for the delicate leaves.
In addition to your main fabrics, you will need strong sewing threads that match your chosen color palette to keep your stitches completely invisible. A good pair of sharp fabric scissors is essential for clean cuts, preventing any fraying along the edges of your miniature flower pieces. You will also need soft polyester fiberfill stuffing to give your little floral creations a plump, three-dimensional look.
To transform these beautiful fabric blossoms into functional accessories, you must gather quality keychain hardware, including sturdy metal split rings and lobster clasps. Some crafters prefer using thin satin ribbons or durable cotton cords to connect the fabric flower bud directly to the metal keyring securely. Having a fabric marker and a reliable ruler handy will also help you measure and mark your dimensions accurately before making any cuts.
2. Step-by-Step Cutting and Sewing Guide
The first physical step in this fabric tulip keychains – tutorial is measuring and cutting your fabric pieces into precise rectangular shapes. For a standard, charming little tulip, cut a rectangle of your main fabric measuring roughly 4 inches by 2.5 inches. For the green leaf, you can cut a small square or a leaf template shape depending on how full you want the greenery to look.
Once your pieces are cut, fold the main flower rectangle in half with the pretty, right sides of the fabric facing each other. Sew along the short edge using a simple straight stitch, leaving a small seam allowance, which effectively creates a small fabric tube. After securing that side, use a running stitch along one of the open circular edges, pull the thread tight to gather the fabric completely closed, and knot it securely.
Turn the fabric tube right side out so the beautiful pattern is now visible and the raw edges are safely hidden away on the inside. Now, gently stuff the fabric tube with your polyester fiberfill, making sure it is plump but leaving enough room at the top edge to fold the fabric inward. Fold the raw top edges inward by about a quarter of an inch to create a clean, professional-looking upper rim for your flower bud.
3. Shaping the Perfect Tulip Bud
Shaping the petals is the most magical part of the entire process, as it instantly transforms a simple stuffed cylinder into a recognizable flower. To begin, find the exact center of the top open rim and pass your threaded needle through from the inside out. Bring the needle over to the directly opposite side of the rim and pull tight, pinching the two sides together in the middle.
Without cutting the thread, take your needle and pierce the remaining open sides, pulling them directly into the center point as well. This cross-stitching technique creates a beautiful four-point star shape, mimicking the elegant, closing petals of a real spring tulip. Pull the thread firmly so the center points meet tightly, then wrap the thread around the center junction a few times for extra security.
Before making your final knot, you can slide a small decorative bead or a loop of ribbon into the center of the petals to anchor your keychain attachment. Push your needle down through the center of the flower and out through the bottom gathered base to hide your thread tail. This clever technique ensures that all your knots remain completely invisible, giving your finished craft a polished boutique quality.
4. Assembling and Customizing Your Keychain
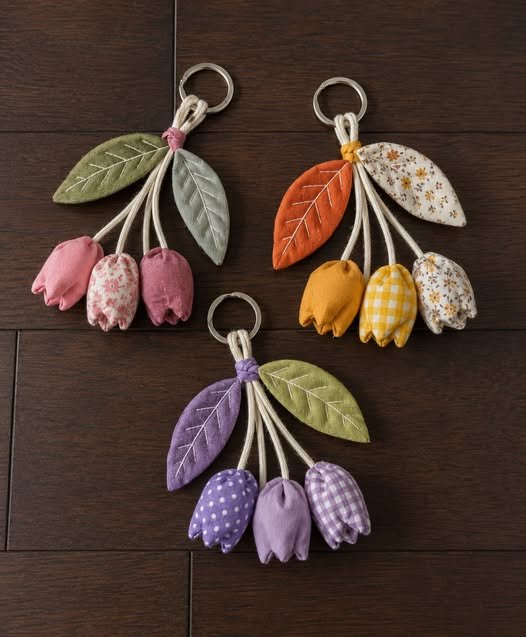
Now that your flower bud is perfectly formed, it is time to attach the greenery and the hardware to finish the accessory. Take your green fabric leaf, fold it slightly at the base to create realistic dimension, and stitch it securely to the stem or base of the tulip. You can use fabric glue for a quick bond, but hand-sewing ensures the leaf will never fall off during daily use.
Thread your ribbon, cord, or metal jump ring through the secure loop you created at the top or bottom of the fabric flower. Connect this cord directly to your metal split ring or lobster clasp, ensuring that every knot or metal connection is pinched tightly with pliers. Testing the strength of your connection now prevents any accidental loss when the keychain is bouncing around inside a heavy purse.
Customization is where you can truly let your unique style shine and make your creations stand out from the crowd. Consider adding small metal charms, personalized initial beads, or delicate lace trim to the base of your colorful fabric blossoms. You can also experiment with infusing your fiberfill with a drop of essential oil, turning your creation into a delightful scented accessory.
Frequently Asked Questions
What is the best type of fabric to use for this project?
The absolute best choice for making these cute floral accessories is 100% quilting cotton fabric. Cotton is incredibly easy to cut, does not slip around while you are trying to hand-sew, and comes in thousands of beautiful prints. You can also use lightweight linen or upcycled clothing scraps, but avoid highly stretchy fabrics like jersey or thick fabrics like heavy denim for the delicate flower bud.
Can I make these tulip keychains if I don’t own a sewing machine?
Yes, absolutely! This project is small enough that it can be completed entirely by hand using a basic needle and thread. Many crafters actually prefer hand-sewing for this specific tutorial because it gives you much better control over the tiny details and delicate gathers. A simple running stitch and a ladder stitch are all you need to achieve professional, durable results.
How do I clean my fabric keychain if it gets dirty?
Since these keychains are made from cotton fabric and polyester stuffing, they can be cleaned relatively easily. It is highly recommended to spot-clean them using a damp cloth with a tiny bit of mild soap to protect the delicate hardware. If it requires a deep wash, remove the metal keyring if possible, place the fabric flower inside a mesh laundry bag, and wash it on a gentle cycle.
What size should the fabric rectangle be for a standard keychain?
For a standard, realistic-looking flower, a fabric rectangle measuring 4 inches wide by 2.5 inches tall is ideal. However, you can easily scale these measurements up or down depending on your personal preferences. If you want a larger statement piece for a bag charm, try using a 6-inch by 4-inch rectangle, keeping the same assembly methods.
Conclusion
In summary, creating handmade accessories is a joyful and fulfilling way to express your personal style while practicing your sewing skills. Throughout this guide, we have explored the entire process of making beautiful fabric flowers, from selecting the finest cotton fabrics to mastering the folding and pinching techniques that create perfect, realistic petals.
We also covered how to securely attach sturdy hardware and add unique personal touches like charms, ribbons, and scent infusions to make your projects truly one-of-a-kind. These charming items are perfect for reducing fabric waste, creating heartfelt gifts, or adding a popular item to your online craft shop inventory.