A Japanese-style Komebukuro Fabric Bag – Tutorial is exactly what you need if you are looking for a beautiful, sustainable, and culturally rich sewing project to sink your teeth into. Traditionally used in Japan to carry ritual offerings of rice or sweet potatoes to temples, these charming drawstring bags have evolved into a global favorite for modern crafters. They blend historical utility with a gorgeous aesthetic, making them perfect for holding everything from your latest crochet project to everyday essentials.
Creating your own Japanese-style Komebukuro Fabric Bag allows you to explore the wonderful world of textile art while practicing mindful crafting. The structural design of this bag relies on a square base and unique patchwork panels, which gives you the perfect opportunity to upcycle fabric scraps or experiment with traditional Japanese fabrics like indigo sashiko or linen. It is a scrap-friendly project that feels deeply rewarding because every single stitch connects you to a centuries-old tradition of resourcefulness and beauty.
In this comprehensive Japanese-style Komebukuro Fabric Bag – Tutorial, we are going to break down every single step of the process so you can confidently create your own masterpiece at home. Whether you are an experienced sewist looking for a relaxing weekend project or a beginner eager to learn new construction techniques, this guide will provide all the structural tips and creative inspiration you need. Grab your fabric scissors, thread your machine, and let’s dive into the rich history and practical steps of making this iconic fabric pouch.
1. Understanding the History and Anatomy of a Komebukuro Bag
To truly appreciate this Japanese-style Komebukuro Fabric Bag – Tutorial, it helps to understand where this beautiful design comes from. The word Komebukuro literally translates to “rice bag” (kome meaning rice, and bukuro meaning bag). Historically, these bags were not mass-produced; instead, they were lovingly handmade by Japanese families using whatever textiles were available, often utilizing boro patchwork techniques to extend the life of worn-out garments.
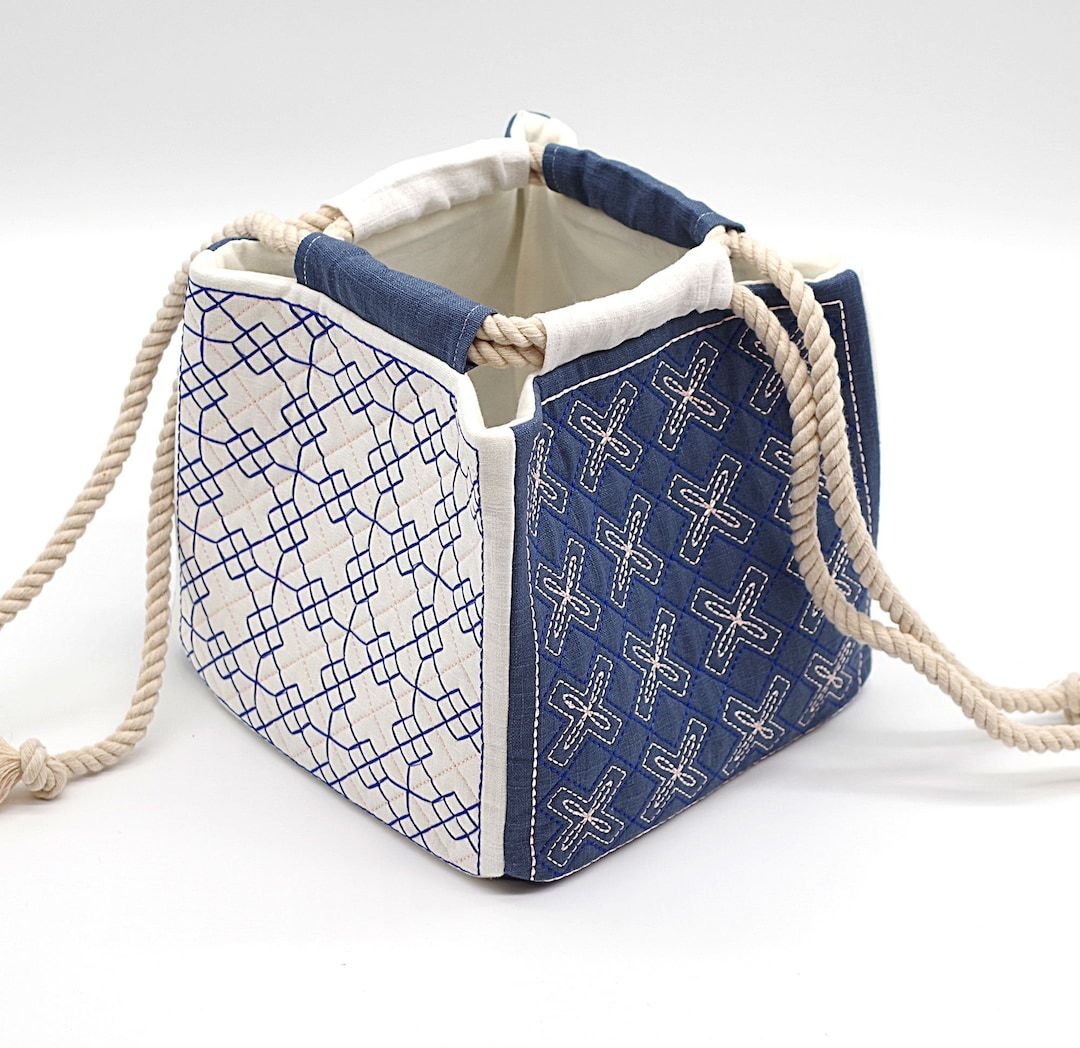
The anatomy of a traditional Japanese-style Komebukuro Fabric Bag is wonderfully distinct from a standard Western drawstring pouch. Instead of a simple round or flat bottom, a true Komebukuro features a definitive square base and structured side panels that allow the bag to stand upright on its own when filled. This clever geometry is what gives the bag its signature boxy look and spacious interior, making it incredibly functional.
Another defining characteristic you will replicate in this Komebukuro fabric bag tutorial is the external loop system used for the drawstring closure. Rather than hiding the drawstring inside a standard casing, the cords run through fabric tabs or loops sewn directly onto the top rim of the bag. This design element adds an extra layer of visual texture and allows the bag to flower outward beautifully when opened.
When choosing materials for an authentic look, think about texture, durability, and history. Cotton, linen, canvas, and upcycled denim are exceptional choices that mimic the sturdy nature of original rice bags. You can keep your panels solid for a modern minimalist look, or you can piece together smaller scraps to honor the historical spirit of resourcefulness and zero-waste crafting.
Beyond historical accuracy, building a Japanese-style Komebukuro Fabric Bag gives you a fantastic lesson in basic geometric bag construction. Understanding how flat pieces of fabric join together to create a three-dimensional container is an invaluable skill for any sewing enthusiast. It expands your spatial awareness at the sewing machine and opens up endless customization options for future projects.
Ultimately, making this bag is about celebrating functional beauty in your daily life. It reminds us that utilitarian objects can also be works of art that deserve time, patience, and care. As we transition into the cutting and preparation phase of this Japanese-style Komebukuro Fabric Bag – Tutorial, keep that spirit of mindful creativity close to your heart.
2. Materials and Precise Cutting Measurements for Your Project
Before flipping the power switch on your sewing machine, gathering the right materials is essential for achieving a professional finish on your Japanese-style Komebukuro Fabric Bag. For this project, you will need two coordinating cotton or linen fabrics: one for the exterior patchwork and one for the smooth interior lining. Additionally, a lightweight fusible interfacing is highly recommended to give your bag panels structure without making them overly stiff.
Let’s talk about the exact measurements needed to create a medium-sized bag, which is the perfect size for a sewing kit or gift pouch. For the exterior, you will need to cut one square measuring 6 x 6 inches for the bottom base. You will also need four rectangular side panels measuring 6 x 8 inches each, which will form the body of your beautiful Komebukuro fabric bag.
For the interior lining, you will mirror the exact same measurements to ensure a flawless fit inside the pouch. Cut one 6 x 6-inch square for the lining base and four 6 x 8-inch rectangles for the lining side walls. Do not forget to cut your fusible interfacing to match the exterior panels exactly, as this adds the necessary body to help your bag stand upright.
The drawstring loops are a crucial feature of this Japanese-style Komebukuro Fabric Bag – Tutorial, and they require separate fabric strips. Cut four strips of fabric measuring 2 x 4 inches; these will be folded down into sturdy tabs to hold your drawstrings. For the drawstrings themselves, you will need two lengths of cotton cording, waxed linen thread, or fabric ribbons, each measuring roughly 28 inches long.
Preparation is the secret weapon of successful sewing, so take your time to iron all of your fabric pieces before cutting. Use a rotary cutter and a quilting ruler if you have them, as precise 90-degree angles will make aligning the square base significantly easier later on. Once your fabric pieces are cut, fuse the interfacing to the wrong side of all your exterior pieces using a hot iron.
Having everything neatly cut and organized on your workspace will make the sewing process incredibly smooth and enjoyable. Double-check that your fabric choices offer a nice contrast between the exterior design and the interior lining for maximum visual impact. Now that your pieces are prepped, fused, and ready, we can move on to assembling the outer shell of your Japanese-style Komebukuro Fabric Bag.
3. Step-by-Step Assembly of the Outer Shell and Lining
With your pieces prepped, it is time to begin the actual construction phase of our Japanese-style Komebukuro Fabric Bag – Tutorial. We will start by creating the external loops that hold the drawstring cord. Take your four small loop strips, fold them in half lengthwise with wrong sides together, press, open them up, and fold the outer edges into the center crease before folding in half once more to hide raw edges. Stitch down the open side of each strip, then fold each finished tab in half to form a loop.
Next, we will assemble the four main exterior side panels into a long, continuous row. Place two side panels right sides together and sew along the 8-inch edge using a standard 1/4-inch seam allowance. Repeat this process until all four panels are joined in a ring, making sure to press your seams open to reduce bulk at the corners of your Japanese-style Komebukuro Fabric Bag.
Now comes the magic step: attaching the square bottom base to the ring of side panels. Pin the 6 x 6-inch exterior base square to the bottom edge of one side panel, right sides together. Sew from one corner to the next, stopping exactly 1/4 inch before the end of the side, pivoting your fabric, and aligning the next side of the square base with the next panel. Repeat this for all four sides to complete the outer shell.
To prepare the lining, you will follow the exact same method you used for the exterior shell, with one crucial modification for turning. When sewing the side panels of the lining together, leave a 3-inch gap open on one of the side seams. This opening will allow you to pull the entire bag right-side out once the exterior and interior are joined together later on.
Once both the outer shell and the lining shell are completely assembled, give them a thorough press with your iron. Pay special attention to the corners of the square base, pushing them out gently with a bone folder or a dull pencil to ensure crisp lines. Your Japanese-style Komebukuro Fabric Bag should now clearly show its signature structural, boxy shape even before the final assembly.
Before moving forward, pin your prepared drawstring loops to the top raw edge of each exterior side panel, centering them perfectly. The raw edges of the loops should align with the raw top edge of the bag, pointing downward toward the base. Take a quick moment to baste these loops in place with a short stitch so they stay perfectly secure during the final steps.
4. Final Sewing, Turning, and Threading the Drawstrings
We have arrived at the exciting final stage of this Japanese-style Komebukuro Fabric Bag – Tutorial, where everything beautifully comes together. Take your completed exterior bag shell (which is currently right-side out) and slip it completely inside the lining shell (which should be wrong-side out). This ensures that the right sides of both the exterior and lining fabrics are facing each other, sandwiches the loops safely in between.
Align the top raw edges of both bags carefully, matching up the side seams perfectly to ensure a balanced look. Pin generously around the entire top perimeter to keep the layers from shifting while you sew. Sew a continuous line around the top edge of the bag using a 1/4-inch seam allowance, ensuring you securely catch all the layers and drawstring loops.
Reach inside the lining through the 3-inch gap you left open earlier and carefully pull the exterior bag through the opening. Take your time during this step to avoid tearing any stitches as the structured fabric turns right-side out. Once turned, push the lining down inside the exterior shell, using your fingers to smooth out the top seam of your Japanese-style Komebukuro Fabric Bag.
Press the top edge of the bag meticulously with your iron so it lays perfectly flat and crisp. To give it a highly professional finish, topstitch around the entire top rim of the bag, roughly 1/8 inch below the edge. This topstitching looks beautiful and keeps the lining from rolling upward when you open and close your completed pouch.
Now, pull the open seam of the lining out slightly, tuck the raw edges inside by 1/4 inch, and edge-stitch it closed using your machine or a neat hand-sewn ladder stitch. Push the lining back into the bag for the last time, ensuring a snug fit. Your Japanese-style Komebukuro Fabric Bag is now fully constructed and ready for its signature drawstring closure.
To thread the cords, take your first 28-inch drawstring and feed it through all four loops starting from the left side, looping all the way around, and exiting on the same left side before knotting the ends together. Take your second 28-inch cord and repeat the exact process, but start and finish on the right side. Pulling both knots simultaneously will effortlessly pull the top of your gorgeous new bag closed into a beautiful flower shape.
FAQ
What is the best type of fabric to use for a Komebukuro bag?
The best fabrics for a traditional look are structured natural textiles like medium-weight cotton, linen, canvas, or lightweight denim. These materials provide the stability required for the bag to stand upright on its square base. For the interior lining, a smoother, lighter-weight quilting cotton works perfectly.
Can I make this bag without a sewing machine?
Yes, absolutely. Because the original Komebukuro bags were crafted by hand using sashiko and running stitches, this project is highly suited for hand-sewing. It will take longer to complete, but hand-stitching adds an authentic, beautiful, and deeply personal touch to the final product.
How do I clean and care for my handmade fabric bag?
Care instructions depend heavily on the fabrics you choose. If you use 100% quilting cotton or linen, you can wash your bag on a gentle cycle in cold water and air dry it. Iron it while it is still slightly damp to restore the crisp, boxy shape of the square base.
What can I use a Komebukuro bag for in daily life?
These bags are incredibly versatile due to their wide square base. They make excellent knitting or crochet project bags, unique gift wrapping pouches, travel cosmetic cases, jewelry organizers, or elegant lunch bags for dry snacks.
Is this tutorial suitable for absolute sewing beginners?
Yes, this Komebukuro fabric bag tutorial is highly accessible for beginners. The most challenging part is sewing the flat square base to the rectangular side panels, but taking it one side at a time and pivoting slowly at the corners makes it a fantastic skill-building exercise.
Conclusion
In this Japanese-style Komebukuro Fabric Bag – Tutorial, we explored the fascinating history, precise cutting measurements, and detailed step-by-step assembly required to create a stunning, boxy drawstring pouch.
By mastering the assembly of a square base, managing independent fabric loops, and implementing a dual-cord drawstring system, you have successfully transformed simple fabric rectangles into a functional piece of art rooted in Japanese tradition.