Crochet Angel – Tutorial is the ultimate guide you need to create a stunning, timeless piece of handmade art for your home or loved ones. Making your own decorations adds a layer of warmth and personality to your living space that store-bought items simply cannot replicate. Whether you are looking to craft a beautiful holiday heirloom, a meaningful gift for a newborn baby, or a serene addition to your year-round home decor, mastering this project is an incredibly fulfilling journey for crafters of all levels.
The art of fiber arts has experienced a massive resurgence lately, as more people discover the meditative benefits of working with yarn and a hook. Focusing on your stitches allows your mind to rest, reducing daily stress while producing something genuinely beautiful and functional. A delicate figurine like this brings a touch of elegance, combining traditional crafting techniques with a modern aesthetic that fits into any styling theme seamlessly.
In this comprehensive guide, we will walk you through everything required to bring this lovely design to life from scratch. From selecting the perfect threads to mastering the shaping and stiffening processes, this step-by-step approach ensures your success. Grab your favorite hooks, choose your favorite yarn colors, and let us dive directly into the wonderful world of lace crafting.
1. Choosing the Best Materials for Your Lace Project
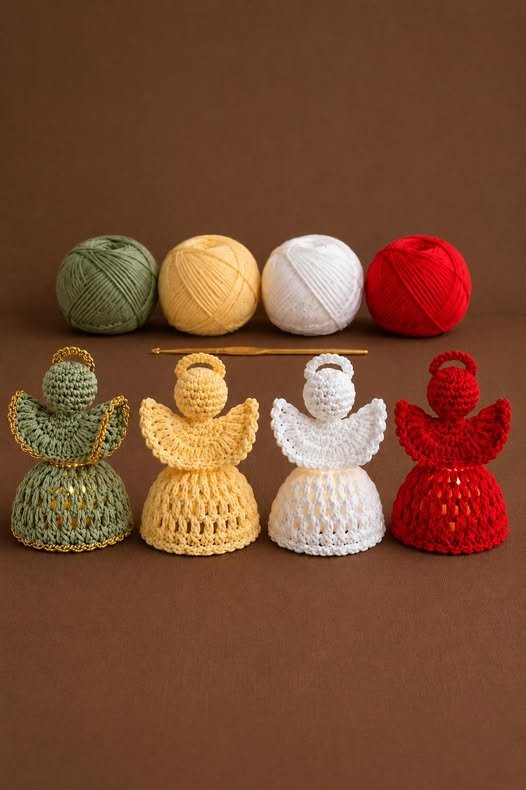
When embarking on this creative journey, selecting the proper yarn or thread is the foundational step that determines the overall look and durability of your final piece. Traditional designs often look best when made with high-quality mercerized cotton thread, specifically sizes 10 or 5, which provide incredible stitch definition and a slight, elegant sheen. If you prefer a larger, cuddlier version, you can easily substitute this for sport weight or worsted weight yarn, keeping in mind that the final size will increase significantly.
The choice of your hook size must correspond perfectly with the fiber thickness you choose to maintain tight, even stitches that hold their shape. For fine lace threads, a steel hook ranging from 1.5mm to 2.25mm is generally ideal, as it allows you to create dense fabric that keeps internal stuffing from peeking through. If you opt for thicker yarn, a standard aluminum hook between 3.0mm and 4.0mm will ensure your hands do not tire out too quickly during the process.
Aside from your primary yarn and hook, you will need a few essential notions to keep your workspace organized and efficient. Polyester fiberfill stuffing is necessary for shaping the head and body, giving your figure a solid, three-dimensional form. A sharp tapestry needle with a large eye is required for weaving in loose ends securely, while fine-point scissors will ensure clean cuts without fraying your delicate fibers.
To give your project its iconic, freestanding structure, you should also plan ahead for the stiffening stage of the process. Fabric stiffener, liquid starch, or a simple mixture of school glue and water are popular choices that work wonders on cotton fibers. You will also want to gather some rust-proof straight pins and a conical form, like a plastic wrap cone or a cardboard base covered in plastic, to shape the skirt while it dries.
If you enjoy adding personalized details to your handmade crafts, consider gathering small embellishments like metallic embroidery floss, tiny faux pearls, or delicate satin ribbons. These can be used to trim the edges of the wings or create a small halo, elevating your piece into a truly unique work of art. Having all these supplies neatly arranged on your table beforehand creates a smooth, uninterrupted crafting experience.
Taking the time to source premium, durable materials ensures that your completed project will withstand the test of time, becoming an heirloom passed down through generations. Once your crafting basket is fully stocked and your ambient lighting is adjusted comfortably, you are officially ready to explore the specific stitches needed for the pattern.
2. Essential Stitches and Techniques You Must Master
Before diving into the actual assembly, it is beneficial to review the fundamental stitches that form the backbone of this elegant design. You will heavily rely on basic stitches such as the magic ring, single crochet, half double crochet, and double crochet to build the different sections of the figure. Clean transitions between these stitches are key to achieving that smooth, professional finish that makes handmade items look so spectacular.
The magic ring, also known as an adjustable loop, is the perfect starting technique for the head and body because it pulls completely closed, leaving no visible hole at the top. If you struggle with this technique, you can substitute it by chaining two and working your first round of stitches directly into the second chain from your hook. However, mastering the adjustable loop gives you far more control over the tension and neatness of your work.
Working in continuous rounds is another technique you will utilize frequently, especially when shaping the head and the solid upper bodice. Using a contrast-colored stitch marker to note the first stitch of each round prevents you from losing your place and ruining the pattern symmetry. It is vital to count your stitches at the end of every single round to ensure your increases and decreases align perfectly.
To create the airy, ethereal wings and the flowing skirt, you will transition from solid work to beautiful, openwork lace crochet patterns. This usually involves combinations of double crochets separated by chain spaces, creating classic pineapple shapes or delicate V-stitches. Keeping your tension consistent during these lace sections is incredibly important, as loose tension can cause the fabric to distort and sag unevenly.
Seamless decreasing is another advanced tip that elevates your work from amateur to expert, particularly when shaping the neck and waistlines. Instead of a standard decrease, try using the invisible decrease method by inserting your hook only into the front loops of the next two stitches before completing your single crochet. This clever trick eliminates bulk and keeps the surface of your project completely smooth and uniform.
Familiarizing yourself with these foundational methods builds up your confidence, making the actual creation process much faster and stress-free. If a particular round feels confusing, do not hesitate to practice on a small scrap piece of yarn until your muscle memory takes over. With these skills firmly under your belt, you are ready to begin constructing the components.
3. Assembling and Shaping Your Finished Figure
The construction process begins from the top down, starting with the neat sphere that forms the head of your figurine. You will increase gradually within your adjustable loop, work a few even rounds to create height, and then begin your decreases to form the chin. Before the opening becomes too small to navigate, firmly pack the sphere with your polyester fiberfill, making sure it is smooth and free of lumps.
From the neck, the pattern expands outwards to create the solid bodice before transitioning into the beautiful, decorative lace skirt. As you work down the skirt, the stitches will naturally widen out, creating a lovely bell shape that allows the figure to stand beautifully once treated. Fasten off your yarn at the bottom hem using a seamless join, weaving the tail securely inside the body cavity.
The wings are typically worked separately as flat, symmetrical pieces that mimic feathers using clever chain loops and picot stitches. Using a lighter weight yarn or a metallic thread accent for the wings can create a stunning contrast against the solid matte body of the figure. Once both wings are completed, leave a long yarn tail for sewing, which makes attaching them to the back of the shoulders much easier.
Before attaching the components permanently, it is highly recommended to block and stiffen the pieces individually to achieve the best results. Dip the lace skirt and flat wings into your chosen stiffening solution, gently squeezing out any excess liquid without twisting or wringing the delicate fabric. Place the wet skirt over your plastic-covered cone template, pulling the lace motifs taut and securing the hem with rust-proof pins.
Pin the wet wings flat onto a blocking mat or a piece of thick foam, shaping the feather tips carefully so they dry perfectly uniform. Allow all the components to dry completely in a well-ventilated area away from direct sunlight, which usually takes anywhere from twelve to twenty-four hours. Trying to assemble the project while the fibers are still damp will compromise the structural integrity of your hard work.
Once every piece is completely dry and rigid, carefully remove the pins and slide the body off the shaping cone template. Use your tapestry needle and the reserved yarn tails to sew the stiffened wings securely to the back of the bodice, ensuring they are perfectly centered. Finally, attach a small golden ring or wire loop above the head to serve as a halo, completing your gorgeous creation.
4. Styling and Caring for Your Fiber Art Creations
Now that your beautiful project is fully assembled and detailed, it is time to find the perfect display location to showcase your craftsmanship. These delicate figures look absolutely stunning when placed on a fireplace mantel, an entryway table, or integrated into a festive tabletop centerpiece. Because they are stiffened and freestanding, they add a wonderful touch of vertical height and elegance to any home decor arrangement.
If you made a smaller version using fine lace thread, you can easily turn it into a magnificent ornament for a holiday tree. Simply attach a clear monofilament line or a gold cord to the top of the halo, allowing it to float gracefully among the tree branches. The way the tree lights filter through the openwork lace stitches creates a magical, glowing effect that charms anyone who sees it.
These handmade creations also make incredibly thoughtful, deeply sentimental gifts for special occasions like christenings, weddings, or memorial services. Gifting a handmade item carries an emotional weight that commercial products simply cannot replicate, as it represents your time, patience, and love. You can personalize the gift further by choosing the recipient’s favorite colors or incorporating birthstone beads into the design.
To keep your fiber art piece looking pristine over the years, proper care and maintenance are required to protect it from dust and moisture. Display your figurine away from high-humidity areas like kitchens or bathrooms, as excessive moisture in the air can soften the stiffening agent over time. If the skirt ever loses its rigid shape, simply re-dip it in liquid starch and pin it back onto a cone template to restore it.
When it comes to cleaning, avoid submerging the entire finished piece in water, as this will completely dissolve the shaping materials and ruin the structural form. Instead, use a soft-bristled makeup brush or a canned air duster to gently remove any accumulated dust from the intricate lace crevices. If a spot stain occurs, gently dab the area with a slightly damp cotton swab dipped in mild soap, taking care not to disturb the surrounding stitches.
Storing your handmade items correctly during the off-season ensures they remain beautiful for decades to come. Wrap the figure loosely in acid-free tissue paper and place it inside a sturdy, crush-proof cardboard box rather than a plastic bag, which can trap unwanted moisture. By taking these simple precautions, your handcrafted masterpiece will remain a cherished part of your family celebrations for many years to come.
FAQ
What is the best way to stiffen a Crochet Angel – Tutorial project?
The most reliable methods include using commercial fabric stiffener, heavy liquid starch, or a homemade mixture of equal parts white school glue and water. Soak the completed piece thoroughly in the solution, gently press out the excess liquid, and shape it over a plastic-covered cone form. Allow it to dry completely for 24 hours until it is rock-hard before removing the pins.
Can a complete beginner successfully finish this pattern?
Yes, a beginner can absolutely complete this project if they are already familiar with basic stitches like single and double crochet. The head and bodice are straightforward, while the skirt introduces simple lace patterns that are highly repetitive and easy to learn. It is recommended to practice with thicker yarn first before moving on to thin lace threads.
How do I prevent my stuffing from showing through the stitches?
To prevent the white polyester fiberfill from peeking through your stitches, you must maintain a tight stitch tension throughout the head and bodice. If you naturally stitch loosely, try dropping down one or two hook sizes smaller than what the yarn label recommends. Alternatively, you can place the stuffing inside a matching nylon stocking before inserting it into the head.
Can I use acrylic yarn instead of cotton thread for this project?
While you can use acrylic yarn, cotton thread or cotton yarn is highly recommended for structures that need to stand on their own. Cotton fibers absorb stiffening agents beautifully and hold their shape rigidly once dry. Acrylic yarn does not absorb liquid starches or glues as effectively, which can result in a slightly floppy or fuzzy finished product.
How can I make a halo that stays upright on the head?
You can create a beautiful, durable halo using a metallic pipe cleaner, a piece of gold craft wire, or a small plastic ring wrapped in metallic yarn. Shape the wire into a circle, leaving a small stem at the base that can be pushed down into the stuffed head. Secure the stem with a drop of fabric glue inside the head to keep it from wobbling or falling over.
Conclusion
In this comprehensive tutorial, we have covered all the essential phases required to design, stitch, stiffen, and maintain a gorgeous handmade holiday keepsake. We learned how to select the proper cotton threads, implement clean stitching techniques, use templates for perfect blocking, and preserve the finished art piece for long-term enjoyment. By combining sturdy materials with openwork lace patterns, you can create a beautiful decoration that adds character and warmth to your home.
We hope this crafting guide inspires you to experiment with different thread weights, metallic borders, and unique accents to customize your work. We are incredibly excited to hear how your project turned out and see your creative variations.