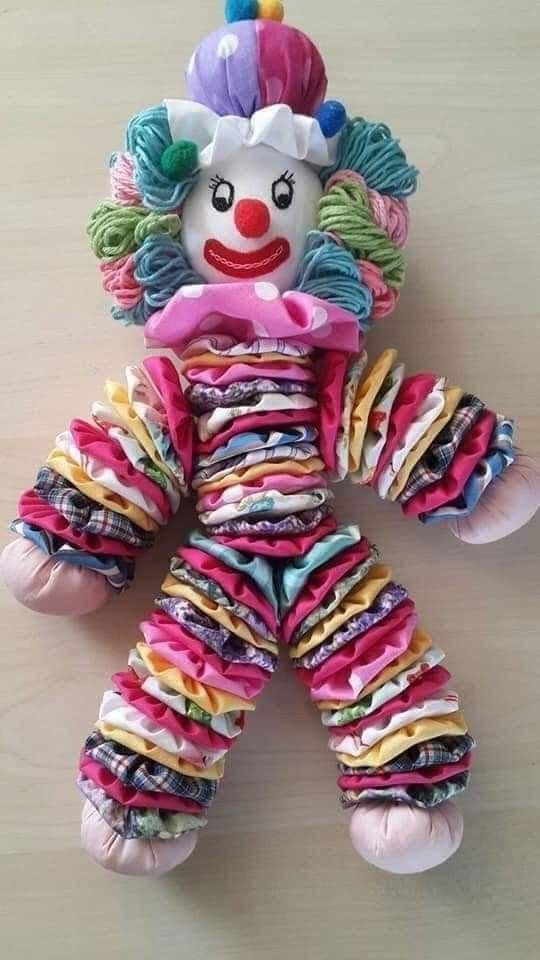
Learning how to create a little clown made with fabric scraps – tutorial is one of the most rewarding and eco-friendly crafting projects you can undertake today. In a world increasingly focused on sustainability, finding creative ways to upcycle leftover materials is not just a fun hobby, but a meaningful way to reduce waste. Whether you are an experienced sewist with piles of leftover textiles or a complete beginner looking for a joyful weekend project, this comprehensive guide will walk you through every step of the process.
This unique little clown made with fabric scraps – tutorial is designed to spark your imagination and help you transform forgotten colorful pieces of cloth into a charming, whimsical keepsake. Clowns have long been a symbol of joy, circus magic, and nostalgic play, making them the perfect subject for handmade dolls. By using small bits of various textures, patterns, and colors, you ensure that your finished creation is absolutely one-of-a-kind and full of distinct personality.
By following this little clown made with fabric scraps – tutorial, you will master the basic techniques of fabric upcycling, soft sculpture crafting, and hand-stitching details. We will explore everything from selecting the right materials and organizing your workspace to assembling the body, creating expressive facial features, and adding those iconic circus finishing touches. Grab your scrap basket, thread your needle, and let us dive into the wonderful world of handmade textile art.
1. Gathering Your Materials and Preparing the Fabric Scraps
Before we begin sewing our little clown made with fabric scraps, it is essential to gather all the necessary supplies and prepare your materials for the best results. The beauty of this project lies in its flexibility, meaning you can use almost any type of textile remnant you have on hand. Look for vibrant cotton prints, soft felt pieces, leftover linen, or even old clothing items that are ready to be repurposed. Mixing different textures like corduroy for the trousers, satin for the collar, and bright cotton for the shirt adds wonderful visual interest and tactile appeal to your doll.
In addition to your colorful fabric remnants, you will need a few basic sewing tools to ensure a smooth crafting experience. Make sure you have sharp fabric scissors, a variety of sewing needles, strong embroidery floss, sewing pins, and a high-quality polyester fiberfill stuffing or wool batting. For the clown’s hair, yarn scraps, wool roving, or even shredded denim work beautifully to create that iconic, messy circus hairstyle. Having a fabric marker or tailor’s chalk on hand will also help you trace your pattern pieces accurately onto your scraps.
Preparation is key to a professional-looking finished product, so take some time to press your fabric scraps with an iron before cutting. Wrinkled fabric can distort your pattern shapes, leading to asymmetrical limbs or a bumpy body structure. If you are using salvaged fabrics from old garments, ensure they are clean and free of stains. Sorting your scraps by color palette or pattern type before you start cutting can also help you visualize the final look of your whimsical character more clearly.
For the structural parts of the clown, such as the face and hands, it is best to choose a solid, neutral-colored fabric like muslin, canvas, or a sturdy knit. This provides a clean canvas for your embroidery and prevents the busy patterns of the clothing from distracting from the clown’s facial expressions. If your scraps are particularly thin or prone to fraying, you might consider backing them with a lightweight iron-on interfacing to give them more stability during the stitching process.
Sustainability is at the heart of this eco-friendly craft project, so challenge yourself to look around your home for unexpected materials. Old colorful socks can make excellent striped stockings or sleeves, while mismatched buttons are perfect for the front of the clown’s tunic or as eyes. Even the stuffing can be eco-friendly if you choose to chop up your tiniest, unusable fabric shreds into microscopic bits to use as internal weight and filling for the doll’s lower body.
Now that your workspace is organized and your materials are prepped, you can feel the creative energy building. Designing a handmade doll allows you to step away from mass-produced items and connect with the slow-craft movement. With your ironed scraps, sorted threads, and tools within arm’s reach, you are completely ready to move on to the exciting phase of pattern cutting and structural assembly for your unique textile creation.
2. Cutting the Patterns and Assembling the Clown Body
The second phase of our little clown made with fabric scraps – tutorial focuses on cutting your pattern shapes and stitching the core body structure together. To begin, you can sketch a simple template on paper consisting of an oval for the head, an elongated torso, simple tube shapes for the arms and legs, and oversized circles for the hands and feet. Once your paper templates are ready, pin them securely to your chosen fabric scraps, keeping in mind how the different patterns will interact next to each other.
Carefully cut out your fabric pieces, remembering to leave a small seam allowance of about one-quarter of an inch around each shape if your template does not already include it. For the clown’s iconic baggy pants and ruffled shirt, you can cut larger rectangles of fabric that will later be gathered with a simple running stitch. This gathering technique creates that classic, voluminous circus silhouette without requiring complex tailoring or advanced dressmaking skills.
With your pieces cut, it is time to start sewing the individual components, beginning with the torso and limbs. Place the matching fabric pieces right sides together, pin them to prevent shifting, and use a tight backstitch or a sturdy machine stitch to sew around the edges, leaving a small opening for turning. When sewing the curves of the head and feet, take your time to maintain smooth lines, as these shapes define the overall silhouette of your handmade textile doll.
Before turning your stitched pieces right side out, gently clip the curved edges and corners with your scissors, taking care not to cut through your stitches. This simple step allows the fabric to stretch smoothly without bunching up inside the doll once it is stuffed. Turn each piece right side out using a blunt tool, like a chopstick or a knitting needle, to gently push out the corners of the hands, feet, and limbs.
Now comes the magic of bringing your character to life through the stuffing process. Take small pinches of your polyester fiberfill and push them firmly into the ends of the limbs, working your way up to the openings. For a floppy, whimsical feel, stuff the arms and legs somewhat loosely, while keeping the head and torso firm to support the weight of the embellishments. Once stuffed, use an invisible ladder stitch to neatly close all the open seams on your limbs and torso.
Finally, you will assemble the core structure by attaching the limbs to the main body. Position the arms at the shoulders and the legs at the bottom of the torso, securing them with strong pins before sewing. Use a heavy-duty thread to stitch them securely, ensuring the limbs can move slightly for posing options. With the blank, stuffed form of your clown sitting before you, the structural foundation is complete, and you are ready to add personality.
3. Creating the Expressive Face and Whimsical Circus Hair
An unforgettable feature of any clown is its expressive, joyful face, and this stage of the little clown made with fabric scraps – tutorial is where your character truly develops its soul. Because we are making a charming, rustic doll, hand-embroidered facial features work beautifully to convey warmth and personality. Start by using a water-soluble fabric pen or a light pencil to softly sketch the eyes, a wide smile, and the classic circus cheek triangles directly onto the doll’s face.
For the eyes, you can use traditional black embroidery floss to stitch simple closed, sleeping eyes, or sew on two small black buttons for a vintage, soulful look. If you prefer an embroidered open eye, use a satin stitch for the pupils and a simple backstitch for the eyelashes and expressive eyebrows. Don’t worry about perfect symmetry; slight variations in the placement of the eyes and brows often give handmade dolls a wonderful, quirky charm.
No clown is complete without a prominent nose, and you can easily create one using a small circle of bright red or pink fabric scrap. Sew a running stitch around the edge of the circle, place a small ball of stuffing in the center, and pull the thread tight to create a perfect, puffy fabric pom-pom. Secure this red nose firmly to the center of the face with hidden ladder stitches, instantly giving your doll that unmistakable circus identity.
The smile can be stitched using a vibrant red or coral embroidery thread, employing a split stitch or stem stitch to create a thick, defined line. You can add little French knots at the corners of the mouth to simulate dimples, or stitch large, exaggerated rosy cheeks using pink felt circles or a bit of real cosmetic blush applied gently with a cotton swab. Let your creativity run wild as you design an expression that makes you smile back.
Next, it is time to tackle the iconic circus hair using your gathered yarn remnants or wool roving. For a messy, curly hairstyle, wrap yarn around your fingers multiple times, tie the bundle in the center, and cut the loops at the ends to create a fluffy pom-pom of hair. Make several of these yarn bundles and stitch or fabric-glue them securely to the top and sides of the clown’s head, covering the raw seams.
If you want a more vintage, folkloric appearance, you can loop long strands of wool over the head and sew a parting line down the center, creating braided pigtails or a wild, windswept mane. Trim the yarn hair with scissors to shape it around the face, ensuring the clown’s beautiful embroidered features remain the main focus. With the face and hair complete, your scrap fabric creation now possesses a distinct, heartwarming personality.
4. Designing the Colorful Circus Outfit and Finishing Flourishes
The final stage of our creative journey involves dressing your character and adding those delightful finishing touches that elevate your little clown made with fabric scraps. This is your opportunity to use your most colorful, patterned, and eccentric fabric remnants to design a classic circus outfit. A simple, oversized tunic or a pair of high-waisted trousers with suspenders can be easily crafted by draping fabric directly onto the doll form and sewing it in place.
To create the iconic ruffled clown collar, cut a long, wide strip of contrasting fabric—such as a bright polka dot or a shiny satin scrap. Fold the strip in half lengthwise, press it, and run a loose gathering stitch along the raw edge. Pull the thread tightly to gather the fabric into a beautiful, dramatic ruffle that fits perfectly around the clown’s neck, and secure it with a few sturdy stitches or a small snap button.
You can replicate this exact gathering technique on a smaller scale to create matching ruffles around the wrists and ankles of your doll. This not only hides the seams where the limbs connect but also adds layers of texture and motion to the outfit. Mix and match patterns fearlessly; pairing stripes with floral prints or plaids with geometric shapes enhances the joyful, chaotic aesthetic inherent to classic circus costuming.
Embellishments are where you can truly let your personal style shine through your handmade creation. Search your notions drawer for tiny mismatched buttons to sew down the front of the tunic, or create miniature fabric bows to place on the shoes. You can also craft a simple pointed circus hat by rolling a semi-circle of felt into a cone shape, stitching the back seam, and topping it with a tiny handmade yarn pom-pom.
If you want your doll to be extra whimsical, consider hiding a small jingle bell inside the torso during the stuffing phase, or sewing tiny bells to the tips of its shoes and hat. Every time the doll is moved, it will emit a soft, magical sound that enhances its playful charm. Take a moment to inspect your doll, trimming any loose threads and ensuring all elements are attached securely for long-lasting durability.
Congratulations, your beautiful, sustainable masterpiece is now complete! You have successfully turned a pile of forgotten, discarded textile remnants into a stunning work of art full of history, texture, and joy. This completed doll serves as a wonderful reminder of the endless potential locked within items we often overlook, proving that creativity and sustainability go hand in hand.
Frequently Asked Questions (FAQ)
What are the best types of fabric scraps to use for a handmade clown doll?
The best fabrics are stable, non-stretching woven materials like 100% cotton quilting scraps, linen, lightweight canvas, and felt. These materials are easy to cut, hold their shape well during stuffing, and do not fray excessively. However, you can use knits, denims, and silks for clothing accents to add diverse textures to your project.
Do I need a sewing machine to complete this fabric scrap tutorial?
Not at all! This entire project can be completed using simple hand-sewing techniques like the backstitch, running stitch, and ladder stitch. Hand-sewing gives the doll a charming, rustic, and artisanal finish. A sewing machine can speed up the process for long straight seams on the body, but it is certainly not a requirement.
How can I make this handmade clown doll safe for toddlers and young children?
To make the doll completely child-safe, avoid using plastic safety eyes, buttons, jingle bells, or small choking hazards. Instead, ensure that all facial features, eye details, and clothing embellishments are securely hand-embroidered using high-quality embroidery floss. Also, ensure all seams are double-stitched for extra durability during rough play.
What can I use as an alternative to polyester fiberfill for stuffing the doll?
If you are aiming for a 100% sustainable or organic doll, you can use clean wool roving, raw cotton filling, or small bamboo fibers. Alternatively, you can shred your tinier, unusable fabric leftovers into microscopic pieces and use them as stuffing. Keep in mind that fabric scrap stuffing will make the doll heavier and firmer than fiberfill.
How do I clean and care for my finished scrap fabric clown?
Because of the delicate hand-embroidery, yarn hair, and mixed fabric types, it is highly recommended to spot clean your doll with a damp cloth and mild soap. Avoid submerging the doll completely in water or placing it in a washing machine, as this can cause the stuffing to clump, colors to bleed, or the yarn hair to become severely matted.
Conclusion
In this comprehensive little clown made with fabric scraps – tutorial, we have journeyed through the entire creative process of transforming simple textile remnants into a whimsical, character-filled circus doll.
From selecting and preparing your vibrant fabric pieces to assembling the core structure, embroidering an expressive face, and designing a colorful outfit, you have learned valuable skills in sustainable crafting. This project beautifully demonstrates how imagination can breathe new life into discarded materials, resulting in a unique keepsake that carries a personal story in every stitch.