The Little Owl Pincushion – Tutorial is exactly what your sewing space needs to add a touch of handmade charm and practical organization. If you are a sewing enthusiast, a quilter, or an avid crafter, you know how easily pins and needles can vanish into thin air, only to reappear exactly where you do not want them. Crafting your own pin container is a wonderful way to keep your tools secure while expressing your personal style. This detailed guide will show you how to create a delightful, bird-themed sewing accessory that is as functional as it is adorable.
Creating a dedicated space for your sewing notions makes every project smoother and more enjoyable. A handmade pincushion also makes a thoughtful, heartwarming gift for the crafters in your life, combining utility with artistic expression. By using scrap fabrics, leftover felt, and simple embroidery stitches, you can bring this character to life in just an afternoon. This project is highly customizable, allowing you to mix and match colors, patterns, and textures to complement your existing sewing room decor.
In this comprehensive Little Owl Pincushion – Tutorial, we will walk you through every step of the design and assembly process, ensuring your final piece looks professional and sturdy. Whether you are a beginner looking to practice basic stitching or an experienced sewist wanting a quick, satisfying weekend craft, this project offers the perfect creative escape. Gather your materials, thread your needles, and let us dive into the rewarding world of making your own owl-themed sewing assistant.
1. Choosing the Best Fabrics and Supplies for Your Owl Craft
When selecting materials for your owl project, opting for high-quality, sturdy fabrics will ensure your sewing accessory lasts for years. Heavyweight cotton, linen, wool felt, or even upcycled denim work beautifully for the main body because they hold their shape well when stuffed tightly. The weight of the fabric prevents the sharp tips of your pins from piercing through the bottom and scratching your work surfaces.
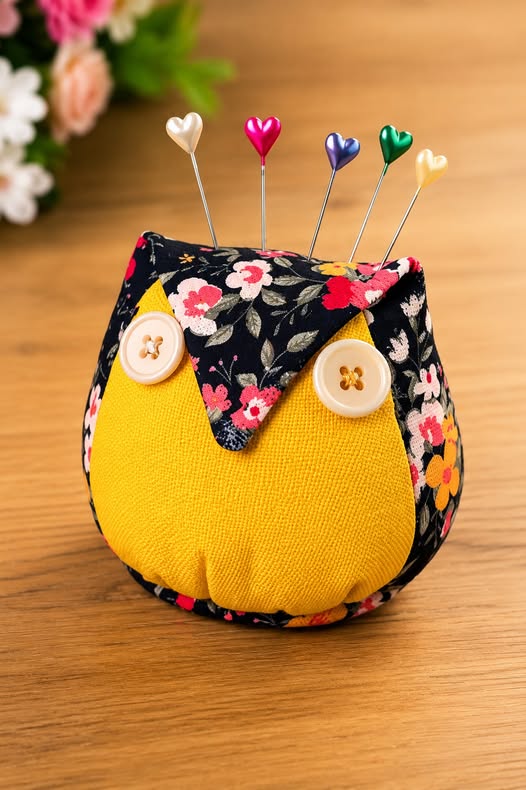
For the decorative elements like the eyes, beak, and belly, wool felt sheets are highly recommended because the edges do not fray when cut. This makes the applique process incredibly smooth, whether you choose to sew the pieces down by hand or use a machine. You can use contrasting scrap fabrics with fun prints, like florals or polkas dots, to give your little bird a playful, whimsical personality.
Beyond the outer shell, the choice of stuffing or filling material inside your project determines how well it functions over time. Traditional polyester fiberfill gives a soft, plush look, but adding a heavy base weight makes a massive difference. Mixing in some crushed walnut shells, emery powder, or clean play sand adds weight to the bottom, ensuring the object stays upright on your table when you pull pins out.
To assemble everything flawlessly, you will need standard sewing tools including sharp fabric shears, embroidery needles, a temporary fabric marker, and strong sewing threads. If you prefer hand sewing, a good quality embroidery floss in matching or contrasting colors adds a beautiful, rustic outline to the applique parts. For those who prefer speed, a sewing machine equipped with a universal needle will handle the seams quickly.
Do not forget to prepare your templates or patterns ahead of time by tracing them onto sturdy cardstock or template plastic. Having durable templates allows you to cut your fabric pieces with precision, which is crucial for achieving a symmetrical, balanced look on the face. Taking a few extra minutes to iron your fabrics before cutting will also prevent distortion and guarantee that your pieces align perfectly during assembly.
Ultimately, this project is a fantastic opportunity to clean out your scrap basket and practice sustainable crafting by reusing small textiles. You can experiment with different color palettes, such as earthy forest tones, bright modern pastels, or vintage-inspired neutrals, to match your style. By investing a little thought into your material choices, your finished piece will look like a premium boutique item rather than a simple homemade craft.
2. Cutting and Preparing Your Pieces with Precision
Precision during the cutting phase is the secret to a stress-free assembly process and a beautifully proportioned final product. Start by laying your prepared templates onto the wrong side of your chosen fabrics, paying close attention to the grainline of the woven material. Secure the templates with a few sharp pins or pattern weights so they do not shift while you trace around the perimeter.
Carefully cut out the main body pieces, ensuring you leave the recommended quarter-inch seam allowance if your template does not already include it. For the felt facial details like the large outer eyes, smaller inner pupils, and the triangular beak, sharp micro-tip scissors work best for clean edges. Cutting slowly around the curves of the eyes prevents jagged edges, resulting in a much cleaner expression on your owl’s face.
Once all your individual textile components are cleanly cut, organize them into separate piles so you do not accidentally lose smaller details in your workspace. It is highly beneficial to mark the placement lines for the eyes and beak directly onto the front body piece using a water-soluble fabric pen. This visual guide takes the guesswork out of alignment and ensures the face does not end up crooked during the stitching phase.
If you are planning to use fusible web or iron-on adhesive for the applique elements, apply it to the back of your fabric or felt before cutting the final shapes. This stabilizing step keeps the small pieces perfectly flat and prevents them from shifting out of position while you sew. It is a fantastic time-saving technique, especially if you are making multiple pincushions in an assembly-line fashion for gifts.
Before moving on to the actual construction, double-check that you have two matching body pieces, two large eye circles, two small pupils, a beak, and a belly patch. Lay them all out together on your flat surface to preview how the colors and patterns interact with each other in the light. This is your last chance to swap out a color or adjust a shape before the pieces are permanently attached.
Taking the time to properly prepare your workspace by clearing away loose threads and keeping your tools within arm’s reach creates a relaxing crafting environment. Ensure your iron is preheated to the correct setting for your chosen fabrics, as pressing your seams flat during construction is essential. With all your pieces neatly organized and marked, you are completely ready to begin building your character.
3. Assembling the Face and Stitching the Body Together
The assembly phase is where your creation truly develops its charming personality, starting directly with the application of the facial features. Position the large felt eye circles onto the marked lines of the front body piece and secure them with a touch of fabric glue or pins. Using a simple blanket stitch, running stitch, or a tight machine zigzag, carefully sew around the perimeter of the eyes.
Next, center the smaller pupils over the large eye circles and repeat the stitching process, using black or dark embroidery floss to add depth. Position the triangular beak slightly overlapping the bottom of the eyes, securing it firmly with a few dense satin stitches or a straight stitch. If you want to add an extra layer of detail, you can embroider tiny eyelashes or little highlights inside the pupils using white thread.
Once the face is fully complete, place the decorative belly patch onto the lower half of the front body piece, aligning it symmetrically. Stitch the belly patch down securely, experimenting with decorative embroidery stitches like a feather stitch or a lazy daisy for added texture. This layer represents the owl’s feathers, so textured stitches or patterned fabrics work exceptionally well here to create visual interest.
With the entire front panel beautifully embellished, it is time to join the front and back body pieces together to form the main structure. Place the front and back panels right sides together, carefully matching up the outer edges, side corners, and top ear points. Pin generously around the entire perimeter to keep the layers from sliding apart as you feed the fabric through your machine.
Begin sewing around the edge using your specified seam allowance, starting at the bottom straight edge and working your way up around the ears. Be sure to leave a two-inch opening along the bottom edge, which is absolutely vital for turning the fabric right side out later. Pivot slowly at the sharp corners and the valley between the ears to maintain the distinct, crisp silhouette of the bird.
After sewing, clip the excess fabric at the corners and make small relief cuts into the curved areas, taking care not to snip your stitches. These strategic clips allow the fabric to lay completely flat and smooth once turned, eliminating bulk inside the seams. Turn the entire body right side out through the bottom opening, gently using a chopstick or point turner to push out the ears and corners.
4. Stuffing Finishing Touches and Securing the Base
Now that your bird shell is turned right side out and pressed flat with an iron, it is time to fill it and give it shape. Start by pushing small clumps of polyester fiberfill up into the tips of the ears, making sure they are packed firmly to maintain their shape. Gradually add more stuffing to the upper half of the body, smoothing out any lumps with your fingers as you fill the cavity.
To give your tool holder excellent stability, create a small funnel using a piece of paper and insert it into the bottom opening of the body. Pour your heavy filling material, such as crushed walnut shells or clean sand, into the lower half of the cushion until it feels weighty. This heavy base prevents the object from tipping over on your sewing table, making it a dream to use during busy projects.
Top off the remaining space with a bit more fiberfill until the owl is plump, firm, and completely free of wrinkles along the side seams. Fold the raw edges of the bottom opening inward by a quarter of an inch, aligning them perfectly with the established seam line. Use applique pins or wonder clips to hold the folded edges tightly together so no filling material can escape.
Thread an embroidery needle with a strong, matching thread and close the opening securely using an invisible ladder stitch or slip stitch. Pull your stitches taut after every few movements to pull the two folded edges together seamlessly, hiding the thread completely inside the fold. Knot your thread securely at the end, bury the tail inside the body, and clip the excess close to the fabric.
Massage the finished shape gently in your hands to distribute the internal stuffing evenly and ensure the weighted base sits perfectly flat on your desk. Your custom sewing tool is now completely ready to hold your collection of pins, needles, and safety clips in style. Place it next to your sewing machine or cutting mat where it can bring a smile to your face during every creative session.
This delightful project demonstrates how easily you can transform simple fabric scraps into a highly functional, beautiful tool for your craft room. By following this systematic approach, you ensure a durable finish that will withstand thousands of pin pierces over its lifetime. Enjoy the companionship of your new workspace buddy, or share the joy by crafting a whole parliament of owls for your sewing friends.
Frequently Asked Questions (FAQ)
What is the best filling for a handmade pincushion?
The best filling depends on what you want your cushion to achieve. A combination of polyester fiberfill for the top half and crushed walnut shells or emery powder for the bottom half is ideal. The fiberfill keeps the shape plump and soft, while the walnut shells add weight for stability and naturally sharpen your pins over time.
Can I make this owl project entirely by hand without a sewing machine?
Yes, this project is highly suited for hand sewing. Because of its small size, you can easily stitch the entire body together using a strong backstitch. Hand sewing gives you immense control around the tight curves of the ears and allows you to enjoy a portable craft project anywhere.
How do I stop the raw edges of my fabric from fraying?
Using wool felt for the face and belly details completely eliminates fraying on the exterior. For the main body cotton fabric, you can use pinking shears to cut the edges, apply a thin line of liquid seam sealant, or use a tight zigzag stitch on your machine over the raw seam allowances.
What size should the finished sewing accessory be?
A standard, comfortable size for a tabletop pincushion is approximately four to five inches tall and three to four inches wide. This size provides a generous surface area for holding dozens of pins without taking up too much valuable real estate on your cutting table or desk.
Can I wash my handmade owl if it gets dusty or dirty?
If you used crushed walnut shells, sand, or emery powder inside your cushion, you should never submerge it in water, as this will cause the filling to clump or ruin. Instead, gently spot clean the exterior fabric with a damp cloth and mild soap, or use a lint roller to remove loose threads and dust.
Conclusion
This detailed Little Owl Pincushion – Tutorial highlights how easy and rewarding it is to craft your own organized sewing room accessories from scratch.
By carefully selecting your fabrics, preparing your pattern pieces with accuracy, and assembling the layers with sturdy stitches, you create a timeless piece that blends utility with pure artistic joy. We hope this guide inspires you to experiment with your fabric scraps and bring your own unique version of this helpful little bird to life.