
Make a Mans Shirt into an Apron Pattern is one of the most creative and sustainable sewing projects you can make with an old button-up shirt. Instead of throwing away a worn or oversized men’s shirt, you can transform it into a beautiful, practical apron that is perfect for cooking, baking, gardening, crafting, or quilting. This beginner-friendly sewing project combines creativity, recycling, and functionality while producing a charming handmade accessory that looks both elegant and professional.
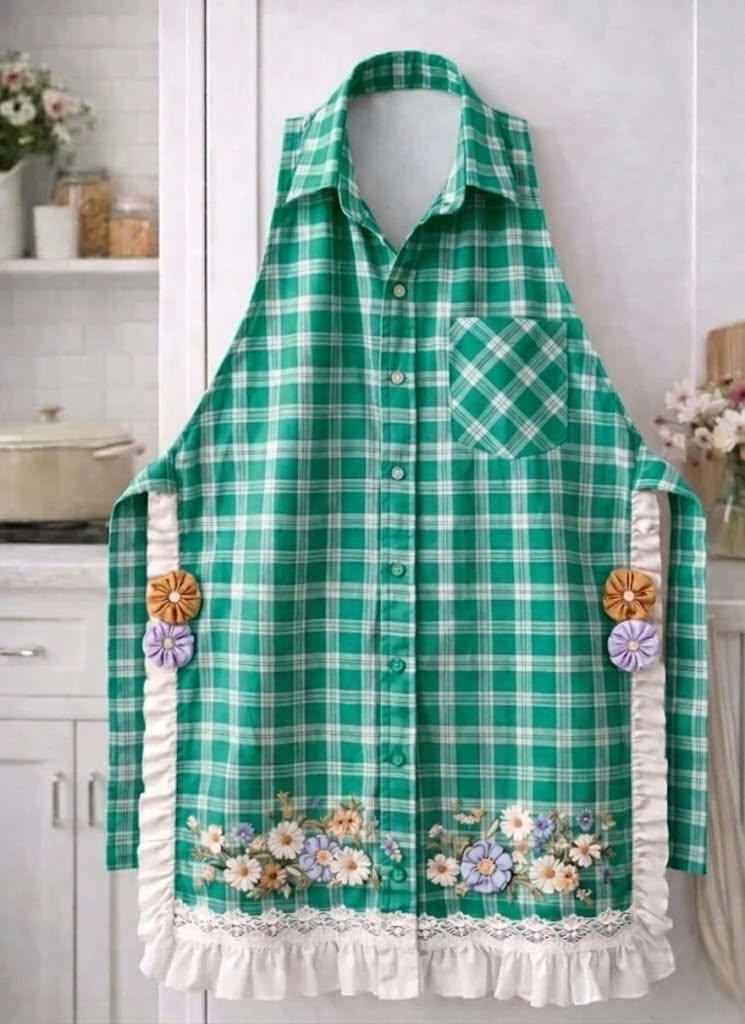
If you love DIY sewing projects, this Make a Mans Shirt into an Apron Pattern tutorial is an excellent way to improve your sewing skills while reducing fabric waste. The design shown in the photo features a classic plaid men’s shirt transformed into a stylish apron with decorative lace, floral embellishments, gathered ruffles, and side ties. The original shirt buttons remain functional, giving the apron a unique vintage appearance that is difficult to recreate with new fabric alone.
One of the greatest advantages of this project is its flexibility. Every men’s shirt has its own colors, textures, patterns, and personality, allowing each finished apron to become completely unique. Whether you choose flannel, cotton, linen, or lightweight chambray, the final result will be practical, comfortable, and attractive. Throughout this guide, you will learn every step needed to recreate this beautiful apron while discovering useful sewing tips that make the process enjoyable for beginners and experienced sewists alike.
Choose the Perfect Shirt and Gather Your Materials
The success of your Make a Mans Shirt into an Apron Pattern begins with selecting the right shirt. An oversized men’s button-up shirt works best because it provides extra fabric for shaping the apron while maintaining comfortable coverage.
Choose a shirt made from 100% cotton or a cotton blend. Cotton is easy to sew, presses beautifully, and washes well after repeated use in the kitchen or sewing room.
Before beginning the project, wash and iron the shirt thoroughly. Clean fabric is easier to cut accurately and helps eliminate shrinking after the apron has already been completed.
Prepare your sewing supplies before cutting. You will need fabric scissors, pins or sewing clips, matching thread, measuring tape, tailor’s chalk, a sewing machine, and an iron. Decorative trims such as lace, ruffles, ribbon, or fabric flowers can also be prepared in advance.
Inspect the shirt carefully for stains or damaged areas. Small imperfections can often be hidden beneath pockets, lace trim, embroidery, or decorative appliqués, making recycled garments look brand new.
Finally, study the shirt’s existing features. The collar, button placket, cuffs, and chest pocket are all attractive design elements that can remain part of the finished apron, giving your project professional character with minimal effort.
Cutting and Shaping the Apron
Lay the shirt flat on a large cutting surface and button it completely before making any cuts. This helps keep both sides symmetrical during the shaping process.
Using tailor’s chalk, draw gentle curved lines beginning near each shoulder and extending toward the underarm area. These curves will become the arm openings of your apron while preserving the shirt collar and button front.
Carefully trim away the sleeves following the marked lines. Save the removed sleeves because their fabric can later become waist ties, pockets, ruffles, or decorative flowers.
Try the shirt on or use a dress form to evaluate the apron shape. Make small adjustments if necessary before permanently sewing any decorative finishes.
If desired, shorten the apron by trimming the lower edge evenly. The design shown in the photo keeps a generous length that offers excellent protection while cooking or crafting.
Press every cut edge with an iron before sewing. Proper pressing creates smoother seams, improves accuracy, and gives the finished apron a polished appearance that looks professionally made.
Sewing the Decorative Details
Now the fun begins. Decorative finishing transforms a simple recycled shirt into an elegant handmade apron full of personality.
Create narrow hems around the newly cut arm openings. Fold each raw edge twice before stitching to prevent fraying and produce a clean finish that withstands frequent washing.
Add gathered ruffles along the arm openings if you want to recreate the romantic appearance shown in the project photo. Lightweight cotton or muslin creates soft, comfortable ruffles without adding unnecessary bulk.
Sew lace trim along the bottom edge of the apron. This delicate finishing touch beautifully contrasts with the structured plaid shirt while adding a vintage farmhouse style.
Decorative fabric flowers can be attached to the sides using hand stitching. These embellishments add dimension and color while hiding seam intersections and creating a custom handcrafted appearance.
If your shirt already includes a chest pocket, leave it in place. The original pocket becomes a practical storage space for recipe cards, scissors, pens, measuring spoons, or gardening gloves while preserving the shirt’s authentic character.
Final Assembly, Personalization, and Care
Cut two long strips from the shirt sleeves to create adjustable waist ties. Fold each strip lengthwise, sew along the edge, turn right side out, press, and attach securely to each side of the apron.
If additional neck adjustment is desired, the original collar can remain functional while the top button stays open for greater comfort during extended wear.
Press the completed apron thoroughly. Steam pressing helps flatten seams, sharpen edges, and showcase every decorative detail, making the finished project look neat and professional.
Personalize your Make a Mans Shirt into an Apron Pattern by adding embroidery, monograms, decorative buttons, machine embroidery, appliqué flowers, quilt blocks, or colorful patchwork pieces. Every customization makes the apron truly one of a kind.
Machine wash the apron using cold water and mild detergent. Tumble dry on low heat or hang to dry to preserve lace, embellishments, and decorative stitching for years of regular use.
With only a few hours of sewing, an old men’s shirt becomes a beautiful apron that is both practical and stylish. This sustainable project is perfect for gifts, craft fairs, holiday presents, kitchen décor, or everyday household use.
Frequently Asked Questions
What size shirt works best for this project?
Large or extra-large men’s shirts usually provide the most fabric and create a comfortable apron with generous coverage.
Can beginners make this apron?
Yes. This project is beginner-friendly because it uses simple straight stitching, basic hemming, and minimal pattern drafting.
What fabric is recommended?
Cotton, cotton blends, chambray, lightweight denim, and linen shirts all work exceptionally well for this apron pattern.
Can I sew the apron by hand?
Yes. Although a sewing machine speeds up the process, the project can be completed with careful hand stitching.
Do I need to remove the collar?
No. Keeping the original collar is one of the signature features of this Make a Mans Shirt into an Apron Pattern, giving the apron its distinctive recycled look.
What can I use instead of lace?
Bias tape, ric-rac trim, pom-pom trim, decorative ribbon, or a simple folded hem all create beautiful finishes.
Can I add more pockets?
Absolutely. Extra pockets can be cut from the sleeves or another coordinating fabric to provide additional storage.
Is this a good gift idea?
Yes. Handmade aprons are thoughtful gifts for cooks, bakers, gardeners, quilters, artists, and anyone who enjoys creative hobbies.
How long does the project take?
Most sewists can complete the apron in approximately two to four hours, depending on the amount of decorative work added.
Can I customize the decorations?
Certainly. Embroidery, appliqué, lace, ruffles, patchwork, decorative stitching, and handmade flowers all allow you to create a completely unique apron.
In this Make a Mans Shirt into an Apron Pattern guide, you learned how to transform an ordinary men’s button-up shirt into a beautiful and functional handmade apron.
We covered how to select the ideal shirt, prepare your sewing materials, shape the apron, finish the edges, create decorative ruffles, add lace and floral embellishments, attach comfortable waist ties, and personalize the final design. By reusing clothing you already own, you create a sustainable sewing project that is both economical and stylish. Whether you make this apron for yourself, as a thoughtful handmade gift, or to sell at craft fairs, the finished result is sure to be admired.