
Crochet Hat Pattern projects are among the most enjoyable and rewarding crochet creations for makers of every skill level. Whether you are looking for a fashionable summer accessory, a thoughtful handmade gift, or simply a relaxing crochet project, this classic bucket hat design combines beauty, comfort, and practicality. Learning how to create your own Crochet Hat Pattern also gives you the freedom to experiment with colors, textures, and yarn types while improving your crochet skills.
A well-designed Crochet Hat Pattern begins with a simple circular crown, gradually increases to fit comfortably around the head, and finishes with a beautifully shaped brim. Although the finished hat appears sophisticated, the construction process is surprisingly straightforward when broken down into manageable steps. With patience and consistent stitch placement, even adventurous beginners can achieve professional-looking results.
One of the greatest advantages of making your own Crochet Hat Pattern is customization. You can easily adjust the size, brim width, stitch texture, or color combination to match your personal style. Soft cotton yarn works exceptionally well because it provides structure while remaining breathable, making the finished hat ideal for warm weather, vacations, gardening, beach trips, or everyday casual wear. Throughout this guide, you’ll learn the complete construction process using standard US crochet terminology, along with helpful techniques that improve stitch consistency and create a polished finish.
Choosing Materials and Preparing Your Crochet Hat Pattern
Before starting your Crochet Hat Pattern, gather all necessary supplies. Proper materials make a noticeable difference in both appearance and durability. Cotton yarn is often the preferred choice because it holds the hat’s shape while remaining lightweight and comfortable throughout the day.
A medium-weight cotton yarn (Category 4) paired with a 4.5 mm to 5 mm crochet hook creates a firm fabric that supports the bucket hat structure. If you prefer a softer drape, consider using a slightly larger hook while maintaining even tension.
Useful supplies include scissors, stitch markers, a yarn needle for weaving in ends, and a measuring tape. Stitch markers become especially valuable during the increase rounds because they help maintain perfectly symmetrical shaping.
Gauge is another important consideration. Creating a small swatch before beginning allows you to verify that your stitch tension matches your desired finished size. Minor adjustments to hook size can dramatically improve the final fit.
When selecting colors, solid shades emphasize the stitch texture beautifully, while striped versions create a playful and modern appearance. Neutral colors offer timeless elegance, whereas vibrant shades bring a fresh summer feel.
Before making your first stitch, review the entire pattern structure. Understanding how the crown transitions into the sides and finally into the brim will make the construction process much smoother.
Step-by-Step Crochet Hat Pattern Construction
Begin your Crochet Hat Pattern with a magic ring. This adjustable loop creates a clean center without leaving a visible opening at the top of the hat.
Round 1: Work 12 double crochet (DC) stitches into the magic ring. Pull the ring tightly and join with a slip stitch to close the round.
Round 2: Chain 2 and work two DC stitches into every stitch around. This evenly increases the crown while maintaining a perfectly flat circle.
Round 3: Alternate one DC in the first stitch and two DC in the next stitch. Continue repeating this sequence around the entire circle.
Continue increasing in each round by adding one additional single DC between every increase section. This gradual method keeps the crown flat without creating ripples or unwanted curling.
Once the crown reaches approximately 6.5 to 7 inches in diameter for an average adult size, stop increasing. From this point forward, crochet one DC into each stitch around. This creates the vertical sides of the bucket hat.
Work these straight rounds until the hat reaches the desired depth, usually between 3.5 and 4.5 inches depending on personal preference. Regularly try the hat on or measure it against the intended head circumference for the best fit.
Creating the Decorative Stitch Sections and Brim
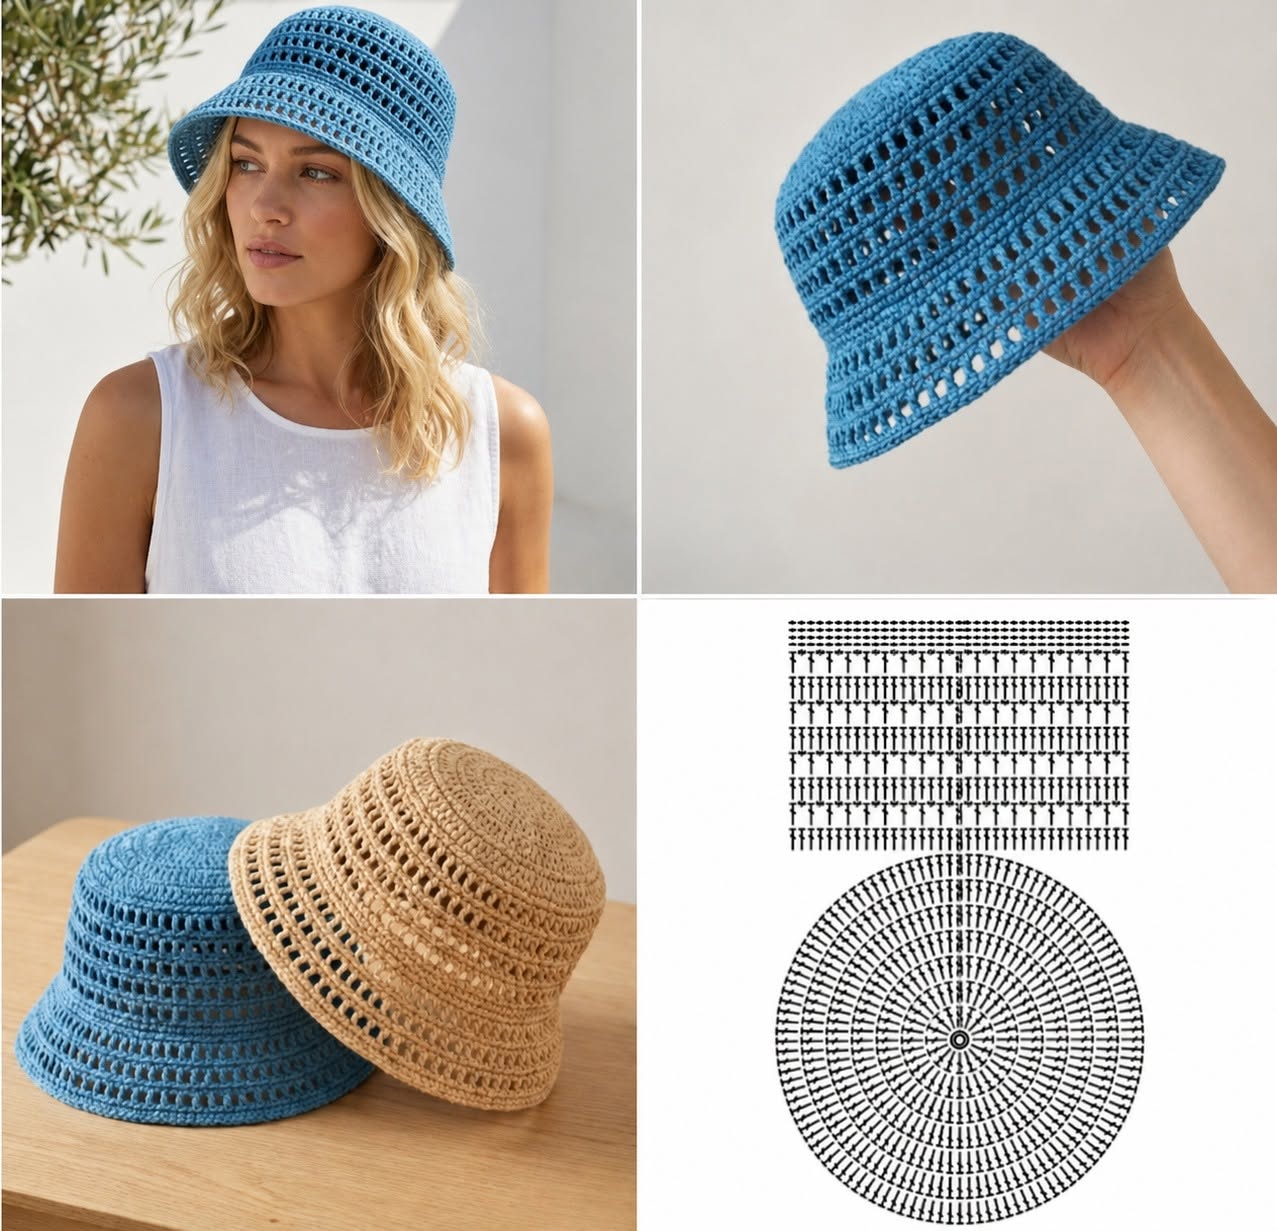
The decorative openwork rows shown in many Crochet Hat Pattern designs add visual interest while keeping the hat lightweight and breathable. These rows are simple to create and repeat consistently around the project.
To create an eyelet row, chain one, skip one stitch, then work one DC into the following stitch. Repeat this sequence around the entire round. On the next round, place a DC into each chain space and each stitch to restore the original stitch count.
Alternate solid rows and eyelet rows until you achieve the decorative effect you prefer. The repeating texture creates elegant horizontal bands that define the bucket hat style.
After completing the body of the hat, begin shaping the brim. Work two DC stitches into every eighth stitch around. This gentle increase causes the brim to naturally flare outward.
Continue crocheting several rounds without further increases. If you prefer a wider brim, repeat another increase round followed by additional straight rounds.
For a firmer brim, maintain tight tension throughout these final rounds. Cotton yarn naturally helps the brim hold its shape without requiring additional reinforcement.
Finish the final round using single crochet stitches. This clean edging creates a professional appearance while helping the brim maintain a crisp outline.
Finishing Techniques, Styling Tips, and Customization Ideas
After completing your Crochet Hat Pattern, carefully weave in all loose yarn tails using a yarn needle. Secure every end thoroughly to ensure long-lasting durability.
Light blocking can improve the overall appearance. Slightly dampen the finished hat and shape it over a bowl, hat form, or similarly sized object. Allow it to dry naturally before wearing.
If the brim curls upward more than desired, gentle steam blocking can help relax the stitches and improve the final silhouette.
Experiment with different color combinations. Classic cream, beige, navy, black, white, sage green, dusty rose, lavender, mustard, and soft blue all create beautiful finished hats suitable for different wardrobes and seasons.
Personalize your Crochet Hat Pattern by adding decorative details such as a crocheted flower, small bow, braided cord, wooden button, or subtle contrasting border around the brim.
This versatile design also adapts well to different sizes. Simply adjust the diameter of the crown before working the straight side rounds. Children’s sizes require fewer increase rounds, while larger adult sizes continue increasing slightly longer before stopping.
With practice, you’ll discover that this timeless bucket hat construction serves as a wonderful foundation for countless future variations, allowing you to create unique handmade accessories for family, friends, or your own wardrobe.
Frequently Asked Questions
What is the best yarn for a Crochet Hat Pattern?
Cotton yarn is generally considered the best option because it provides excellent stitch definition, durability, breathability, and structure while remaining comfortable in warm weather.
Can beginners make this Crochet Hat Pattern?
Yes. Beginners who are familiar with basic stitches such as chain, slip stitch, single crochet, and double crochet can successfully complete this project by following each step carefully.
Which crochet hook works best?
A 4.5 mm to 5 mm crochet hook works well with medium-weight cotton yarn, although hook size may vary depending on your personal tension.
How do I make the hat larger?
Continue working increase rounds until the crown reaches the correct diameter for the intended head size before beginning the straight side rounds.
Why is my hat curling?
Curling usually occurs when there are too few increases. If the crown curls upward early, add another evenly spaced increase round before continuing.
Why is my hat wavy?
Excessive increases often create ripples. Maintaining evenly spaced increases prevents this issue and produces a smooth, flat crown.
Can I wash my finished crochet hat?
Yes. Most cotton yarns can be hand washed with mild detergent. Lay the hat flat to dry while reshaping the brim to preserve its appearance.
Can I add stripes or multiple colors?
Absolutely. Color changes between rounds create beautiful striped effects and allow endless creative possibilities while maintaining the same construction method.
Conclusion
This Crochet Hat Pattern demonstrates that a stylish handmade bucket hat can be created using simple stitches, careful shaping, and consistent tension.
Throughout this guide, you learned how to choose the right materials, build the crown with balanced increases, crochet the straight sides, create decorative openwork sections, shape a comfortable brim, and apply finishing techniques that give your project a polished, professional appearance. With these techniques, you can confidently customize colors, sizes, and finishing details to create hats that perfectly match your personal style or make thoughtful handmade gifts.