
Home Kitchen Apron Pattern is one of the most rewarding sewing projects for beginners and experienced makers alike. A beautiful Home Kitchen Apron Pattern not only protects your clothes while cooking, baking, or crafting, but it also adds a personal touch to your daily routine. Whether you are sewing for yourself, creating handmade gifts, or selling finished aprons at craft fairs, this project combines practicality with timeless style. With the right materials and careful measurements, you can create an apron that is both comfortable and elegant.
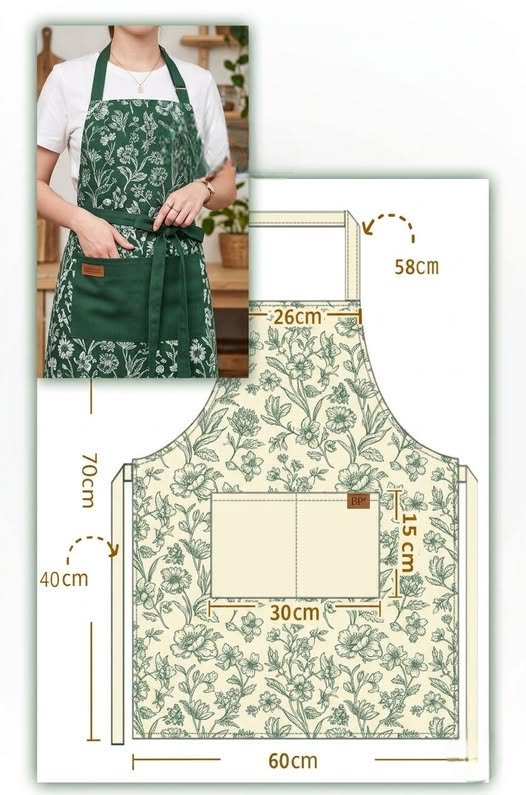
A floral apron like the one shown in the project is an excellent example of how fabric choice can completely transform a simple sewing pattern into something eye-catching. The combination of a printed cotton fabric with a solid-colored pocket creates a balanced design that feels modern while remaining classic. This project is beginner-friendly because it uses mostly straight seams, gentle curves around the armholes, and simple finishing techniques that are easy to master with a standard sewing machine.
Throughout this guide, you will learn every important step needed to create your own Home Kitchen Apron Pattern, from selecting materials and cutting the fabric to sewing the straps, attaching the pocket, and making professional finishing touches. Every stage has been explained in detail so you can confidently complete your project while improving your sewing skills. By the end of this tutorial, you will have a durable apron that is comfortable enough for everyday use and attractive enough to give as a handmade gift.
Choosing Materials and Preparing the Home Kitchen Apron Pattern
Before cutting your fabric, gather all of the materials you will need. Medium-weight cotton, canvas, linen blends, or quilting cotton are excellent fabric choices because they are breathable, durable, and easy to sew. Printed fabrics work beautifully for the body of the apron, while a coordinating solid fabric creates an attractive pocket and neck straps.
The finished apron shown in the project measures approximately 60 cm across the lower edge and around 70 cm in total body height. The neck strap is approximately 58 cm long, while each waist tie measures roughly 70 cm, allowing enough length to tie comfortably around the waist.
Wash and press your fabric before cutting. Prewashing prevents future shrinkage and helps the finished apron maintain its proper size after laundering. Ironing also removes wrinkles, making it easier to cut accurate pattern pieces.
Transfer the apron shape onto pattern paper before cutting the fabric. This allows you to make adjustments for different body sizes without repeatedly drawing directly on the fabric. Label every piece clearly so assembly becomes much easier later.
Use sharp fabric scissors or a rotary cutter with a cutting mat for clean edges. Accurate cutting makes sewing easier and improves the final appearance of the apron. Smooth curves around the armholes are especially important for a professional finish.
Do not forget to add seam allowances around every pattern piece. A seam allowance of approximately 1 cm is suitable for most sewing projects and provides enough fabric for secure stitching.
Cutting and Sewing the Apron Body
Fold your fabric with the right sides together and place the apron pattern on the fold if your pattern is designed as a single mirrored piece. Pin the pattern securely before cutting to prevent shifting.
After cutting the main body, cut the large front pocket using the measurements shown in the project. The pocket is approximately 30 cm wide and 15 cm tall, making it spacious enough for utensils, recipe cards, kitchen towels, or small cooking tools.
Press the upper edge of the pocket twice before stitching. This double-fold hem creates a clean, durable finish that will withstand frequent use and washing. Decorative topstitching can also be added for extra style.
Position the pocket evenly on the front of the apron body. Measure carefully from each side to ensure it sits perfectly centered. Pin it securely before sewing around the remaining three sides.
Backstitch at the beginning and end of every seam. Reinforced stitches prevent stress points from opening during everyday use, especially around the pocket corners.
If desired, divide the pocket into multiple sections by sewing one or two vertical lines. Separate compartments are useful for holding cooking utensils, pens, scissors, or thermometers.
Making the Neck Strap and Waist Ties
Cut long fabric strips for the neck strap and waist ties. Folding each strip lengthwise with the right sides together creates a clean tube that can be turned inside out after stitching.
Sew along the long edge using a straight stitch, leaving one short end open for turning. Trim the seam allowance slightly to reduce bulk and create smoother edges after turning.
Use a loop turner, safety pin, or turning tool to carefully pull the fabric tube right side out. Press each strap thoroughly so the edges become crisp and professional.
Topstitch close to both long edges of every strap. This step not only strengthens the straps but also gives the apron a polished appearance similar to commercially made garments.
Attach the neck strap securely to the upper corners of the apron. Reinforce these seams with a square or X-shaped stitch pattern because this area experiences the greatest amount of tension during use.
Attach the waist ties to each side of the apron using the same reinforced stitching method. Double stitching greatly improves durability, especially if the apron will be worn frequently.
Finishing Touches, Personalization, and Care
Finish the raw edges of the apron by folding and pressing the outer edges twice before sewing. A narrow double-fold hem creates a clean finish without requiring a serger.
Alternatively, bias binding may be used around the curved armholes and edges. Bias tape creates smooth curves while adding decorative contrast that enhances the overall appearance of the apron.
Press the entire apron after construction. Careful pressing helps flatten every seam, improves the overall shape, and gives the finished project a professional look that is immediately noticeable.
Personalize your Home Kitchen Apron Pattern by adding embroidery, decorative labels, lace trim, contrasting pockets, or colorful topstitching. Small custom details make every apron unique and perfect for personalized gifts.
This apron can easily be resized for teenagers, adults, or larger body types by adjusting the width, height, and strap lengths before cutting the fabric. Keeping a reusable paper pattern allows you to make multiple versions quickly.
Once completed, wash the apron in cold or warm water using mild detergent. Press lightly after drying to maintain crisp edges and preserve the beautiful appearance of the finished garment for years of everyday use.
Frequently Asked Questions
What is the best fabric for a Home Kitchen Apron Pattern?
Cotton canvas, quilting cotton, linen, cotton-linen blends, and lightweight denim are excellent choices because they are durable, washable, breathable, and easy to sew.
Is this project suitable for beginners?
Yes. Most of the construction uses straight seams, simple hems, and basic sewing techniques, making it an excellent beginner-friendly sewing project.
How long does it take to make this apron?
Most sewists can complete the project in approximately two to four hours, depending on experience and the amount of decorative customization added.
Can I make adjustable neck straps?
Absolutely. You can install D-rings, sliders, or adjustable buckles to create a neck strap that fits different body sizes comfortably.
What seam allowance should I use?
A seam allowance of approximately 1 cm works well for this type of apron and provides enough strength while remaining easy to sew accurately.
Can I add more pockets?
Yes. Additional divided pockets, zippered pockets, or towel loops can easily be incorporated into the design to increase functionality.
Is this apron machine washable?
Yes. Wash using mild detergent and similar fabric colors. Cotton fabrics generally become softer with repeated washing while maintaining their durability.
Can I sell aprons made from my own version of this pattern?
If you create the apron using your own sewing work and materials, you can generally sell your finished handmade items while respecting any applicable intellectual property rights associated with specific commercial patterns.
Conclusion
Creating your own Home Kitchen Apron Pattern is an enjoyable sewing project that combines creativity, practicality, and valuable sewing techniques into one beautiful handmade item. Throughout this guide, you learned how to choose the right fabric, prepare the pattern, cut each piece accurately, sew the apron body, construct durable neck and waist straps, attach a spacious front pocket, finish the edges professionally, and personalize the design to match your own style. These skills can also be applied to many future sewing projects, helping you build confidence while producing high-quality handmade creations.
Whether you are sewing your very first apron or adding another design to your handmade collection, this project offers an excellent balance of simplicity and elegance. With careful measuring, accurate cutting, and patient stitching, you can create an apron that is comfortable enough for everyday cooking, baking, gardening, crafting, or even professional kitchen use.