If you are looking for a unique, eco-friendly way to upgrade your wardrobe, mastering a patchwork bell-bottom pants – tutorial is the ultimate creative project. Fashion trends constantly cycle back, and right now, the vibrant energy of the 1970s is merging perfectly with modern sustainable style. By learning how to create your own patchwork bell-bottom pants, you can turn forgotten fabric scraps or old jeans into a stunning, custom-fit statement piece that stands out in any crowd.
This comprehensive guide is designed to walk you through every single step of the process, ensuring that even intermediate crafters can achieve a professional, durable finish. Upcycling textiles is not just an incredible way to express your personal style, but it also reduces textile waste, making your new favorite outfit entirely eco-conscious. Whether you want a subtle, monochromatic denim look or a bold, colorful explosion of different fabric textures, this patchwork bell-bottom pants – tutorial will give you the tools and confidence to bring your vision to life.
Throughout this article, we will break down the essential techniques required to master this craft, from selecting the right materials to sewing the perfect flared silhouette. You will learn how to prepare your fabric pieces, structure your layout for maximum visual impact, and assemble everything seamlessly. Grab your sewing machine, gather your supplies, and let’s dive into the ultimate patchwork bell-bottom pants – tutorial that will elevate your DIY fashion game.
1. Selecting and Preparing Materials for Your Patchwork Bell-Bottom Pants
The success of your patchwork bell-bottom pants relies heavily on the quality and compatibility of the fabrics you choose to use. For a classic, durable look, utilizing old denim jeans, jackets, or skirts is highly recommended, as denim provides the structure needed for that iconic flare. However, you can also incorporate corduroy, heavy cotton, or flannel scraps to add unique textures and contrasting colors to your design.
Before you start cutting into your material, it is absolutely essential to pre-wash all the fabrics you plan to use in this patchwork bell-bottom pants – tutorial. Pre-washing prevents future shrinking issues, ensuring that your pants maintain their exact size and shape after their first trip through the laundry. It also helps wash out any excess dyes, ensuring that dark denim won’t bleed into lighter fabric patches later on.
Once your fabrics are clean and dried, spend some time pressing them thoroughly with a hot iron to remove all wrinkles. Working with perfectly flat fabric makes the cutting and measuring process significantly more accurate, which is vital for alignment. After ironing, inspect your pieces for any weak spots, stains, or areas that might need reinforcement before being integrated into your new garment.
Next, you need to decide on a base for your project, which can either be an existing pair of fitted straight-leg pants or a commercial sewing pattern. Using an old pair of jeans as a base is a fantastic shortcut for beginners, as it cuts down on the time needed to construct the waistband and zipper area. If you choose this method, you will only need to focus on replacing or expanding the legs with your patchwork creations.
Gathering the proper tools before you begin sewing will save you a lot of time and frustration during the assembly process. Make sure you have heavy-duty sewing machine needles (sizes 90/14 or 100/16 work best for denim), high-quality polyester thread, and ultra-sharp fabric shears or a rotary cutter. A self-healing cutting mat and a long quilting ruler are also incredibly helpful for achieving clean, straight edges on your individual patches.
Lastly, consider the overall color palette and aesthetic you want to achieve before making your final fabric cuts. You can group your scraps by color family, mix light and dark washes for high contrast, or arrange them randomly for a true bohemian vibe. Planning your layout early in this patchwork bell-bottom pants – tutorial guarantees a balanced, visually appealing result that looks intentionally designed.
2. Cutting Blocks and Designing the Perfect Layout
Creating a beautiful patchwork bell-bottom pants design requires a bit of strategy when it comes to cutting your individual fabric pieces. You can cut your scraps into uniform squares, rectangles, or even irregular geometric shapes if you want an asymmetrical, artistic look. For beginners following this patchwork bell-bottom pants – tutorial, sticking to rectangular strips or uniform squares makes the alignment and sewing process much easier.
As you cut your patches, always remember to factor in a standard seam allowance of at least one-quarter of an inch on all sides. If you cut your pieces exactly to the finished size you want, your final fabric panels will end up much smaller than anticipated once sewn together. Consistency is key here, so use your quilting ruler to make sure your lines are perfectly straight and your angles are precise.
Once you have a large pile of cut patches ready, find a large, flat surface like a clean floor or a big table to map out your design. Lay out the patches in the shape of your front and back pant leg panels, arranging the colors and textures until you are happy with the mix. Take your time during this step to ensure that dark and light shades are evenly distributed across the entire silhouette.
A great tip for keeping track of your layout is to take a quick digital photo of the arranged pieces on your phone. This photo will serve as an invaluable reference point as you begin moving pieces to your sewing machine, preventing any confusion about which patch goes where. You can also use small numbered sticky notes or fabric chalk to label the rows and columns of your design.
When designing the layout specifically for patchwork bell-bottom pants, keep in mind where the fabric will need to flex and stretch the most. It is often wise to use larger, sturdier pieces of fabric around the thigh and knee areas to minimize bulky seams that could cause discomfort. Save your smallest, most intricate patchwork sections for the lower calves and the dramatic flared hem where they can be fully seen.
After you are completely satisfied with the visual arrangement, stack your pieces carefully by row, keeping them in the exact order they will be joined. Organizing your workflow this way makes the actual sewing process highly efficient and prevents mistakes. With your layout finalized and your pieces organized, you are now ready to start joining your scraps into cohesive fabric panels.
3. Sewing the Patchwork Panels and Managing Seams
Now it is time for the core sewing segment of our patchwork bell-bottom pants – tutorial, where your individual scraps become solid fabric. Start by sewing the patches together row by row, placing the right sides of the fabric together and using a consistent seam allowance. A standard straight stitch works perfectly for this, but make sure your stitch length is set appropriately for the thickness of your materials.
As you finish sewing each row, press the seams open or to one side with your iron before joining the rows together. Pressing your seams at every single step is a non-negotiable rule in quilting and garment making, as it creates flat, professional-looking results. Flat seams prevent your patchwork bell-bottom pants from buckling, puckering, or looking lumpy when you finally wear them.
Once all your rows are completed, you will begin sewing the rows together vertically to create two large sheets of patchwork fabric. Pin the rows securely at every intersection to ensure that the corners of your patches align perfectly, creating clean lines. Take your time sewing these long seams, pulling out the pins just before your needle reaches them to avoid breaking your needle.
Because denim and woven cotton scraps can fray easily over time, it is highly recommended to finish the raw edges of your seams. If you own a serger, run it along the edge of every seam; if you are using a standard sewing machine, a simple zigzag stitch works beautifully. Finishing your seams ensures that your patchwork bell-bottom pants can withstand regular washing and daily wear without unraveling.
For an extra touch of durability and style, you can add topstitching along the right side of your patchwork panels. Topstitching involves sewing a straight line of stitches parallel to the seam line, catching the seam allowance underneath to hold it flat. Using a contrasting thread color, like classic golden-brown denim thread, adds a wonderful heritage look to your handmade garment.
Once both of your large patchwork panels are fully assembled, finished, and pressed, lay your pant leg pattern pieces on top of them. Carefully pin the pattern down, ensuring that the design is centered exactly how you want it on each leg. Cut around the pattern pieces precisely, leaving you with beautiful, custom-made front and back panels ready for the final assembly.
4. Constructing the Bell-Bottom Flare and Final Assembly
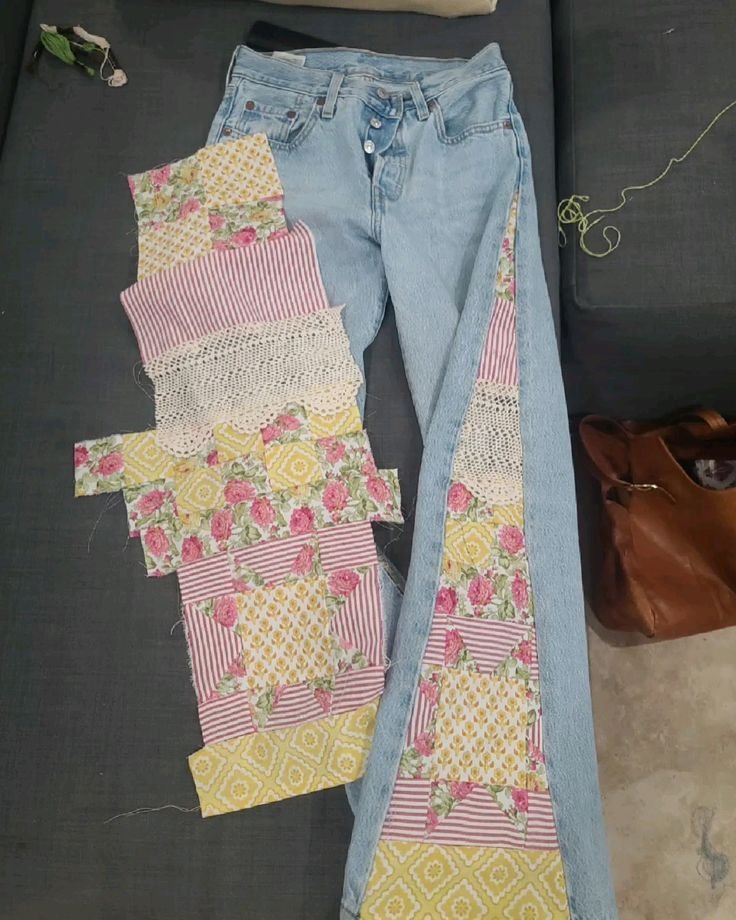
The defining feature of this patchwork bell-bottom pants – tutorial is, of course, the dramatic, vintage-inspired flare at the bottom of the legs. If you are modifying an existing pair of jeans, you can create this flare by cutting open the outer side seam from the knee down to the hem. This open slot creates a triangular gap where you will insert a large, wedge-shaped patchwork piece called a gusset.
To design your flare gusset, determine how wide you want your bell-bottoms to be at the very bottom hem. Cut a triangular piece of your patchwork fabric that matches the height of your cut side seam and features the desired width at its base. A wider triangle base will result in a more dramatic, theatrical 70s flare, while a narrower base offers a subtle bootcut style.
Pin the triangular patchwork gusset into the open side seam of your jeans, starting from the top vertex at the knee and working your way down. Sew down one side of the triangle to the hem, then sew down the opposite side, ensuring the fabric lays perfectly flat without puckering. Repeat this exact process on the other leg, matching the measurements carefully so both flares are identical.
If you are building your patchwork bell-bottom pants completely from scratch using a pattern, you will simply sew the front and back patchwork panels together. Pin the inseams first, sew them completely, and then pin the outseams from the waist down to the dramatic flared hemline. Always try the pants on inside out before doing your final stitch to check the fit around your waist, hips, and thighs.
Once the overall fit is perfected, it is time to finish the waistband and the lower hem of your new statement pants. For the hem of your bell-bottoms, you can create a clean, double-folded traditional hem, or leave the edges raw and run a stay-stitch an inch above to create a stylish frayed look. Make sure the length is ideal for the shoes you plan to wear, as bell-bottoms look best when they just skim the floor.
Give your completed pants one final, thorough press with your iron to set all the new seams and smooth out the fabric. Check the entire garment for any loose threads, clipping them closely to maintain a clean, high-quality presentation. Congratulations, you have successfully completed this detailed patchwork bell-bottom pants – tutorial and created a gorgeous, sustainable addition to your wardrobe!
Frequently Asked Questions (FAQ)
What is the best type of fabric to use for patchwork bell-bottom pants?
Medium to heavy-weight woven fabrics are ideal for this type of project. Denim is the most popular choice because it offers excellent structure, durability, and a classic look. You can also use corduroy, canvas, heavy linen, and sturdy cotton scraps to add variety and texture to your design.
Can I make these pants if I am a complete beginner at sewing?
Yes, you can absolutely complete this project, but it is highly recommended to start by modifying an existing pair of jeans rather than sewing pants from scratch. Inserting a patchwork flare gusset into the side seam of old jeans is an accessible, beginner-friendly method that yields incredible results without the complexity of sewing waistbands and zippers.
How do I prevent the patchwork seams from being too bulky and uncomfortable?
To minimize bulk, always press your seams flat and open with an iron during the construction process. Additionally, try to avoid placing multiple intersecting seams directly over high-friction areas like the inner thighs or knees. Using lighter-weight cotton scraps mixed with your denim can also keep the garment flexible and comfortable.
Will the patchwork design shrink or lose shape when washed?
As long as you thoroughly pre-wash and pre-shrink all of your fabric scraps before cutting them into patches, your pants will hold their shape beautifully. When washing your finished garment, use cold water and a gentle cycle, then hang them to dry or tumble dry on low heat to preserve the integrity of the seams.
How many pairs of old jeans do I need to make a full pair of patchwork pants?
If you are building the entire pair of pants out of patchwork panels, you will typically need about 3 to 4 pairs of old, unwanted jeans, depending on their size and the size of the garment you are making. If you are only adding flare inserts to an existing pair, a single pair of scrap jeans or a few large fabric remnants will be more than enough.
Do I need a special sewing machine needle for this tutorial?
Yes, because you will be sewing through multiple layers of denim and other thick fabrics, you should use a dedicated denim or jeans needle (sizes 90/14 or 100/16). Using a standard universal needle can cause skipped stitches, thread breakage, or even bend and damage your sewing machine needle mechanism.
Conclusion
In conclusion, mastering this patchwork bell-bottom pants – tutorial allows you to merge sustainable crafting practices with bold, personalized fashion.
Throughout this guide, we explored how to select and prepare your materials, cut and arrange your patches for the best visual layout, sew durable panels while managing seam bulk, and construct that iconic retro flare. By recycling old textiles into a functional garment, you create a beautiful piece of wearable art that is entirely unique to your style.