Creating a Patchwork Curtain – Tutorial is a wonderful way to breathe new life into your living space while honoring the timeless tradition of textile artistry. This project allows you to blend various colors, textures, and memories into a functional piece of home decor that reflects your unique personality. By following this Patchwork Curtain – Tutorial, you will discover that sewing your own window treatments is not only a cost-effective alternative to store-bought options but also a deeply rewarding creative journey.
The beauty of a Patchwork Curtain – Tutorial lies in its versatility, as you can choose to use vibrant modern prints or soft, vintage-inspired scraps to match your interior design. Whether you are an experienced quilter or a beginner picking up a needle for the first time, the process of piecing together fabric is meditative and fulfilling. Using this Patchwork Curtain – Tutorial as your guide, you will learn how to calculate measurements, select the right materials, and assemble a durable curtain that filters light beautifully while adding a cozy, handcrafted touch to any room.
In this comprehensive Patchwork Curtain – Tutorial, we will focus on building a sturdy foundation for your sewing project by emphasizing precision and high-quality finishes. A well-made Patchwork Curtain – Tutorial project ensures that your final product hangs straight and withstands the test of time, even after multiple washes. As we move through the steps, remember that the goal of this Patchwork Curtain – Tutorial is to inspire you to experiment with different layouts and techniques, turning simple fabric squares into a stunning masterpiece that showcases your passion for DIY crafts and home styling.
1 Planning and Fabric Selection for Your Patchwork Curtain
Selecting the right materials is the first essential step in this Patchwork Curtain – Tutorial. You want to look for medium-weight cotton fabrics, often referred to as quilting cotton, because they are easy to handle and offer a crisp finish. Since curtains are exposed to sunlight, choosing high-quality dyes is vital to prevent premature fading over time.
Before you begin cutting, you must determine the total dimensions of your window. For a professional Patchwork Curtain – Tutorial result, always add at least 10 cm to the width for a nice drape and 15 cm to the length to account for the top casing and bottom hem. This ensures that your patchwork does not look sparse or ill-fitted once it is hung on the rod.
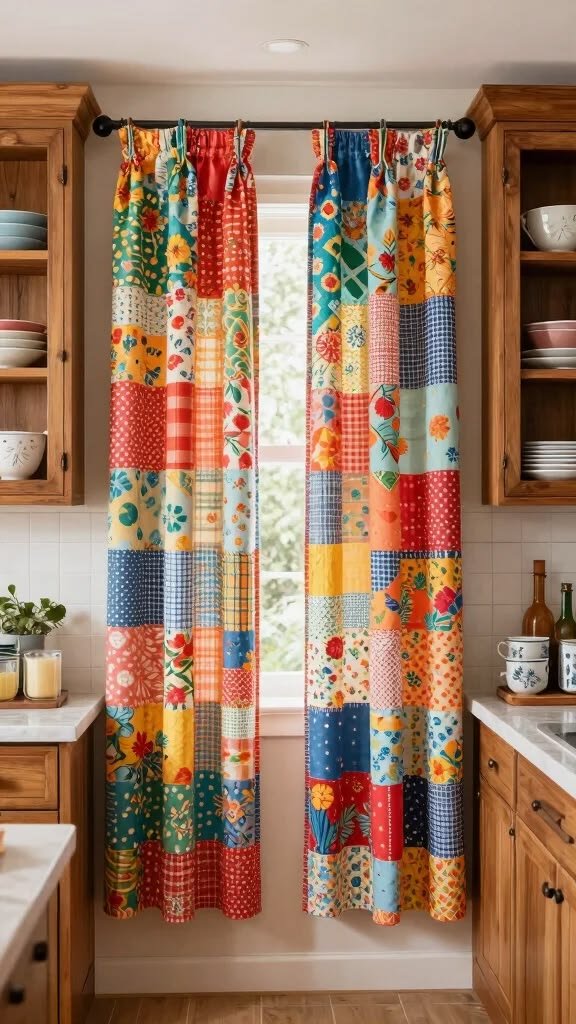
Color theory plays a massive role in the success of your Patchwork Curtain – Tutorial. Try laying out your fabric scraps on a large table or the floor to see how the patterns interact. Mixing large-scale florals with tiny geometric dots or solid colors creates a balanced visual rhythm. This tutorial encourages you to step out of your comfort zone with bold combinations.
Texture is another element to consider when following this Patchwork Curtain – Tutorial. While cotton is the standard, you can incorporate linen or light denim for a more rustic look. However, keep the weights similar so the curtain hangs evenly. If one fabric is significantly heavier than the others, it may cause the patchwork seams to sag or pucker.
Don’t forget the importance of pre-washing your fabric. In any Patchwork Curtain – Tutorial, this step is non-negotiable because different fabrics shrink at different rates. By washing and ironing your materials beforehand, you ensure that your Patchwork Curtain – Tutorial project maintains its shape and size after the first domestic laundry cycle.
Finally, gather your essential tools: a rotary cutter, a self-healing mat, a clear acrylic ruler, and high-quality polyester thread. Having the right equipment makes the Patchwork Curtain – Tutorial much smoother and more enjoyable. Precise cutting is the secret to perfectly aligned corners, which is the hallmark of a high-quality handmade curtain.
2 Cutting and Piecing Techniques for Beginners
Once your fabric is prepped, the next stage of the Patchwork Curtain – Tutorial is the cutting process. Use your ruler to cut uniform squares; 15 cm by 15 cm is a popular size for beginners as it is easy to manage. Consistent cutting is what allows the rows of your Patchwork Curtain – Tutorial to line up perfectly without frustrating gaps.
The most common method used in a Patchwork Curtain – Tutorial is the “row-by-row” assembly. You will sew your squares into long horizontal strips first, then join those strips together. Always use a 6 mm seam allowance (a standard quarter-inch) to maintain consistency throughout the entire Patchwork Curtain – Tutorial assembly process.
Pressing is just as important as sewing in this Patchwork Curtain – Tutorial. After sewing a row, press the seams to one side. For the next row, press the seams in the opposite direction. This technique, known as “nesting seams,” helps the fabric lie flat and makes the corners of your patchwork look sharp and professional.
As you progress through the Patchwork Curtain – Tutorial, keep a design board or a flat surface nearby. Periodically lay out your finished rows to ensure the color distribution remains balanced. If you notice too many dark colors clumping together, this is the time to swap squares before the final curtain assembly is completed.
Pinning is your best friend during this Patchwork Curtain – Tutorial. When joining the long rows, pin at every intersection where the corners meet. This prevents the fabric from shifting under the sewing machine needle. A slow and steady pace during this part of the Patchwork Curtain – Tutorial will save you from using the seam ripper later.
To ensure durability, use a slightly smaller stitch length on your machine. Since a Patchwork Curtain – Tutorial involves many individual pieces, a tight stitch prevents the seams from opening under the weight of the fabric. Reinforcing the start and end of each row with a backstitch is a recommended SEO-friendly sewing tip for long-lasting home decor.
3 Adding the Header and Finishing the Edges
Now that the main body of your Patchwork Curtain – Tutorial is pieced together, it is time to focus on the header. The header is the top part where the curtain rod will slide through. In this Patchwork Curtain – Tutorial, we recommend a simple rod pocket design, which is achieved by folding the top edge down twice and sewing across.
The width of your rod pocket depends on the thickness of your curtain rod. For a standard rod, a 5 cm to 8 cm opening is usually sufficient. This Patchwork Curtain – Tutorial suggests measuring your rod first to ensure a smooth glide. A pocket that is too tight will make opening and closing your patchwork curtains a daily struggle.
Side hems are the next priority in our Patchwork Curtain – Tutorial. Fold the side edges in by 1 cm, press, and then fold another 2 cm and sew. This “double-fold hem” hides the raw edges of the fabric completely, protecting your Patchwork Curtain – Tutorial project from fraying and giving it a clean, store-bought appearance.
The bottom hem provides the “weight” that helps your curtain hang straight. In this Patchwork Curtain – Tutorial, we suggest a deeper bottom hem of about 10 cm. This extra fabric adds a bit of gravity to the patchwork, ensuring it doesn’t flutter too much with every breeze and sits elegantly against the window frame.
If you want a more decorative look, this Patchwork Curtain – Tutorial can be adapted to include tabs or rings. However, for a classic look that highlights the patchwork patterns, the rod pocket remains the most popular choice. Whichever method you choose, ensure the stitching is straight, as the header is often the most visible part of the curtain.
Finally, give the entire piece a final steam press. This is the “magic touch” of the Patchwork Curtain – Tutorial. Pressing settles the stitches into the fiber and smooths out any minor puckering. Your Patchwork Curtain – Tutorial project is now nearly finished and ready to transform the light entering your home into a mosaic of colors.
4 Care and Maintenance for Handmade Patchwork
To keep your Patchwork Curtain – Tutorial creation looking beautiful for years, proper care is essential. Since these are made of multiple fabric types, hand washing or using a delicate cycle in cool water is highly recommended. This protects the patchwork seams from the agitation of a heavy-duty wash cycle.
Drying your curtains correctly is a vital part of the Patchwork Curtain – Tutorial aftermath. Avoid the tumble dryer, as the heat can shrink the cotton unevenly and damage the integrity of the threads. Instead, hang your Patchwork Curtain – Tutorial project back on the rod while slightly damp or lay it flat on a clean towel to air dry.
Over time, sunlight can be harsh on fabric. To extend the life of your Patchwork Curtain – Tutorial work, consider adding a plain white lining to the back. A lining acts as a barrier against UV rays, preserving the vibrant colors of your patchwork and providing extra insulation for your windows during the winter months.
Ironing your curtains while they are still slightly damp will produce the best results. Use a medium heat setting and avoid sliding the iron back and forth aggressively, which can stretch the patchwork out of shape. Instead, use a “press and lift” motion, which is a common technique used by professional quilters and featured in this tutorial.
If you notice a loose thread or a small gap in a seam, repair it immediately. Because a Patchwork Curtain – Tutorial piece is composed of many small parts, one loose seam can eventually affect the surrounding squares. A quick hand-stitch with matching thread will keep your handmade decor in top condition for a long time.
Lastly, enjoy the process of rotating your curtains or making new ones for different seasons. The skills you learned in this Patchwork Curtain – Tutorial are transferable to many other projects, such as pillows, table runners, or even full-sized quilts. Handcrafted items like these bring a warmth to a home that mass-produced items simply cannot replicate.
FAQ – Frequently Asked Questions
How much fabric do I need for a standard Patchwork Curtain – Tutorial project?
The amount depends on your window size. Typically, for a standard window, you will need approximately 4 to 5 meters of total fabric if you are using 15 cm squares. It is always better to have a little extra for mistakes or matching patterns.
Can I use old clothes for this Patchwork Curtain – Tutorial?
Yes! Upcycling is a fantastic way to create a Patchwork Curtain – Tutorial. Just make sure the fabrics are of similar weight and are not too stretchy, like jersey, which can be difficult for beginners to sew into straight lines.
Do I need a quilting machine for a Patchwork Curtain – Tutorial?
No, a standard domestic sewing machine is perfectly fine. As long as your machine can do a straight stitch and handle a few layers of cotton, you can successfully complete this Patchwork Curtain – Tutorial.
Is a lining necessary for a patchwork curtain?
While not strictly necessary, a lining is highly recommended. It protects the fabric from sun damage and hides the messy “wrong side” of the patchwork seams, making the curtain look professional from both inside and outside the house.
How do I make sure my squares line up?
The secret is consistent cutting and using a fixed seam allowance. Using a quarter-inch foot on your sewing machine can help you maintain the same distance from the edge for every single square in your Patchwork Curtain – Tutorial.
Can I wash my patchwork curtain in the machine?
Yes, but use a “delicate” or “hand wash” setting with cold water. To prevent the colors from bleeding, you can add a “color catcher” sheet to the wash. Always air dry your patchwork projects.
Conclusion
In this Patchwork Curtain – Tutorial, we have covered everything from the initial planning and fabric selection to the technical details of piecing squares and finishing hems.
You have learned that creating a Patchwork Curtain – Tutorial is an accessible way to customize your home while developing valuable sewing skills. By focusing on SEO-optimized techniques like precise cutting and careful pressing, you can ensure your project looks professional and lasts for many years.