The 3D Tumbling Quilt Blocks – Pattern is a captivating and visually striking design that has become a favorite among quilters who enjoy geometric patterns with depth and dimension.
Known for its optical illusion effect, this block design appears as if cubes are stacked and tumbling forward on the surface of the quilt, creating a mesmerizing 3D look that’s both classic and modern.
One of the things that makes the 3D Tumbling Quilt Blocks – Pattern so appealing is its ability to play with color, contrast, and light.
With careful fabric selection, quilters can enhance the three-dimensional effect, making each block stand out or blend seamlessly into the next. It’s the kind of pattern that makes people stop and say, “Wow, how did you make that?”
In this article, we’ll walk you through the construction, materials, tips for selecting the right fabrics, layout techniques, and ideas for personalization. Whether you’re a seasoned quilter or someone looking to challenge themselves with a new project, learning to make the 3D Tumbling Quilt Blocks – Pattern will elevate your quilting game to the next level.
1. What Makes the 3D Tumbling Quilt Block Unique
The 3D Tumbling Quilt Blocks – Pattern is special because it mimics the illusion of stacked cubes using only flat fabric pieces. It draws inspiration from classic geometric art and takes advantage of shading and color placement to trick the eye into seeing three dimensions.
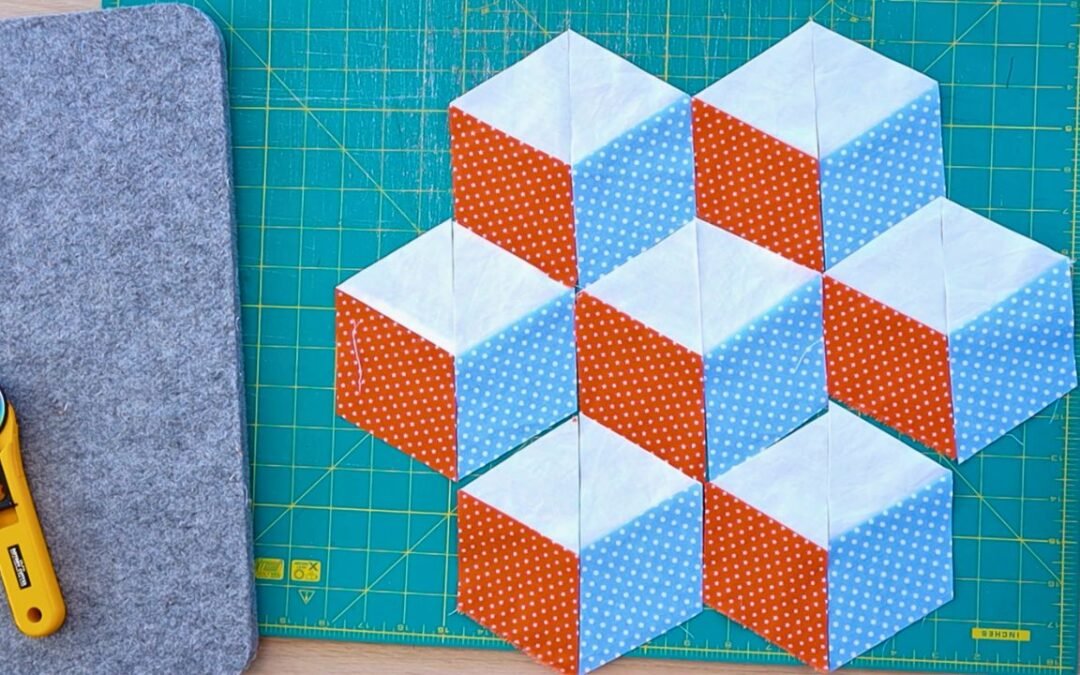
Each block typically consists of three diamond-shaped pieces that come together to form a hexagon or cube-like shape. When repeated across the quilt, the blocks connect to create an endless field of tumbling cubes, hence the name. This interlocking design is both orderly and dynamic.
Unlike simpler block patterns, the 3D tumbling block requires careful attention to color placement. Each cube uses a light, medium, and dark fabric. This trio helps to simulate how light hits an object in real life, giving the illusion of depth and form.
The pattern works well in both solid fabrics and prints, although solids are more commonly used for a stronger 3D effect. High contrast between light and dark values is key to creating the illusion, while medium tones add smooth transitions and dimension.
It’s also a design that works across quilt sizes. Whether you want a small wall hanging or a full-sized bed quilt, the 3D Tumbling Quilt Blocks – Pattern can scale beautifully. You just adjust the size of the diamonds and the number of blocks used.
What’s more, once you understand how the tumbling block works, you can experiment with different variations—offset blocks, multicolor cubes, or even combining it with other geometric patterns for a truly custom quilt.
2. Materials and Tools Needed for 3D Tumbling Blocks
To begin working on the 3D Tumbling Quilt Blocks – Pattern, you’ll need a selection of fabrics in three values: light, medium, and dark. These values are essential in achieving the 3D effect, so choose fabrics with strong contrast between them.
Solid fabrics are ideal for first-timers because they clearly show the depth illusion. However, textured solids or subtle prints can also be effective if they don’t distract from the light/dark contrast. It helps to test your fabrics in black and white photos to evaluate value difference.
You’ll need a rotary cutter, cutting mat, and quilting ruler. A diamond template or a 60-degree triangle ruler is also necessary for accurately cutting the pieces that will make up the blocks. Precision is critical, especially for matching seams.
In addition to your cutting tools, a sewing machine with a reliable 1/4-inch seam allowance will help keep your blocks uniform. A steam iron is crucial too—pressing your seams open or to one side will make the final quilt top smoother and easier to quilt.
Thread in a neutral or matching color will work well for piecing. You’ll also need pins or fabric clips to hold your pieces in place while sewing, especially when aligning angles and intersections.
Finally, make sure you have a printed or digital version of your 3D Tumbling Quilt Blocks – Pattern to follow along. Many patterns offer layout diagrams that show the correct arrangement of colors and blocks, which is especially helpful when sewing your quilt top together.
3. How to Piece the 3D Tumbling Block
Constructing the 3D Tumbling Quilt Blocks – Pattern begins with cutting precise diamond shapes. These diamonds are usually made from strips of fabric cut at a 60-degree angle. Each cube block will require three diamonds: one light, one medium, and one dark.
Lay out the three diamonds in a “Y” shape, with each color representing a side of the cube. This layout is essential because the orientation of the light, medium, and dark diamonds determines how the 3D effect appears.
Begin sewing two of the diamonds together along one edge, using a 1/4-inch seam allowance. Press the seam carefully, then add the third diamond to complete the unit. This process creates a three-diamond block that looks like a single cube.
Continue making multiple units using the same color layout or mix them for a patchwork effect. You can experiment with different orientations to change the direction in which the cubes seem to tumble.
Once you have a number of completed cube units, begin joining them in rows. The trick is to keep the alignment clean so the edges of the diamonds line up and the 3D illusion remains consistent across the quilt.
Finally, when assembling the full quilt top, use triangle or half-hexagon shapes to fill in the edges if needed. This will square off the sides of your quilt and make binding easier.
4. Tips for Color Layout and Creative Variations
Choosing the right color layout is key when working with the 3D Tumbling Quilt Blocks – Pattern. The depth and realism of the cubes depend heavily on how your fabrics are arranged.
One popular layout is the monochromatic cube, where each cube uses different shades of the same color—light blue, medium blue, and dark blue, for example. This creates a uniform yet dynamic look across the quilt.
Another option is the scrappy cube layout, where each cube is made from different fabric colors, creating a rainbow or mosaic effect. This version is playful and great for using up fabric scraps.
You can also experiment with negative space by using a single color (such as white or gray) in place of one of the cube sides across the quilt. This creates a striking modern design with an architectural feel.
For more advanced projects, try creating offset rows or combining tumbling blocks with other geometric blocks like stars or hexagons. This can add movement and complexity to your quilt design.
Consider using batik fabrics or fabrics with a subtle directional print to give texture to your blocks. Just be cautious that the prints don’t clash or flatten the 3D effect.
Lastly, don’t forget the quilting stage. Use echo quilting or straight-line quilting that follows the cube edges to enhance the three-dimensional look. Quilting can add shadows and structure that make the cubes pop even more.
FAQ – 3D Tumbling Quilt Blocks – Pattern
Q1: Is the 3D Tumbling Quilt Block good for beginners?
It’s suitable for confident beginners with some experience in piecing and using templates. Precision is key, but the pattern is manageable with attention to detail.
Q2: How do I ensure the 3D effect works?
Use high-contrast fabrics for light, medium, and dark values. Test your layout before sewing, and take a photo in black and white to check value contrast.
Q3: What is the best fabric to use?
Solid cotton fabrics are ideal, but subtle tone-on-tone prints can also work if they don’t overwhelm the value contrast.
Q4: Can I use precuts like jelly rolls or charm packs?
Precuts may work for smaller blocks, but you’ll likely need to trim them into diamonds. Strips are useful for creating consistent diamonds if wide enough.
Q5: How do I avoid stretched or distorted diamonds?
Always cut on the grain when possible and handle the bias edges gently. Press instead of ironing to avoid stretching.
Q6: Can I make a modern version of this quilt?
Absolutely! Use grayscale fabrics, minimal colors, or mix in modern quilt blocks to create a unique, contemporary design.
Conclusion
The 3D Tumbling Quilt Blocks – Pattern is a fascinating and creative journey into the world of visual illusion through quilting. With the right fabrics, tools, and attention to detail, you can create a show-stopping quilt that combines geometry, artistry, and functionality.
We explored what makes the pattern unique, how to choose your materials, step-by-step construction techniques, and creative ways to make your quilt truly one-of-a-kind. The possibilities are endless once you understand the fundamentals.
If this guide helped you get started or inspired your next quilt project, please leave your honest opinion and any suggestions in the comments. Your feedback supports our growing community of quilters and creators—and we can’t wait to see what you’ll make next!