The Altar Quilt Block pattern is a unique and beautiful design often used for quilt-making, reflecting elegance and symmetry.
If you’ve ever wondered how to create this intricate yet stunning pattern, you’re in the right place.
In this guide, we’ll take you through the steps of creating an Altar Quilt Block and help you understand the techniques that make it so appealing.
Whether you’re an experienced quilter or a beginner looking to challenge yourself, this article will provide you with everything you need to know to create your very own Altar Quilt Block.
Creating a quilt block is not just about piecing fabric together – it’s about designing a pattern that speaks to your personal style and creativity. The Altar Quilt Block is characterized by its geometric shapes, sharp lines, and careful stitching that come together to form a beautiful block. The symmetrical design is perfect for both traditional and modern quilt styles, making it versatile enough to fit into any quilt project.
Throughout this article, you will learn how to make your own Altar Quilt Block pattern, how to choose fabrics that complement the design, and tips for perfecting the quilting process. By the end of this guide, you’ll have a complete understanding of how to assemble the pieces, which tools to use, and how to customize your block for a finished quilt that will truly shine.
1. Materials Needed for the Altar Quilt Block
Before you can begin creating your Altar Quilt Block, you will need to gather all the necessary materials. Having the right tools and fabrics will ensure that your quilt block turns out perfectly. Here are the essential materials you will need:
- Fabric: The fabric you choose plays a significant role in the look of your quilt block. For an Altar Quilt Block, you’ll want a variety of fabrics that contrast well with each other. Choose one or two solid fabrics for the background and a selection of patterned fabrics for the central design. You can go for classic colors or try something modern with bold and vibrant patterns.
- Rotary Cutter and Mat: A rotary cutter will make it easier to cut the fabric into precise shapes. A cutting mat is also essential to protect your work surface and ensure that your cuts are straight and accurate.
- Ruler: A quilting ruler helps to measure and cut your fabric pieces with precision. Make sure your ruler is long enough to cover the width of the fabric strips.
- Needle and Thread: Choose a sturdy needle suitable for quilting, along with a matching thread. A good quality cotton thread will work best to ensure durability and a clean finish.
- Iron and Ironing Board: Pressing your fabric before piecing it together is essential to achieve crisp seams and accurate measurements. Having a hot iron and ironing board on hand will be helpful throughout the quilting process.
- Quilting Pins: Pins are essential for holding the fabric pieces together as you sew. You can use them to secure the pieces before stitching.
With these materials, you’ll be ready to dive into creating your Altar Quilt Block pattern!
2. Understanding the Basic Structure of the Altar Quilt Block
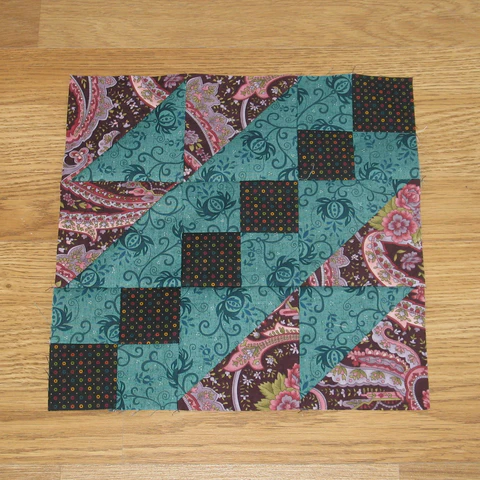
The Altar Quilt Block has a simple yet structured design that revolves around straight lines and sharp angles. It usually consists of several key components that come together to form a balanced block. Here’s a breakdown of the basic elements you need to understand before starting:
- Square Center: The focal point of the Altar Quilt Block is often a central square. This square is typically made from contrasting fabric, which makes it stand out against the rest of the block. The size of the center square will depend on the overall size of your block.
- Geometric Shapes: The surrounding pieces of the quilt block often form geometric shapes like triangles or diamonds. These shapes are arranged around the center square, and their precise placement creates the symmetrical look of the Altar Quilt Block.
- Seams and Points: The key to making the Altar Quilt Block pattern stand out is creating crisp seams and points. This requires careful attention to detail, especially when piecing the triangle sections together. Precision is crucial to ensure that the points match up correctly and that the block retains its geometric integrity.
- Borders: The border of the block is just as important as the center and surrounding shapes. The border can be made from a solid fabric or a combination of prints. It frames the design and adds balance to the overall block.
- Sashing: In some versions of the Altar Quilt Block, additional sashing (narrow strips of fabric) is added around the block to separate it from other blocks in the quilt. This can give your quilt a more cohesive and finished look.
With this basic structure in mind, you can begin planning the layout and assembly of your Altar Quilt Block.
3. Step-by-Step Guide to Creating Your Altar Quilt Block
Now that you have a solid understanding of the structure, it’s time to begin the process of creating your Altar Quilt Block. Here’s a simple, step-by-step guide to get you started:
Step 1: Cutting the Fabric
Start by cutting the fabric pieces. You’ll need:
- One square for the center (the size will depend on your preferred block size).
- Several smaller squares or triangles for the surrounding geometric shapes.
- Border pieces to frame the block.
Use your rotary cutter and ruler to cut the pieces precisely.
Step 2: Assembling the Geometric Shapes
Begin by piecing together the smaller squares or triangles to form the geometric shapes around the center square. Take your time to ensure that each piece is sewn together neatly, pressing each seam as you go.
Step 3: Attaching the Center Square
Once the surrounding shapes are pieced together, sew the center square to the fabric pieces. Make sure the edges align properly to maintain the symmetry of the design.
Step 4: Adding the Border
Once the main block is assembled, add the border pieces. These should be the last elements you sew onto the block. Trim any excess fabric to ensure that the block is a uniform size.
Step 5: Pressing and Final Touches
Once everything is sewn together, give your Altar Quilt Block a good press with an iron. This will help smooth out any wrinkles and ensure that the seams lay flat. Trim any stray threads, and your block is ready for use!
4. Tips for Customizing Your Altar Quilt Block
While the Altar Quilt Block pattern is beautiful on its own, there are many ways to customize it and make it your own. Here are some ideas to add a personal touch:
- Fabric Selection: Experiment with different fabrics for the center square, borders, and geometric shapes. For a modern look, try using bold, contrasting colors or metallic fabrics. For a traditional quilt, stick to classic prints like florals or checks.
- Sashing: Consider adding sashing between the blocks to give your quilt a more polished, cohesive appearance. You can use a contrasting color or pattern for the sashing to make it pop.
- Block Size: You can make your Altar Quilt Block larger or smaller by adjusting the size of the pieces. If you want a larger quilt, simply increase the size of the squares and triangles.
- Quilting Stitches: Once your blocks are pieced together, experiment with different quilting stitches to enhance the design. From straight lines to intricate patterns, the stitching will add texture and dimension to your quilt.
With these tips, you can personalize your Altar Quilt Block and create a quilt that reflects your own unique style.
FAQ: Common Questions About the Altar Quilt Block Pattern
1. What is the size of an Altar Quilt Block? The size of an Altar Quilt Block can vary depending on your design preferences. A typical block size is around 12 to 14 inches, but you can adjust the size to suit your quilt’s needs.
2. Can I use different fabrics for each block? Yes, you can use a variety of fabrics for each Altar Quilt Block. Mixing different fabrics can add depth and interest to your quilt. However, it’s important to keep the color scheme cohesive for a balanced look.
3. Is the Altar Quilt Block pattern beginner-friendly? The Altar Quilt Block is suitable for quilters with basic to intermediate skills. While the pattern may require some precision, it’s a great project for quilters who want to challenge themselves.
4. How can I make my quilt blocks more precise? To ensure that your Altar Quilt Block pieces fit perfectly, always measure and cut your fabric pieces accurately. Press your seams flat, and take your time when piecing the blocks together.
5. Can I hand-sew the Altar Quilt Block instead of using a sewing machine? While using a sewing machine is faster and more efficient, you can certainly hand-sew the Altar Quilt Block if you prefer. Just be sure to use small, even stitches for a clean, neat finish.
Conclusion
In this article, we’ve explored the steps to creating your own Altar Quilt Block, from gathering materials to customizing the design. The process of piecing together this beautiful pattern is both rewarding and creative. With attention to detail and the right techniques, you can create stunning quilt blocks that will be the foundation of your next quilt project.
We hope you’ve found this guide helpful in your quilting journey. Don’t forget to leave a comment with your thoughts, experiences, or any suggestions you might have for future articles. Happy quilting!