If you’re passionate about quilting and love exploring timeless designs, the Basket Weave Quilt Block – Pattern is a beautiful and versatile option to add to your repertoire.
Its interlocking strips create the illusion of a woven basket, offering a stunning texture that works wonderfully in both traditional and modern quilt projects.
Whether you’re a beginner or a seasoned quilter, this block pattern is a rewarding and satisfying piece to master.
The beauty of the Basket Weave Quilt Block – Pattern lies in its simplicity and elegance. It mimics the visual appearance of basketry using just fabric and seams, creating depth and interest in any quilt layout. Plus, it’s a fantastic way to use up fabric strips or jelly rolls, making it both economical and scrap-friendly. With a bit of careful alignment, you’ll soon have a quilt block that appears far more complex than it actually is.
In this guide, we’ll walk you through everything you need to know to create your own Basket Weave Quilt Block – Pattern — from fabric selection and cutting to piecing and styling. You’ll also find helpful tips to ensure accuracy and ideas to personalize your project for a truly custom finish.
1. Choosing Fabrics and Planning Your Basket Weave Quilt Block
To get started with the Basket Weave Quilt Block – Pattern, you’ll need to carefully consider your fabric choices. The block relies heavily on contrast and fabric placement to achieve the woven effect, so your colors and patterns should be chosen thoughtfully.
Opt for a mix of light and dark fabrics to highlight the woven illusion. High contrast between the “strips” helps create visual depth. Solid colors work well, but subtle prints or textured fabrics can also add richness without overwhelming the design.
You can use pre-cut strips (like 2.5” jelly roll strips) to save time, or cut your own from fabric yardage. This pattern is excellent for using up leftover strips from previous projects, making it a great stash-buster option.
Plan your color layout before you begin cutting. Laying out your pieces in advance helps you visualize how the strips will intersect and “weave” together. This step is particularly important if you’re making multiple blocks and want consistency in your quilt.
Consider using a design wall or photo editing app to try out different color combinations. This can help you avoid clashing tones or confusing layouts once the sewing begins.
Finally, make sure all your fabrics are pre-washed and pressed before cutting. This helps prevent shrinking later and ensures accurate cutting and piecing, which is crucial in achieving the crisp, clean lines that make the Basket Weave Quilt Block – Pattern so striking.
2. Cutting and Assembling the Fabric Strips
Once your fabrics are chosen, it’s time to cut and prepare the pieces for your Basket Weave Quilt Block – Pattern. Accuracy is key in this step, as uneven cuts can throw off the alignment and make the woven design look messy.
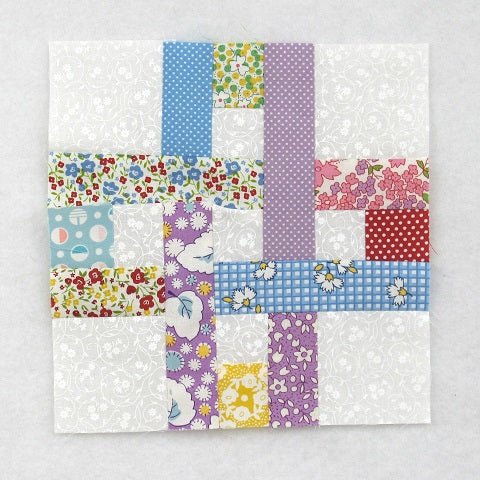
Most patterns call for uniform rectangles or strips, usually in widths of 2.5” to 3.5” depending on the desired block size. A typical block may consist of nine rectangles arranged in a grid-like layout, alternating direction to simulate weaving.
Using a rotary cutter, self-healing mat, and quilting ruler will help you achieve precise, straight cuts. Stack multiple layers of fabric for quicker cutting if you’re confident in your measurements.
Once the strips are cut, start arranging them into rows. Usually, the top and bottom rows will have vertical strips, while the center row has horizontal ones (or vice versa, depending on the variation you choose). This alternation creates the woven illusion.
Pin or clip your pieces together before stitching to keep everything aligned. Sewing the strips with a consistent ¼ inch seam allowance is crucial. Be sure to press seams after each row to reduce bulk and improve accuracy.
As you piece each row, double-check the placement and alignment of the strips. Even small errors can distort the basket weave effect, so take your time and adjust as needed. Patience here will pay off in the final look of your Basket Weave Quilt Block – Pattern.
3. Pressing, Squaring, and Piecing Blocks Together
Once you’ve sewn your strips together into rows and joined them into a completed block, pressing and squaring the block is the next essential step. This ensures that your Basket Weave Quilt Block – Pattern will fit perfectly with other blocks in a quilt top.
Start by pressing all the seams carefully. Use a hot iron and press (not slide) to avoid distorting the fabric. Press seams open or to one side, depending on your preference and bulk at intersections.
After pressing, measure your block. Use a square quilting ruler to check that each side is even and that corners are at perfect right angles. If the block is slightly off, you may need to trim it down — but be careful not to trim too much or alter the woven effect.
If you’re making multiple blocks, consistency in size and seam allowance is crucial. Slight variations can accumulate, making it difficult to assemble the quilt top later. Always square each block before moving on.
At this stage, you can begin thinking about how to join your Basket Weave Quilt Block – Pattern with others. Sashing between blocks can help highlight the woven design, while setting blocks on-point adds movement and variety.
Consider alternating basket weave blocks with solid blocks, nine-patch blocks, or other traditional styles. This keeps the eye engaged and adds dimension to your overall quilt layout.
No matter how you assemble them, maintaining precision and consistency is key. The basket weave design is subtle yet visually impactful, and careful piecing ensures your quilt top looks polished and professional.
4. Styling, Quilting, and Finishing Ideas
Now that your blocks are assembled, it’s time to think about quilting and finishing your Basket Weave Quilt Block – Pattern project. This is where you bring your creative vision to life and decide how to style your final piece.
If you’re making a full quilt, decide on a layout. You can arrange your basket weave blocks in a traditional grid or alternate them with different blocks for a more eclectic design. You might even use just a few blocks as a central motif or border detail.
When it comes to quilting, straight-line quilting works beautifully with this pattern, emphasizing the woven grid look. You can stitch in the ditch (along the seams) or use diagonal lines to contrast with the strip direction.
Free-motion quilting is also a great option for adding texture. Swirls, feathers, or pebbles in the background areas can enhance the woven effect and give your quilt an artistic finish.
For a modern look, consider using bold solids or high-contrast monochromes in your Basket Weave Quilt Block – Pattern. For a more vintage style, use reproduction prints or soft pastels with low-volume backgrounds.
The pattern also lends itself well to smaller projects — such as quilted pillows, table runners, or wall hangings. Just one or two blocks can make a big visual impact when styled correctly.
Finally, bind your quilt or project with a complementary or contrasting fabric. Don’t forget to label and date your quilt — a handmade basket weave project deserves to be remembered and appreciated for years to come.
FAQ – Basket Weave Quilt Block – Pattern
1. Is the Basket Weave Quilt Block – Pattern suitable for beginners?
Yes! It’s a great beginner project. The construction involves simple rectangles and straight-line sewing, making it approachable while still delivering a complex-looking result.
2. What is the typical finished size of a basket weave quilt block?
Common sizes include 9” x 9” or 12” x 12”, but you can scale it up or down based on your strip widths and number of pieces.
3. Can I use pre-cut fabric like jelly rolls for this pattern?
Absolutely. Jelly rolls are perfect for this pattern and save cutting time. Just make sure the lengths match your pattern dimensions.
4. How do I prevent my blocks from becoming distorted?
Accurate cutting, consistent seam allowances, and careful pressing are key. Use a ruler and square up your blocks before assembly.
5. What types of quilts can I make using this block?
You can make full-sized quilts, baby quilts, runners, pillows, or even use a single block as part of a sampler quilt.
6. How do I add a modern twist to this traditional pattern?
Use bold color blocking, high contrast fabrics, or asymmetrical layouts. Negative space and minimalist design pair well with the basket weave block.
Conclusion
The Basket Weave Quilt Block – Pattern is a timeless, flexible design that offers visual interest and endless customization opportunities. From fabric selection to the final quilt stitch, this pattern allows you to express creativity while maintaining clean, classic lines that mimic woven textures.
We’ve covered everything you need to create your own basket weave blocks, including material selection, cutting and piecing techniques, assembly tips, and styling options. Whether you’re creating a cozy quilt or a modern wall hanging, this pattern is sure to impress.
We’d love to hear from you! Please leave a sincere comment below sharing your thoughts, tips, or ideas for variations. Have you made a quilt with this pattern? How did you personalize it? Your feedback helps build a vibrant and supportive quilting community for everyone.