If you’re searching for a quilting design that is both visually stunning and rich with traditional charm, the Braided Star Quilt Block – Pattern is a perfect choice. This pattern combines intricate angles and bold geometry, resulting in a design that catches the eye and showcases your piecing skills. Despite its detailed appearance, this quilt block is accessible to intermediate quilters and even ambitious beginners with a little patience.
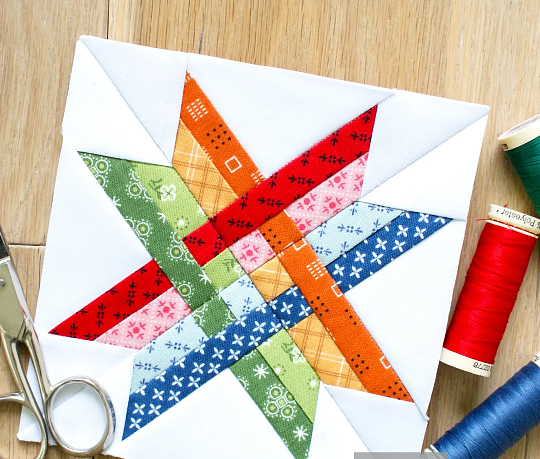
The Braided Star Quilt Block – Pattern creates a beautiful interwoven star effect by using strips of fabric arranged in a braided fashion. The result is a dynamic and dimensional block that can be used in standalone projects like pillows, table runners, or pieced together to form a full-sized quilt. Its versatility, along with the endless fabric combinations possible, makes it a favorite in both modern and traditional quilting circles.
In this guide, you’ll learn everything you need to know to master the Braided Star Quilt Block – Pattern, including choosing fabrics, cutting techniques, piecing strategies, and creative uses. You’ll also find a detailed FAQ section addressing common questions and helpful advice to ensure your success, along with a thoughtful conclusion to inspire your next quilting project.
1. What Makes the Braided Star Quilt Block Unique?
The Braided Star Quilt Block – Pattern stands out for its complex appearance, though its construction can be broken down into manageable steps. The design mimics the look of woven or braided fabric, giving it depth and movement that isn’t always present in standard block patterns.
At the heart of this block is its strip-piecing technique, where fabric strips are sewn together in a deliberate order to form the star’s arms. This braiding effect isn’t just visually striking—it also allows for high contrast between fabrics, which can make the star “pop” against its background.
This block offers a great opportunity to experiment with color theory. You can create bold contrast by using dark and light fabrics in alternating positions or keep it soft and subtle by choosing analogous colors. The way the colors flow through the star’s braided design adds an extra layer of artistry to your quilt.
Another advantage of the Braided Star Quilt Block – Pattern is its ability to serve as either a focal point or a repeating motif. A single block framed in a wall hanging looks just as stunning as a quilt filled with dozens of braided stars. The flexibility is ideal for creative quilters who want to put their own twist on a traditional motif.
Because of its modular design, the block also lends itself well to quilting bees or collaborative projects. Each quilter can create a braided star using their own fabric scraps, which can be combined into a quilt filled with personality and history.
Learning this pattern can improve your accuracy and cutting skills. While not overly complex, it requires attention to alignment and seam allowances, helping you develop techniques that will serve you well in future quilting endeavors.
2. Materials, Tools, and Fabric Selection Tips
To start creating your Braided Star Quilt Block – Pattern, you’ll need basic quilting supplies, as well as carefully selected fabric strips to bring out the best in this intricate design. Proper preparation is key to ensuring each piece aligns perfectly and the star takes shape beautifully.
Begin by choosing three to five coordinating fabrics. These should include a mix of light, medium, and dark tones to create contrast in your braided sections. Using fabrics from the same color family but different prints can add depth without overwhelming the design.
You’ll need a rotary cutter, quilting ruler, and cutting mat to ensure your strips are cut precisely. Consistent width is essential, especially when dealing with the angles in the braided portions of the block. A 2-inch width is common for this design, but always check your specific pattern instructions.
In addition to fabric, gather your standard sewing tools: a sewing machine with a ¼-inch foot, matching thread, pins or clips, and an iron for pressing seams. Accuracy in your seams is important, as small errors can compound across multiple strips and disrupt the symmetry of your star.
A template or foundation pattern can be helpful for beginners. Some quilters prefer to paper piece this block for greater precision, while others use strip piecing and trim as they go. Choose the method that matches your skill level and available tools.
Consider using scraps or pre-cut fabric strips (jelly rolls) for a scrappy or colorful effect. The braided design is a great stash-buster, making it ideal for quilters who love using leftover fabrics from past projects.
Finally, keep your ironing station close. Pressing between each step—not just at the end—is vital to maintaining accuracy. Press seams either open or to one side, depending on how the pieces nest together. Clean, crisp seams will help your star lay flat and look professionally finished.
3. Step-by-Step Assembly of the Braided Star Quilt Block
Now let’s walk through how to build the Braided Star Quilt Block – Pattern. This block is typically made by piecing together eight braided star points and arranging them around a center square. Each star point is built from overlapping fabric strips that angle outward to create a woven appearance.
Start with a center square, usually in a contrasting or focal fabric, which acts as the anchor for your block. The size of this square will dictate the scale of the finished block, so refer to your pattern for exact measurements.
Create your braided strips by layering fabric strips diagonally, starting with a short center piece and adding angled strips to each side. Alternate sides as you go, pressing after each addition. This builds the visual braid effect. You’ll need four left-facing and four right-facing strips to complete the star.
Once all eight braided points are finished, trim them to match the pattern shape. Accuracy is key here—each point should be symmetrical and match the size needed to fit cleanly around the center square.
Join two opposing star points to opposite sides of the center square. Then, add the remaining four points to the corners, forming the full star shape. If needed, you can trim the block slightly to square it up before final assembly.
Sew the block together in rows or in quadrants, depending on your preference. Maintain a consistent seam allowance and double-check that your points meet cleanly at the center. Nest seams where possible for a smooth finish.
After assembling the block, press it well and inspect for any needed touch-ups. Your finished Braided Star Quilt Block should be flat, balanced, and ready to use in a larger project—or framed on its own as a beautiful piece of textile art.
4. Creative Uses for the Braided Star Quilt Block
Once you’ve mastered the Braided Star Quilt Block – Pattern, you’ll find dozens of ways to showcase this eye-catching design. Its balance of geometry and softness makes it a standout choice for both modern and traditional quilting projects.
Create a wall hanging using a single large Braided Star block, bordered with coordinating fabric and quilted with echo lines that highlight the star’s shape. Add a hanging sleeve and display it as a seasonal or everyday décor piece.
Incorporate several blocks into a throw or bed quilt, alternating with solid or low-volume blocks to let the stars shine. Sashing between blocks can help define each star and reduce visual clutter if you’re using busy prints.
Turn your blocks into decorative pillows by quilting them lightly and adding a backing. These make excellent gifts and can add a cozy, handmade touch to living spaces. Choose soft batting to keep the pillow comfortable.
Use the pattern for holiday-themed projects by selecting fabrics in seasonal colors. Think red and green for Christmas, orange and black for Halloween, or pastel shades for spring. The star motif works wonderfully for many occasions.
The braided star design also lends itself to table runners or placemats. A row of blocks stitched together with minimal borders can make a bold statement on your dining table. Finish with a neat binding for a polished look.
If you’re feeling adventurous, explore quilting competitions or exhibits. The intricate appearance of the Braided Star Quilt Block often impresses judges and audiences alike. Add personal flair with embroidery or custom quilting to set your piece apart.
FAQ: Common Questions About the Braided Star Quilt Block – Pattern
Q1: Is the Braided Star Quilt Block suitable for beginners?
A: Yes, ambitious beginners can make this block, especially if they’re comfortable with accurate cutting and seam allowances. Using templates or foundation paper piecing can help with precision.
Q2: What size should the block be?
A: Block sizes vary by pattern, but common sizes are 12”, 16”, or even larger. Always check your chosen pattern for measurements and scaling instructions.
Q3: Can I use scraps to make a Braided Star block?
A: Absolutely! This pattern is a great way to use fabric scraps or jelly roll strips. Just make sure your strips are consistent in width for best results.
Q4: Should I press seams open or to the side?
A: It depends on your construction method. Pressing open can reduce bulk, while pressing to the side helps with nesting seams. Try both and see what works best for your style.
Q5: How can I make sure the star points align properly?
A: Careful measuring, trimming, and pressing between steps are key. Using a design wall or flat surface to lay out the pieces before sewing helps ensure correct alignment.
Q6: Can I mix modern and traditional fabrics in one block?
A: Yes! The Braided Star design adapts well to different fabric styles. Combining vintage florals with bold solids can give the block a unique look.
Conclusion
The Braided Star Quilt Block – Pattern is a stunning blend of tradition and innovation, offering quilters a chance to create something truly special. Whether you use
it in a large quilt, a wall hanging, or a small home décor piece, this block has the potential to become a favorite in your collection.
We’ve explored what makes this pattern unique, how to prepare your materials, step-by-step construction tips, and creative ways to display your work. The FAQs addressed common concerns and offered helpful insights for beginners and experienced quilters alike.
If you’ve tried the Braided Star Quilt Block – Pattern, we’d love to hear from you. Please leave a sincere opinion or suggestions in the comments. Your feedback not only supports this community but also inspires others to start their quilting journey with confidence and creativity. Happy quilting!