The Broken Blocks Quilt – Pattern is a modern twist on traditional quilting, known for its stunning visual impact and surprisingly simple construction.
This quilt style is characterized by its fragmented block look, which creates an illusion of movement and disruption—while still maintaining harmony and structure.
It’s a favorite among quilters who love clean lines, geometric appeal, and a bold yet approachable aesthetic.
The name Broken Blocks Quilt – Pattern refers to the intentional “break” in the block design—typically created by offsetting or slicing through traditional square or rectangular patchwork units. This design trick adds interest and energy to the overall quilt without requiring advanced techniques. Even beginner quilters can achieve a professional, gallery-worthy result.
In this guide, you’ll learn everything you need to create your own Broken Blocks Quilt – Pattern. From choosing fabrics and cutting with confidence to piecing and finishing your quilt, this article provides a step-by-step roadmap. We’ll also explore creative variations and offer an FAQ section to answer popular online questions. Whether you’re sewing for yourself, a loved one, or even a quilt show, this pattern delivers bold design with easy execution.
1. What You Need to Get Started
Before diving into the creative process of the Broken Blocks Quilt – Pattern, it’s important to gather all the essentials to ensure a smooth experience and beautiful outcome.
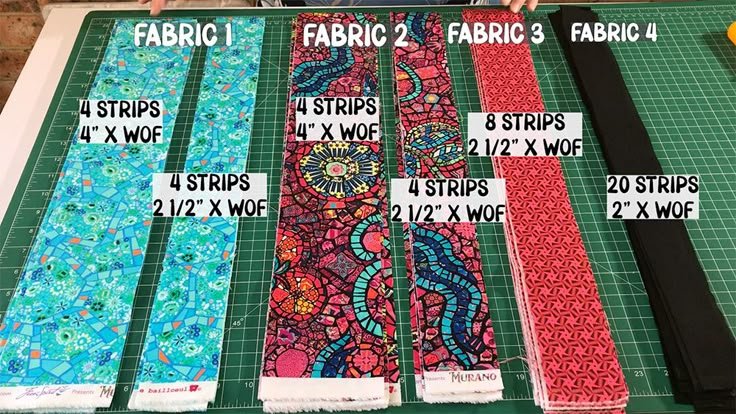
Start with fabric. A key to success in this pattern is contrast—think bold solids mixed with low-volume prints, or bright colors against dark backgrounds. You can use pre-cut fabrics like layer cakes or fat quarters, or cut your own squares from yardage. Choose 100% quilting cotton for durability and ease of sewing.
Next, make sure you have a sharp rotary cutter, a large self-healing cutting mat, and a long acrylic ruler (6” x 24” is ideal). These tools help maintain consistent measurements, which is crucial for accurate piecing, especially when creating the visual illusion of broken blocks.
For batting, choose a low- to medium-loft cotton or cotton/poly blend. This keeps the quilt lightweight but warm and allows the broken design lines to remain crisp after quilting. A coordinating backing fabric and binding will complete your material list.
Your sewing machine should be equipped with a ¼” quilting foot for precise seams. A walking foot is helpful during quilting if you’re going for straight-line or echo quilting, which complements the Broken Blocks Quilt – Pattern beautifully.
Finally, grab basic supplies: thread, pins or clips, a seam ripper (just in case!), and a pressing iron. Set up your workspace so it’s comfortable and functional—this project is fun, and the right setup makes it even more enjoyable.
With all your materials ready, you’re now prepared to begin creating your very own Broken Blocks Quilt – Pattern—a modern masterpiece that looks complex but is incredibly satisfying to make.
2. Cutting and Assembling the Blocks
Creating the visual appeal of the Broken Blocks Quilt – Pattern comes down to strategic cutting and piecing. This section guides you through that process step by step.
Start by cutting your fabric into consistent squares—common sizes include 10″ x 10″ or 12″ x 12″. You’ll be slicing these squares later, so accuracy matters. Stack several layers together with a sharp blade to save time, but be sure to cut slowly for clean edges.
The “broken” effect comes from slicing your blocks at different angles and reassembling them with insert strips or offset seams. You might cut each square in half diagonally or vertically, then add a contrasting strip in the middle before sewing them back together.
As you sew the pieces back into square shapes, make sure to maintain the original block size. You may need to trim each block to square them up again—this keeps the quilt top neat and makes the final assembly smoother.
Lay out your blocks on a design wall or large surface. Play with orientation—rotate blocks randomly or alternate directions to create visual tension and rhythm. This irregular placement is key to the “broken” illusion and gives your quilt a sense of motion.
Once your layout is set, begin sewing the blocks into rows using a consistent ¼” seam. Press seams to one side or open, depending on your preference. Then sew the rows together to complete your quilt top.
Don’t forget to measure the top before quilting—this helps ensure your backing and batting are the correct size and your quilt remains square after finishing.
3. Quilting and Finishing Techniques
Now that your Broken Blocks Quilt – Pattern top is assembled, it’s time to quilt, bind, and finish your project. These final touches will turn your work into a polished, usable quilt.
Start by creating your quilt sandwich: lay your backing fabric right side down, place the batting on top, then add your quilt top right side up. Smooth each layer carefully, avoiding puckers. Baste with safety pins or temporary adhesive spray.
For quilting, straight-line stitching is the perfect choice. It complements the blocky, geometric design of the Broken Blocks Quilt – Pattern and enhances the illusion of movement. Use your walking foot and quilt along seams or diagonally across the quilt for added texture.
Free-motion quilting is also an option if you want to add swirls, pebbles, or echo quilting around the broken blocks. This can provide contrast between the block structure and the quilting texture.
Once quilting is complete, trim the edges of your quilt sandwich to square everything up. Prepare your binding strips (2½” wide is standard), join them into a continuous strip, and attach to the front of the quilt using a ¼” seam.
Fold the binding over to the back and hand-stitch it down, or use machine binding if you prefer a quicker finish. Either method works well with the clean lines of this pattern.
Finally, label your quilt with your name, date, or message. It’s a small step that personalizes your quilt and adds meaning, especially if it’s a gift or keepsake.
4. Design Variations and Creative Ideas
The Broken Blocks Quilt – Pattern is wonderfully versatile, allowing you to express your creativity through color, size, and layout. Here are a few ideas to take your design even further.
Use a monochrome color scheme—try all blues or greys for a sophisticated, minimalist quilt. This highlights the broken block effect without the distraction of busy prints.
Want to go bold? Mix solids with large-scale prints. When sliced and reassembled, these prints create unexpected patterns and make your quilt visually dynamic.
For a scrappy look, use leftover fabric in a wide range of colors. This gives your quilt a playful, eclectic vibe, perfect for a cozy throw or a child’s room.
Experiment with negative space. Leave some blocks unbroken and surround them with broken ones to add contrast and draw the eye. This creates a sense of structure within the randomness.
Scale it down! Make a baby quilt using smaller squares or even turn a single broken block into a pillow or wall hanging. This lets you practice the technique on a small scale before committing to a full quilt.
Finally, share your finished quilt online or at local quilt guilds. Seeing how others interpret the Broken Blocks Quilt – Pattern can inspire new ideas and build your confidence as a quilter.
FAQ
Q: Is the Broken Blocks Quilt – Pattern suitable for beginners?
A: Yes! While the design looks complex, the construction is beginner-friendly with basic cutting, piecing, and straight-line quilting.
Q: What size blocks should I use?
A: Common sizes are 10″ or 12″ squares, but you can adjust to suit your design or fabric stash. Just maintain consistency across all blocks.
Q: Can I use pre-cuts like charm packs or layer cakes?
A: Absolutely. Layer cakes (10″ squares) are especially convenient for this pattern and save time on cutting.
Q: How do I keep the quilt looking balanced with random placement?
A: Use a design wall or lay the blocks on the floor to view the whole quilt. Step back often to check balance in color and orientation.
Q: What’s the best way to quilt this design?
A: Straight-line quilting works well and enhances the geometric look. Free-motion quilting can add texture but is optional.
Q: Can I make this quilt in different sizes?
A: Yes! Simply increase or decrease the number of blocks to scale the quilt up or down. It’s a flexible design for baby quilts, throws, or beds.
Conclusion
The Broken Blocks Quilt – Pattern is a modern classic that blends creativity, simplicity, and strong design elements. With its versatile layout and bold graphic appeal, it’s a favorite project for quilters of all levels. You’ve learned how to choose materials, cut and assemble your blocks, quilt with purpose, and explore unique variations.
Now it’s your turn—try this pattern and make it your own. Whether you’re creating for your home, a friend, or a show, this quilt delivers visual impact with beginner-friendly steps. Leave a comment with your experience, share your favorite color combinations, or suggest your own spin on the pattern—we’d love to hear from you! Happy quilting!