The Butterfly Social Quilt – Pattern is more than just a creative sewing project—it’s a beautiful expression of community, storytelling, and the shared love of quilting.
Whether you’re making it as part of a group project or as a personal heirloom, this quilt pattern captures the elegance of butterflies and the emotional warmth that handmade quilts are known for.
What makes the Butterfly Social Quilt – Pattern so special is its symbolic nature. Butterflies represent transformation and freedom, and when combined in a quilt filled with colors, patterns, and pieces from different people or sources, they come alive in a deeply meaningful way.
It’s called a “social quilt” because it often brings people together—quilting circles, families, or online communities sharing blocks and stories.In this article, we’ll explore everything you need to know to begin your journey with the Butterfly Social Quilt – Pattern. From fabric selection to block construction and layout ideas, you’ll learn how to create a stunning butterfly-themed quilt that carries both beauty and heart. Whether you’re quilting solo or joining others, this guide is designed to support your creativity every step of the way.
1. Understanding the Meaning and Structure of a Butterfly Social Quilt
A Butterfly Social Quilt – Pattern is rich with meaning and invites creativity and connection among crafters.
This type of quilt often includes butterfly blocks contributed by different people or designed to reflect different styles, stories, or emotions. Each butterfly becomes a symbol of transformation, hope, and diversity. It’s perfect for memory quilts, donation projects, or friendship quilts where multiple makers contribute.
The “social” aspect refers to collaboration. Whether you’re working on this with a quilting guild, classroom, or a virtual sewing group, each participant can create their own butterfly block using unique fabric, color schemes, or embellishments. This makes every quilt distinct and deeply personal.
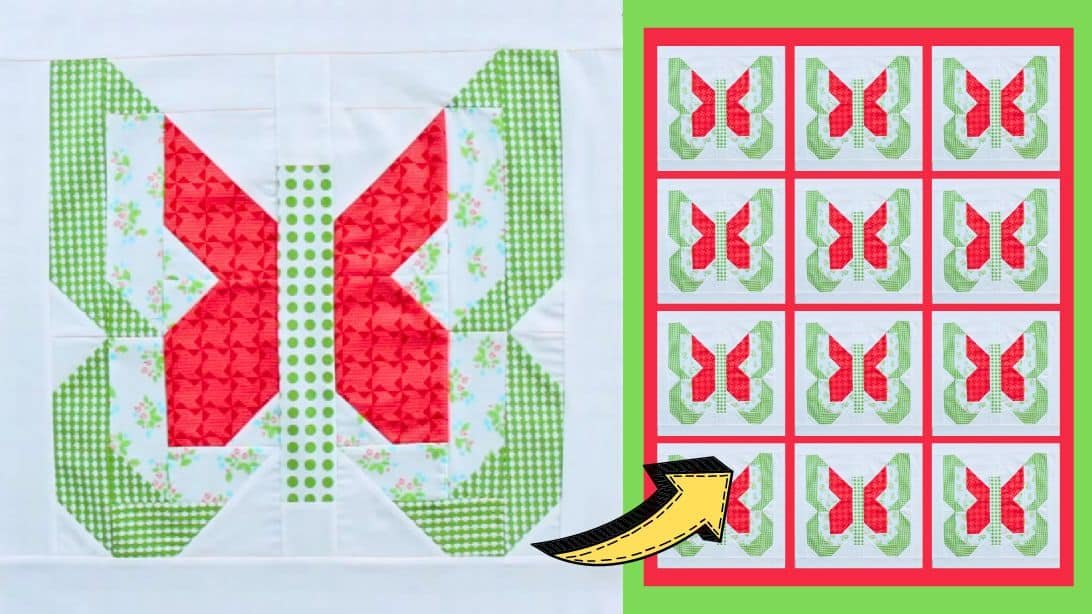
In terms of structure, the quilt is usually block-based. Each butterfly block is framed or bordered, then connected in rows. Layouts can be traditional or playful, depending on your aesthetic. The wings can vary in size and orientation, offering lots of creative freedom.
Butterfly blocks can be pieced using patchwork, appliqué, or even paper-piecing techniques. Beginners can start with simple geometric butterfly blocks, while experienced quilters may experiment with detailed wing patterns and embroidery.
The quilt can be as small or large as needed. It could be a lap quilt, wall hanging, or a full-sized bed quilt. The flexibility in sizing and design makes this project appealing for many different purposes.
Many crafters love including a message or label with each butterfly block, noting who made it and why. When assembled, the quilt becomes a visual and emotional tapestry of shared love and connection.
2. Choosing Fabrics and Colors for Your Butterfly Blocks
Choosing the right fabrics for your Butterfly Social Quilt – Pattern is essential for achieving both visual harmony and emotional impact.
Start with a theme or intention. Are you creating this quilt in memory of someone? To celebrate a friendship or event? Your purpose will influence your color palette. Bright colors can symbolize joy and celebration, while soft pastels can evoke calm and remembrance.
Butterflies naturally lend themselves to creative expression, so don’t be afraid to mix prints, solids, florals, or even metallic fabrics. Wings are the perfect opportunity to showcase scrap fabrics or sentimental materials like pieces of clothing or old linens.
For the background fabric, choose a neutral or consistent tone that helps each butterfly stand out. Light grays, soft creams, or pale blues work well to give contrast without overpowering the colorful wings.
When working with others in a group project, establish a color guideline to ensure consistency across blocks. You might ask participants to use fabrics from a specific color family or require each block to include a certain color.
If you’re working alone, try laying out all your chosen fabrics in advance. Arrange them to see how they interact together visually. Don’t forget to test for colorfastness if the quilt will be washed regularly.
Always pre-wash your fabrics before cutting to prevent shrinkage and ensure better sewing accuracy. Iron each piece thoroughly to achieve clean, crisp lines when cutting and piecing your blocks.
3. Assembling and Sewing the Butterfly Quilt Blocks
Once your fabric is selected, it’s time to start piecing the butterfly blocks that make up the Butterfly Social Quilt – Pattern.
There are many types of butterfly blocks, from simple squares and triangles to more advanced techniques. For beginners, a block might consist of a few rectangles and half-square triangles forming the wings and body. These simple blocks can still be incredibly effective when repeated with varied fabrics.
For a more intricate look, appliqué techniques allow you to create curved butterfly wings and antennae using fusible fabric or hand stitching. Paper-piecing is another great way to achieve precision in more complex designs, especially if you’re working with detailed butterfly shapes.
Begin each block by laying out your cut fabric pieces and double-checking their placement before stitching. Use a quarter-inch seam allowance for accuracy, and press seams as you go to keep your blocks flat.
If you’re sewing blocks contributed by different people, be sure to square them up before assembling the full quilt. This ensures the blocks align neatly, even if each person’s stitching or measurements vary slightly.
Arrange your blocks in rows or columns on a design wall or flat surface. This is your chance to experiment with the layout—mix bold and subtle butterflies, balance color tones, and ensure a pleasing visual flow.
Once your layout is finalized, sew blocks together row by row, pressing seams open or to one side. Finally, add borders if desired, and prepare for quilting and binding.
4. Finishing Touches and Display Ideas for Your Butterfly Quilt
After the blocks are assembled, it’s time to complete your Butterfly Social Quilt – Pattern and consider how to share its story with others.
Choose a quilting method that enhances your butterfly blocks. A simple all-over quilting pattern works well, but you can also outline the butterflies with echo quilting or add swirls to mimic wind and movement. Free-motion quilting gives you the most freedom to get creative.
For the backing fabric, choose something that complements the front but also fits your theme. Many quilters use muslin or a single solid color, while others include pieced backings for added detail.
Binding your quilt is the final sewing step. Use a color that frames your quilt nicely—something bold for contrast or soft and subtle for harmony. You can choose to machine-stitch or hand-sew the binding.
Don’t forget to label your quilt! Whether you’re making it for personal use or giving it away, include a label with the quilt’s name, date, contributors, and a message. This adds to the legacy of the Butterfly Social Quilt – Pattern.
Display options are endless. You can hang it on a wall, drape it over a couch, or donate it to a cause that resonates with you. If the quilt is made with contributions from a group, consider organizing a reveal event or digital presentation to showcase everyone’s work.
Sharing your finished quilt on social media or quilting forums is a great way to inspire others and document your journey. The story behind each butterfly becomes a thread that ties your community closer together.
Frequently Asked Questions (FAQ)
Q1: What does a Butterfly Social Quilt mean?
A: It’s a quilt made using butterfly blocks that often symbolize transformation and community. The “social” aspect typically involves group collaboration or storytelling.
Q2: Is this pattern suitable for beginners?
A: Yes! The Butterfly Social Quilt – Pattern can be adapted for all skill levels. Beginners can start with simple pieced blocks, while advanced quilters may try appliqué or paper-piecing techniques.
Q3: How big should each butterfly block be?
A: Most patterns use 10″ or 12″ blocks, but you can adjust the size to fit your overall quilt dimensions and design preferences.
Q4: Can I make this quilt using fabric scraps?
A: Absolutely. This quilt is ideal for scrap fabrics, especially for the butterfly wings. It’s a great way to use leftover or sentimental pieces.
Q5: What quilting method works best for this pattern?
A: Echo quilting around the butterflies or free-motion quilting with swirls are popular choices. Choose a method that highlights the butterflies without overwhelming the design.
Q6: How do I involve others in a social quilt project?
A: Reach out to a quilting guild, classroom, or friends online. Set guidelines for block size, fabric use, and deadlines. Then combine the blocks into a shared masterpiece.
Conclusion
The Butterfly Social Quilt – Pattern is more than just a sewing project—it’s a symbol of transformation, connection, and creativity. Through the steps of fabric selection, thoughtful construction, and collaborative contribution, you can create a quilt that tells a powerful story. Whether you’re making it alone or as part of a community, the finished piece becomes a celebration of shared passion and care.
We hope this guide has given you the inspiration and tools to begin your own butterfly quilt journey. We’d love to hear your thoughts—please share your honest opinion and suggestions in the comments. Whether you’re a beginner or seasoned quilter, your experience matters, and your creativity makes the quilting world more beautiful, one butterfly at a time.
.