Making a Card Wallet Very Easily – Pattern is a fun and practical project that combines creativity and function.
Whether you’re just beginning your crafting journey or are already skilled in sewing or crochet, a handmade card wallet is a great project to start with.
Not only does it help you organize your credit cards, ID, and gift cards, but it’s also a thoughtful gift idea for friends and family.
This DIY card wallet is compact, stylish, and budget-friendly. It requires very little material and can be completed in under an hour, making it ideal for those with limited time or supplies. The Card Wallet Very Easily – Pattern can be customized with your choice of colors, textures, closures, and even additional features like pockets or labels.
In this article, we’ll take you through the step-by-step process to create your own card wallet, starting from materials and cutting patterns, all the way to finishing details and personalization options. We’ll also provide insights on how to optimize your project for functionality and durability. Let’s dive into the creative process of building a card wallet very easily.
1. Materials and Preparation for Your Card Wallet
Before starting your Card Wallet Very Easily – Pattern, gathering the correct tools and materials will make your project go smoothly. With minimal supplies, you can create a stylish and durable wallet for everyday use.
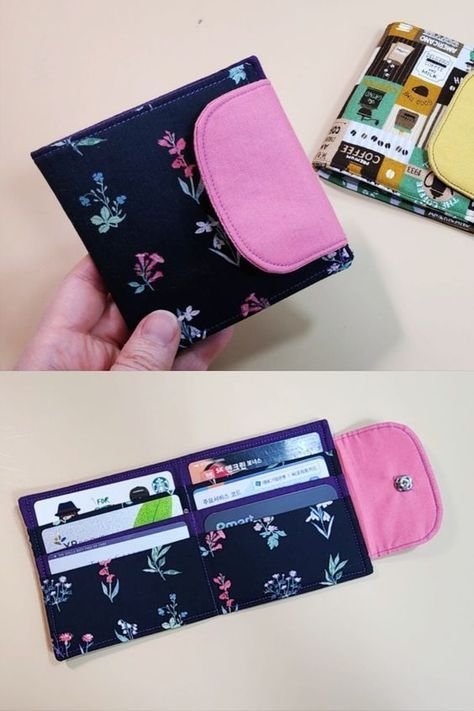
The most common material used is cotton fabric or canvas. These are easy to sew, easy to wash, and come in endless patterns and colors. If you prefer a more elegant finish, consider faux leather or felt. These materials are slightly thicker but give the wallet a professional look.
You will also need interfacing. Interfacing gives structure to your wallet, helping it stay firm and not flop over. Fusible interfacing works well and is applied using an iron. Choose medium-weight interfacing for a balance of flexibility and sturdiness.
Thread, scissors, pins, and a sewing machine (or hand-sewing needle if you prefer) are essential tools for putting the wallet together. If you’re crocheting, choose a tightly stitched yarn and an appropriate hook size to ensure the wallet is sturdy.
For closures, options include snaps, buttons, Velcro, or zippers. Magnetic snaps are popular because they are easy to use and give a modern look. Choose one based on the design you’re going for and how often you plan to open and close the wallet.
Finally, print or draw out your Card Wallet Very Easily – Pattern to size. A basic wallet pattern usually includes two to three rectangular pieces: the outer layer, the lining, and pockets. Cutting everything in advance will make the process easier when assembling.
2. Step-by-Step Instructions to Sew or Make Your Wallet
Creating the wallet is where the fun begins. With your materials ready and your Card Wallet Very Easily – Pattern laid out, follow these easy steps to build your own minimalist wallet.
Start by cutting your fabric pieces according to the pattern. You’ll typically need one piece for the exterior, one for the interior lining, and one or two smaller pieces for the card pockets. Don’t forget to cut interfacing in the same sizes.
Iron the interfacing to the wrong side of the outer fabric and pocket pieces. This gives them structure and helps the wallet hold its shape after frequent use. Make sure the adhesive side of the interfacing is facing the fabric when you apply heat.
Next, fold your pocket pieces in half lengthwise and topstitch along the folded edge for a clean finish. Then layer the pockets onto the lining fabric, aligning the edges. Use pins or clips to hold them in place while you sew.
Stitch the pockets to the lining by sewing along the sides and bottom. You can also add vertical lines to divide the pockets into sections for multiple cards. Make sure each pocket is wide and deep enough to hold a standard credit card.
With the pockets attached, place the outer and lining pieces right sides together and sew around the edges, leaving a small opening for turning. After sewing, clip the corners to reduce bulk, then turn the wallet right-side out through the opening.
Finally, press the wallet flat with an iron, tuck in the open seam, and topstitch around the entire edge for a polished finish. Add your chosen closure—snap, button, or Velcro—and your handmade card wallet is ready to use or gift.
3. Design Ideas and Personalization Options
One of the best things about the Card Wallet Very Easily – Pattern is how easily it can be personalized. You’re not limited to one style or color—this pattern is the perfect canvas for expressing your personality and creativity.
Choose fabrics that reflect your style or the season. Use bold prints for a fun, eye-catching wallet or minimalist solids for a sleek and modern look. You can even mix and match different fabrics for the inside and outside to create a unique contrast.
Add a decorative touch with embroidery. Stitch initials, flowers, geometric shapes, or other small motifs to the front flap or pocket area. Hand embroidery gives your wallet a handmade charm that’s hard to find in store-bought items.
For a touch of luxury, consider using faux leather or suede for the outer fabric. These materials look professional and are easy to clean. They also provide more durability for long-term use, especially if you carry the wallet daily.
Label tags or name patches can also be sewn into the inside or back of the wallet. These are great if you’re giving the wallet as a gift or want to include your branding if you’re selling them.
You can also play with closures. Magnetic snaps give a sleek finish, while decorative buttons or toggles can add character. Zippers are a great addition if you want a secure compartment for coins or folded bills.
Lastly, consider turning your card wallet into a keychain pouch or adding a small wrist strap. These functional additions make your wallet even more versatile, allowing you to carry it easily without needing a full bag.
4. Tips for Making Your Wallet Last Longer
Durability is key when creating something you’ll use daily. The Card Wallet Very Easily – Pattern can be optimized with a few simple techniques that ensure your handmade wallet stands the test of time.
First, always reinforce stress points. Backstitch or double stitch areas that will experience frequent tension, such as corners, closure points, and the tops of pockets. This helps prevent unraveling over time.
Use high-quality thread, especially if you’re sewing with thicker materials like canvas or faux leather. Cheaper thread can snap easily and cause seams to open, while good thread provides better strength and longevity.
If you’re crocheting the wallet, use tight, dense stitches and consider adding a fabric lining inside. This prevents the crochet from stretching too much and keeps your cards secure. You can hand-sew the lining to the inside after completing the crochet piece.
Regularly check closures and restitch them if they begin to loosen. Magnetic snaps and Velcro may wear out with time, so having replacements on hand is helpful if you use the wallet often.
Avoid overstuffing your wallet. Although it may be tempting to carry all your cards at once, excessive use can wear out the seams and fabric faster. Keep it minimal to maintain its shape and function.
Finally, hand wash your fabric wallet when needed. Spot clean with mild soap and let it air dry completely. For leather or faux leather, use a soft damp cloth to wipe off dirt and restore the surface’s shine.
FAQ – Frequently Asked Questions
Q1: Is this card wallet project suitable for beginners?
Yes, the Card Wallet Very Easily – Pattern is perfect for beginners. It involves simple cutting and straight sewing, making it a great introduction to DIY accessories.
Q2: What type of fabric should I use for a card wallet?
Cotton, canvas, felt, and faux leather are all great options. Choose one based on your desired look and durability needs.
Q3: Can I make this wallet without a sewing machine?
Absolutely! You can hand-sew the wallet using a strong needle and quality thread. It might take longer but can be just as effective.
Q4: How many cards can this wallet hold?
Depending on your pocket design, it can comfortably hold 4–8 cards. You can add more layers if you want extra capacity.
Q5: What’s the best closure to use?
Magnetic snaps are easy and sleek, but buttons, Velcro, or zippers also work well. It depends on your design and personal preference.
Q6: Can I sell these wallets?
Yes, handmade card wallets are popular at markets and online shops. Just be sure to use original or public domain patterns if selling commercially.
Conclusion
Creating a Card Wallet Very Easily – Pattern is a simple yet satisfying project that blends creativity with functionality. With just a few materials and basic skills, you can craft a custom wallet that suits your style and keeps your cards organized.
In this guide, we walked through choosing the right fabric and tools, cutting and assembling the pattern, personalizing the design, and ensuring long-lasting quality. Whether you’re sewing or crocheting, the result is a handmade wallet you’ll be proud to use or gift.
We hope this article inspired you to try this project! If you’ve made your own card wallet using this pattern, feel free to share your results. We’d love to hear your honest feedback and any suggestions you have for future tutorials. Your voice helps us create better, more helpful content for all DIY lovers.