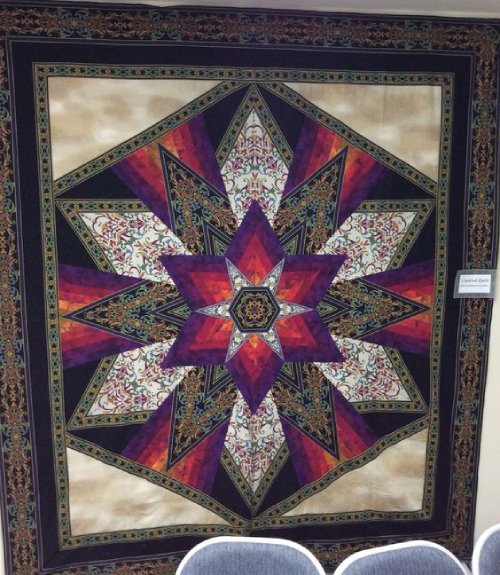
The Carnival Quilt – Pattern is a joyful and dynamic design that celebrates movement, color, and the festive spirit of traditional carnivals. Inspired by whirling rides, bright tents, and playful energy, this quilt pattern transforms fabric into a visual celebration.
Whether you’re a quilting novice or a seasoned stitcher, working on a Carnival Quilt offers a rich experience that brings creativity to life.Unlike minimalist or monotone quilt designs, the Carnival Quilt – Pattern invites you to embrace bold hues, mixed prints, and unexpected combinations.
Each block can feel like a ride in a carnival—spinning, shifting, and coming together in a way that’s both cohesive and thrilling. It’s perfect for scrap busting or using a curated bundle of vibrant fabrics.
In this guide, we’ll explore everything you need to know about quilting a Carnival Quilt, from materials and assembly tips to layout suggestions and maintenance. By the end, you’ll not only understand how to execute this pattern beautifully but also how to put your unique spin on it. Get ready to create a quilt that’s as exciting and expressive as the carnival itself.
1. Materials and Tools for the Carnival Quilt
When starting your Carnival Quilt – Pattern, having the right tools and fabric is the first step to success. This design thrives on variety and energy, so preparation is key to letting your creativity flow without interruption.
Begin with fabric selection. The Carnival Quilt is perfect for using a mix of solids, prints, and textures. Think bold florals, geometric shapes, and bright color blocks. Aim for high-contrast combinations to emphasize the movement within each block.
A rotary cutter, cutting mat, and acrylic ruler are essential for accurate cuts. Since the quilt features repeating blocks with dynamic shapes—often involving triangles or curves—precision in your cuts will help your blocks align properly later.
You’ll need a reliable sewing machine, ideally with a ¼” quilting foot. Consistency in seam allowance is crucial for the blocks to fit together smoothly. Also, make sure to have extra needles and bobbins ready to avoid mid-project interruptions.
Don’t forget thread—a neutral color often works best for piecing, though you might choose a vibrant shade for topstitching. Use 100% cotton thread to match most quilting cotton fabrics, ensuring durability and strength.
You’ll also want a pressing station nearby. A good iron and ironing board help you press seams open or to the side depending on your pattern’s instructions. Pressing frequently gives your blocks a crisp, professional look.
Lastly, have basting materials, batting, and backing fabric prepared for finishing your quilt. Whether you prefer spray basting or pins, secure your layers well before quilting. Choose a backing that complements your top—or contrasts dramatically, for a twist!
2. Building the Carnival Quilt Block by Block
One of the most exciting parts of working on the Carnival Quilt – Pattern is watching each block come to life. This quilt is often built using rotating pinwheels, starbursts, or circular illusions that mimic carnival rides and dynamic motion.
Start by selecting a block style. Some Carnival Quilts use traditional pinwheel blocks, while others feature more modern curved piecing or foundation paper pieced elements. Choose a style that matches your skill level and comfort with techniques.
Cut your pieces with care. For example, if your pattern includes half-square triangles (HSTs), cut your squares slightly larger and trim them down after sewing. This ensures clean, uniform units that make assembly easier.
Next, arrange your colors thoughtfully. You can organize fabrics by warm and cool tones, or alternate light and dark values. A successful Carnival Quilt often has a deliberate rhythm in color placement that helps guide the viewer’s eye across the quilt.
Sew blocks in batches to maintain consistency. Whether you’re chain piecing triangles or assembling full blocks one at a time, working in groups helps save time and keeps your work uniform. Press seams as you go to avoid bulk in intersections.
Once all blocks are completed, begin layout planning. Use a design wall or large surface to experiment with arrangements. You can create waves, spirals, or radiating lines with strategic block placement, enhancing the carnival theme.
Sew your rows together slowly, checking for alignment along seams and points. Take your time pinning if needed. After joining all rows, give your quilt top a final press before moving on to the quilting stage.
3. Creative Variations and Artistic Expression
The Carnival Quilt – Pattern is a canvas for artistic expression. While the original design calls for energetic, repeating blocks, don’t be afraid to make it your own. Customizing your quilt can turn a great design into a personal masterpiece.
Play with scale. Enlarge the blocks to make a bold, graphic baby quilt or shrink them to create a complex wall hanging. Changing block sizes adds movement and variety, reinforcing the carnival theme.
Add fussy cutting to highlight motifs within your prints. Select fabric areas with images or patterns you’d like to showcase—like animals, stars, or shapes—and place them at the center of each block for added interest.
Consider asymmetry. While traditional quilts often stick to symmetrical layouts, a Carnival Quilt can handle unpredictability. Use different-sized blocks or staggered placements to mimic the wild, fun chaos of a real carnival.
You can also experiment with appliqué or embroidery. Add stitched details, such as streamers or confetti effects, to the background or block centers. These details bring even more life and character to your quilt.
For a more minimalist look, use monochrome fabrics or a restricted palette like black, white, and red. This bold color strategy modernizes the pattern while maintaining the visual impact and movement.
If you’re into storytelling, organize your blocks to reflect a narrative—perhaps a journey through a fair, or a favorite memory. Incorporate meaningful colors or prints to turn your Carnival Quilt – Pattern into a family heirloom.
4. Quilting, Finishing, and Care
Once your top is complete, it’s time to quilt and finish your project. The finishing process is essential in turning your blocks into a usable and long-lasting Carnival Quilt – Pattern creation.
Begin with basting your quilt sandwich—quilt top, batting, and backing. Make sure the layers are smooth and wrinkle-free. Spray baste or pin, starting from the center and working outward.
Choose a quilting design that matches the motion of your blocks. Swirls, loops, spirals, or echo quilting all work beautifully with the Carnival theme. These patterns enhance the sense of fun and playfulness in your quilt.
If you’re quilting by machine, ensure your walking foot or free-motion foot is installed and test your tension on scraps before starting. For hand quilting, use strong thread and even stitches for durability.
Once quilting is complete, trim the edges and prepare your binding. Bias binding is a great choice if your quilt has curves. Otherwise, straight grain binding works perfectly and gives a clean, structured finish.
Sew your binding to the front of the quilt, then hand-stitch or machine-stitch it to the back for a seamless look. Be sure to miter corners neatly and check for any missed sections.
To keep your Carnival Quilt looking great, wash it gently in cold water with mild detergent. Air dry or tumble dry on low. Store in a breathable cotton bag or folded loosely to avoid creases.
FAQ – Frequently Asked Questions
Q1: What is the standard size for a Carnival Quilt?
A: The size can vary, but most Carnival Quilts are made in lap or throw sizes (50″ x 60″) due to their dynamic design. You can easily adjust block counts for a larger or smaller quilt.
Q2: Can beginners make a Carnival Quilt?
A: Yes, absolutely! Start with a simpler block style like pinwheels or squares, and use pre-cut fabrics to save time.
Q3: What fabrics work best for a Carnival Quilt – Pattern?
A: Bright, high-contrast cotton fabrics are ideal. Mixing prints, solids, and even novelty fabrics adds to the festive look.
Q4: Do I need a special sewing machine?
A: No. Any basic sewing machine with a straight stitch and ¼” foot will work. A walking foot is useful for quilting, but not required.
Q5: How do I plan my block layout?
A: Use a design wall or lay blocks out on the floor. Try color gradients, spirals, or mirrored patterns to find a layout that excites you.
Q6: Can I add personal touches?
A: Definitely! Use embroidery, appliqué, or fussy cutting to make each block tell its own story.
Conclusion
The Carnival Quilt – Pattern is more than just a sewing project—it’s a journey into color, creativity, and fun. Whether you’re crafting for yourself, a loved one, or simply exploring a new design, this pattern offers endless possibilities. From fabric choices to layout design, every decision you make adds your unique fingerprint to the final masterpiece.
In this article, we’ve covered materials, construction, creative customizations, and finishing techniques—all to help you succeed in making your own Carnival Quilt.
Now it’s your turn!
Have you tried the Carnival Quilt – Pattern? Leave your thoughts and suggestions below, or share your photos if you’ve completed one. We’d love to hear how you made it your own and what tips you’d give to other quilters. Happy stitching!