The Carpenter Star quilt pattern is a stunning and classic design that has stood the test of time.
This beautiful quilt pattern has been a favorite among quilting enthusiasts for generations, offering intricate design elements that create a striking visual effect.
If you’re looking to create a quilt that combines traditional charm with a touch of elegance, the Carpenter Star quilt pattern is the perfect choice for you.
Quilting is an art form that requires skill, patience, and creativity, and the Carpenter Star quilt is a perfect project for those who want to challenge themselves while creating a truly memorable piece. This pattern, known for its star-like shape, is not only beautiful but also versatile, making it suitable for a wide variety of occasions. Whether you’re making a quilt for a wedding, a special occasion, or simply for your own enjoyment, this pattern will not disappoint.
In this article, we will provide a comprehensive guide on how to create a Carpenter Star quilt. From selecting materials and understanding the pattern to sewing your blocks and assembling the quilt, we’ll cover every detail to help you complete this project with confidence and success.
1. Understanding the Carpenter Star Quilt Pattern
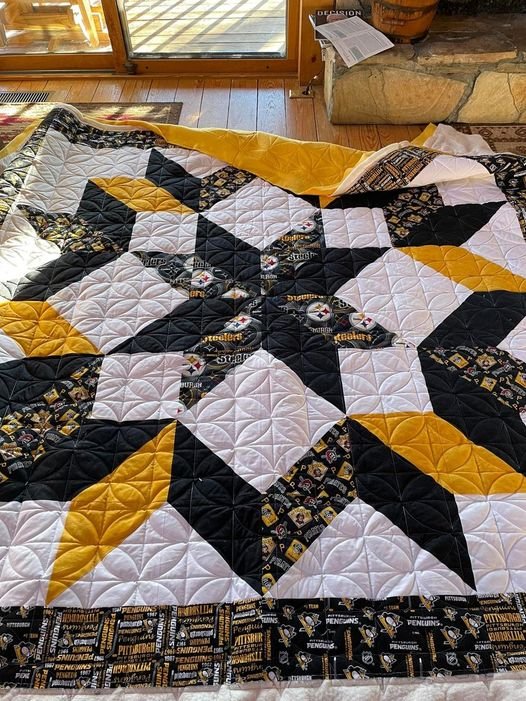
Before jumping into the details of creating your Carpenter Star quilt, it’s important to understand the pattern and its design elements. The Carpenter Star pattern features a star-shaped block made up of a combination of half-square triangles and squares. The central star is framed by surrounding blocks, giving the quilt its distinctive look.
Design Elements of the Carpenter Star Quilt
The pattern itself is made up of several individual blocks arranged in a way that creates the star effect. Typically, the Carpenter Star quilt is made up of a central star block surrounded by additional blocks in different colors, creating a sense of movement and depth within the quilt.
The blocks are sewn together to form rows and columns, with each piece contributing to the overall star design. The color scheme is essential to achieving the desired effect, and many quilters choose contrasting colors to make the star pop against the background.
Popular Variations of the Carpenter Star
There are several ways to customize the Carpenter Star quilt pattern to suit your personal style. Some quilters prefer to use traditional fabrics, while others experiment with modern prints or even hand-dyed fabrics. The size of the blocks and the number of blocks used in the quilt can also vary, allowing you to create a design that fits your needs and preferences.
Why Choose the Carpenter Star Quilt?
The Carpenter Star quilt is an ideal pattern for those who enjoy intricate designs but want something that is still manageable to sew. Its symmetrical star pattern offers a sense of balance and harmony, making it a beautiful and timeless addition to any home.
2. Materials Needed for the Carpenter Star Quilt
Before you begin stitching your Carpenter Star quilt, it’s essential to gather the necessary materials. Having the right tools and fabrics is crucial to ensuring the quilt comes out just as you imagined.
Fabric
Choosing the right fabric for your Carpenter Star quilt is key to the overall look. Cotton fabric is a popular choice for quilting due to its durability and ease of use. You can opt for a variety of fabrics, such as solids, prints, or a mix of both. For a more traditional look, many quilters choose a combination of light and dark fabrics, with the contrast helping the star pattern stand out.
Quilting Ruler and Rotary Cutter
To accurately cut your fabric pieces, a quilting ruler and rotary cutter are essential tools. The ruler allows you to measure and cut straight lines, while the rotary cutter makes clean cuts through multiple layers of fabric. This will help ensure that your Carpenter Star quilt pieces fit together perfectly.
Sewing Machine
A reliable sewing machine is an important tool for any quilting project. Choose a machine that allows for precision stitching and is capable of handling multiple layers of fabric. For the Carpenter Star quilt, you’ll need a machine with a quarter-inch seam allowance, which is commonly used in quilting.
Thread
Select a high-quality quilting thread that matches your fabric. Cotton thread is a great choice, as it’s durable and easy to work with. It’s important to choose a color that complements your fabric choices, ensuring the seams blend seamlessly into the quilt.
Batting and Backing Fabric
The batting provides the quilt with its soft, puffy texture and insulation. Polyester or cotton batting works well for most quilts, providing a lightweight feel. As for the backing fabric, you can choose a solid or patterned fabric that complements the front of your quilt.
3. Step-by-Step Guide to Making a Carpenter Star Quilt
Now that you have your materials ready, let’s dive into the step-by-step process of creating your Carpenter Star quilt. Follow these instructions carefully to ensure each block is sewn correctly and the quilt comes together beautifully.
Step 1: Cutting the Fabric Pieces
Start by cutting your fabric into the necessary pieces for the Carpenter Star quilt. You’ll need squares and triangles, which will form the individual star blocks. Use your quilting ruler and rotary cutter to ensure the pieces are the correct size.
Step 2: Sewing the Half-Square Triangles
Next, sew the half-square triangles that will form the star points. To do this, you’ll need to sew two fabric squares together, placing them right sides facing each other. Once you’ve sewn the two squares together, cut along the diagonal to create two triangles. Press the seams open to flatten them.
Step 3: Assembling the Star Block
Now, begin assembling your star block by arranging the half-square triangles and the square pieces. The triangles should be positioned to form the points of the star, while the square pieces fill in the center and corners. Sew the pieces together to form the star block, ensuring that all seams match up perfectly.
Step 4: Adding the Surrounding Blocks
Once the star block is complete, it’s time to add the surrounding blocks. These blocks will frame the central star and help to create the overall quilt design. Arrange the blocks in a way that maintains the symmetry of the star and complements the colors you’ve chosen. Sew them together, and then join the rows to complete the quilt top.
Step 5: Quilting the Layers
After assembling the quilt top, it’s time to quilt the layers together. Place the quilt top, batting, and backing fabric in a quilt sandwich, and pin the layers together. Using your sewing machine, quilt the layers by sewing along the seams or creating free-motion quilting designs. This will help hold the layers in place and give your quilt its texture.
Step 6: Binding the Quilt
Finally, finish your Carpenter Star quilt by adding the binding. Cut strips of fabric to create the binding, and sew them around the edges of the quilt to give it a clean, finished look. Fold the binding over the edges and hand-stitch it to the back of the quilt to secure it.
4. Tips and Tricks for a Perfect Carpenter Star Quilt
Creating a beautiful Carpenter Star quilt can be challenging, but with the right techniques, you can achieve great results. Here are some tips to help you along the way:
Tip 1: Use Accurate Cutting Tools
Accurate cutting is crucial for quilting, especially when working with intricate patterns like the Carpenter Star quilt. Using a rotary cutter, quilting ruler, and cutting mat will help you cut fabric pieces precisely, ensuring the blocks fit together perfectly.
Tip 2: Press Your Seams
Pressing your seams as you go will help prevent fabric from shifting and create crisp, clean lines. Always press the seams open to reduce bulk and make the quilt top lay flat.
Tip 3: Take Your Time with the Half-Square Triangles
The half-square triangles are the foundation of the Carpenter Star quilt pattern. Take your time to sew and trim them accurately, as they determine the overall shape and alignment of the star blocks.
Tip 4: Consider Color Placement
Color placement can make or break the look of your Carpenter Star quilt. Experiment with different color combinations and contrast to create a quilt that stands out. For example, use dark fabric for the star points and lighter fabric for the center to create depth and visual interest.
Tip 5: Make a Quilt Label
Once your quilt is complete, consider adding a quilt label with your name, the date, and any special information about the quilt. This adds a personal touch and makes the quilt even more special.
Tip 6: Practice Patience
Quilting takes time, so don’t rush through the process. Enjoy the journey, and don’t be afraid to make mistakes. Each quilt you create will help you improve your skills and grow as a quilter.
FAQ: Common Questions About the Carpenter Star Quilt
1. What is a Carpenter Star quilt?
A Carpenter Star quilt is a traditional quilt pattern that features a star-shaped block made from half-square triangles and square pieces. It is often framed by surrounding blocks to create a stunning overall design.
2. How do I choose colors for my Carpenter Star quilt?
The color choices for a Carpenter Star quilt can vary greatly. Many quilters choose contrasting colors for the star and background, but you can also experiment with different color combinations to achieve the desired effect.
3. Is the Carpenter Star quilt pattern suitable for beginners?
While the Carpenter Star quilt pattern can be challenging, it is a great project for intermediate quilters who are comfortable with basic techniques like half-square triangles and piecing. Beginners may want to practice these skills before attempting the full quilt.
4. How do I prevent my Carpenter Star quilt from becoming too bulky?
To prevent bulk, be sure to press your seams open as you go. Also, choose a lightweight batting and backing fabric to reduce the thickness of the quilt.
5. Can I use a Carpenter Star quilt for other occasions besides traditional events?
Yes! The Carpenter Star quilt can be customized with different colors and fabrics to suit a variety of occasions, from holidays to modern home decor. It’s a versatile pattern that works well in any setting.
6. How long does it take to make a Carpenter Star quilt?
The time it takes to make a Carpenter Star quilt depends on your quilting experience and the size of the quilt. On average, it can take several days or weeks to complete, especially if you’re working on a larger quilt.
Conclusion
The Carpenter Star quilt pattern is a timeless and beautiful design that brings a sense of elegance and charm to any room. With careful planning, attention to detail, and the right materials, you can create a stunning quilt that will be cherished for years to come. By following the steps outlined in this article, you’ll be well on your way to creating a quilt that showcases your creativity and quilting skills.
If you’ve created a Carpenter Star quilt, or if you plan to, we’d love to hear about your experience. Please leave a comment below with your thoughts, suggestions, or any questions you may have. Happy quilting!