The Castle Wall block – pattern is a timeless and visually striking quilt block that has fascinated quilters for generations.
Its intricate design mimics the strong, symmetrical shapes found in medieval architecture, offering both structure and elegance.
With sharp angles, layered pieces, and circular elements, the Castle Wall block stands out as a beautiful centerpiece in any quilt project.
The original Castle Wall block – pattern dates back to the early 20th century and remains popular in traditional and modern quilting circles. Its unique octagonal shape and multiple fabric sections allow for exciting color play and intricate visual effects. While it might look complex, with careful cutting and piecing, even intermediate quilters can create a stunning Castle Wall block with confidence.
One of the most attractive aspects of this pattern is its versatility. Whether you’re working on a heritage quilt, a wall hanging, or a bold table topper, the Castle Wall block – pattern adapts well to different scales and styles. In this article, we’ll explore its history, how to make it, creative uses, and useful tips to help you master this captivating block design.
1. Understanding the Castle Wall Block – Pattern
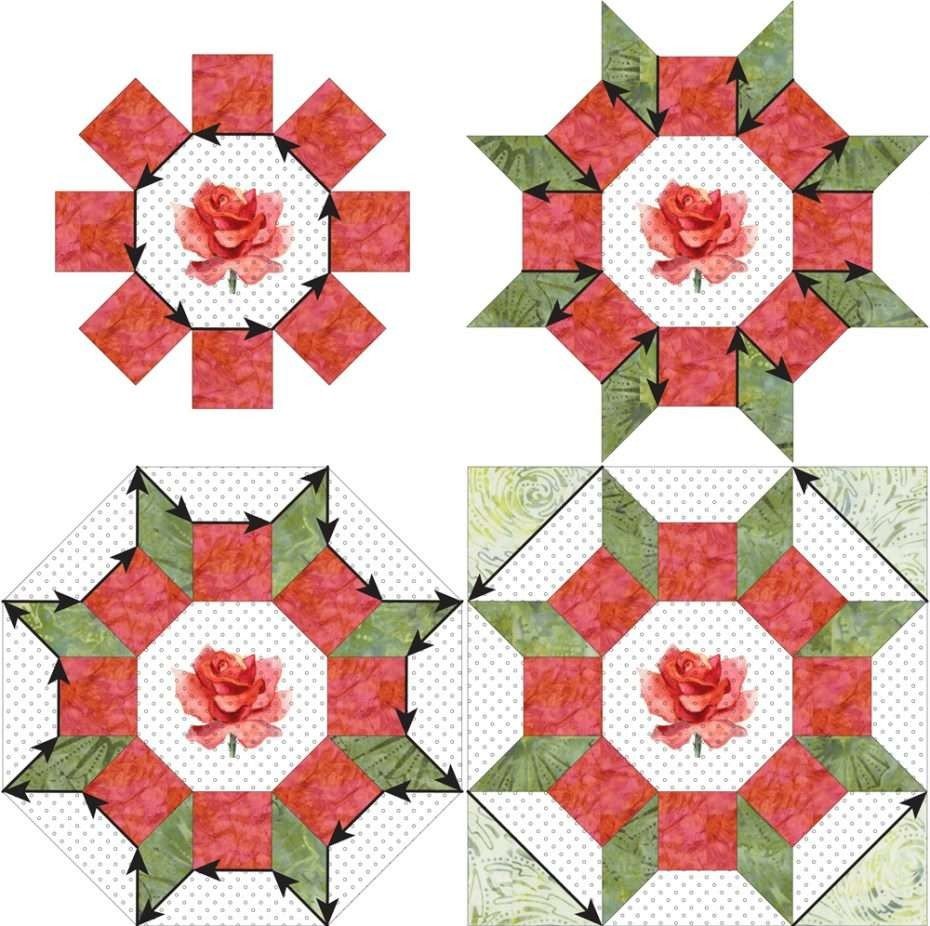
The Castle Wall block – pattern features a central square surrounded by eight trapezoidal and triangular sections, forming an octagonal shape. The layered structure gives it a “framed” appearance, which is where the block gets its name—it resembles a window or opening within a stone castle wall.
This block typically includes a central square, often used to highlight a fussy-cut motif or showcase a favorite fabric. Surrounding it are pieced sections that radiate outward, giving the illusion of depth and dimension. The result is a complex yet harmonious composition that becomes a focal point in any quilt.
The Castle Wall block is an excellent choice for showcasing contrasting or complementary fabric colors. Because of its layered appearance, quilters often use darker tones in the outer pieces and lighter tones toward the center to emphasize the block’s structure.
Originally popularized in traditional hand-pieced quilts, the Castle Wall block – pattern is now also widely available in digital templates and acrylic cutting guides. These modern tools make it easier than ever to achieve accurate cuts and precise joins, ensuring a polished final product.
The block usually finishes at 12″ or larger, depending on the pattern variation. Its size and complexity make it well-suited for quilts with fewer, larger blocks or for use as a standout design in sampler quilts.
Learning how to construct the Castle Wall block is a rewarding experience. It builds essential piecing skills, teaches color balance, and challenges your precision—all while delivering a stunning visual payoff.
2. How to Make a Castle Wall Block – Pattern
To begin working with the Castle Wall block – pattern, you’ll first need a reliable template or pattern, rotary cutter, quilting ruler, and fabric in three or more contrasting colors. Start by choosing a fabric for your center square—this will be the visual anchor of your block.
After cutting your central square, move on to the inner ring of trapezoids. These pieces form the “walls” around the center and are usually cut using a specialty ruler or printed templates. Be sure your seam allowances are accurate (¼ inch is standard in quilting) to maintain symmetry.
Next, you’ll cut the corner triangles that complete the octagonal shape. These often involve sewing two triangles together to form a larger square before joining them to the surrounding pieces. Use pins or clips to keep edges aligned as you sew to prevent distortion.
As you begin piecing the block together, work in sections. Start with the inner square and trapezoids, then add the outer triangles. Press your seams carefully—either open or to the side, depending on how the seams will nest with adjacent blocks.
When your block is fully pieced, square it up using a ruler. Trimming the edges helps keep your quilt top even and prevents difficulties during final assembly. Don’t worry if the edges are slightly oversized; this is common and expected with more complex blocks.
Once you’ve finished the first Castle Wall block – pattern, consider making several more to create a cohesive quilt. Each one will improve your technique and give you more opportunities to experiment with color and texture.
3. Design Possibilities and Creative Ideas
One of the joys of the Castle Wall block – pattern is the creative freedom it offers. With so many pieces and fabric sections, you can easily create variations that feel entirely unique. Try alternating bold and neutral colors to give your quilt visual rhythm and movement.
Another exciting option is to make a two-tone version of the block. Use shades from the same color family for a more subdued, elegant effect. This approach highlights the block’s architecture and is ideal for sophisticated, modern quilts.
Some quilters choose to use novelty fabrics or fussy cuts in the center square, creating a storytelling effect within the quilt. Animals, flowers, or even photo-transfer fabrics make each Castle Wall block personal and memorable.
The block also works beautifully as a wall hanging or pillow cover. Because of its ornate structure, it doesn’t need to be repeated dozens of times to make an impact. A single well-made Castle Wall block can be the centerpiece of a room.
For a more dynamic quilt, try alternating Castle Wall blocks with simpler companion blocks, such as four-patch or log cabin squares. This approach gives the eye a place to rest and makes the complex Castle Wall blocks shine even more.
Finally, consider playing with size. Making oversized Castle Wall blocks can reduce the overall number of blocks needed for a quilt and emphasize the block’s structure even more. Enlarged versions also allow for showcasing fabric prints more effectively.
4. Tips, Tricks, and Common Mistakes to Avoid
Making a Castle Wall block – pattern requires precision and patience. Start with accurate cutting—use templates or specialized rulers if available, and take your time measuring each piece before cutting. Accurate cuts lead to easier piecing and more consistent results.
Be mindful of your fabric grain. The trapezoids and triangles can easily stretch if sewn on the bias. Use starch or fabric stabilizer to minimize distortion, and avoid pulling the fabric as you sew.
Another important tip is to press carefully. Press seams as you go, and consider pressing open for flatter intersections. A well-pressed block lies smoother and makes joining blocks easier during quilt assembly.
If your pieces don’t align perfectly, don’t panic. Slight mismatches can be corrected by easing the fabric or adjusting seam allowances. Use pins generously when matching seams, especially at corners where multiple pieces meet.
Always square up your finished block. Even experienced quilters find that complex blocks can shift slightly during construction. Use a quilting ruler to trim and align your edges before joining the block with others.
Lastly, practice patience. The Castle Wall block may take longer to complete than simpler designs, but the final result is well worth the effort. Each block you make will improve your skills and build your confidence with intricate patterns.
FAQ – Castle Wall Block – Pattern
Q: Is the Castle Wall block – pattern suitable for beginners?
A: It’s better suited for intermediate quilters, but adventurous beginners can try it with patience and accurate tools like templates or acrylic rulers.
Q: What size does the finished block usually measure?
A: The most common size is 12 inches finished, though some patterns offer 10” or 16” variations depending on the template used.
Q: Can I piece this block by machine, or is it better by hand?
A: While traditionally hand-pieced, the Castle Wall block can be made by machine using accurate cutting and seam alignment.
Q: How do I square up the block without losing the design?
A: Always leave a small seam allowance when trimming. Use a ruler to ensure corners are 90 degrees without cutting into design elements.
Q: What kind of fabric is best for this pattern?
A: Use high-quality quilting cotton with a tight weave to ensure durability and accuracy in piecing.
Q: How can I make a quilt using only Castle Wall blocks?
A: Simply repeat the block, joining them with or without sashing. Use consistent colors for cohesion or vary fabrics for a scrappy look.
Conclusion
The Castle Wall block – pattern offers quilters a rich and rewarding challenge that results in a stunning, architectural design. With its layered geometry, bold lines, and adaptability, it’s a perfect choice for quilters seeking to elevate their skills and add drama to their quilt projects.
In this article, we explored the structure of the Castle Wall block, how to construct it, different design ideas, and helpful tips for getting it just right. Whether you use it as a standalone statement piece or part of a larger quilt, this pattern brings a sense of craftsmanship and creativity to your work.
Have you made a Castle Wall block – pattern before or plan to try it soon? We’d love to hear from you! Please leave a sincere opinion in the comments below and share your suggestions or any tips that helped you. Your experiences could inspire and support fellow quilters in their creative journeys.