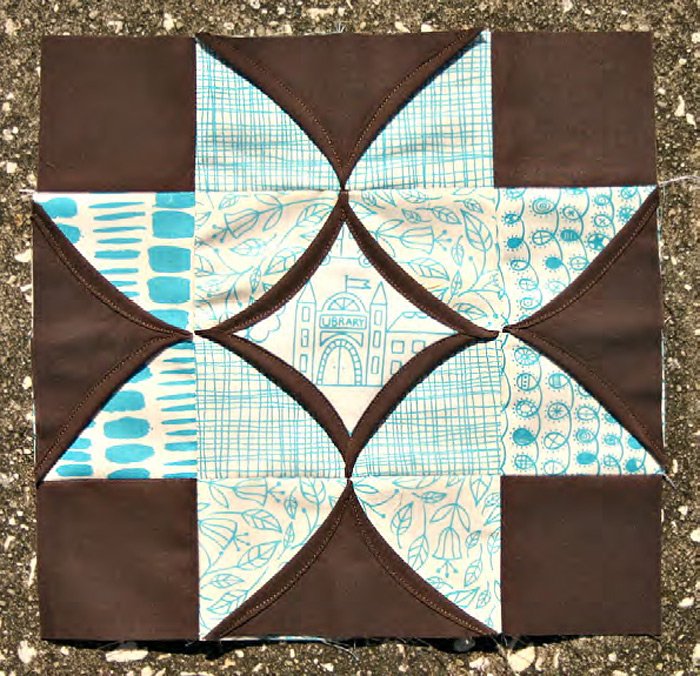
The Cathedral Star Block – Tutorial is your gateway to mastering one of the most visually stunning and geometrically satisfying designs in the world of quilting. This classic pattern combines the sharp, dramatic points of a traditional star with the curved, architectural elegance reminiscent of stained-glass windows found in ancient cathedrals. Whether you are a seasoned quilter looking to challenge your precision or a motivated beginner eager to create a show-stopping piece, this guide will walk you through every nuance of the process.
Quilting is more than just sewing fabric together; it is an act of storytelling through texture and color, and the Cathedral Star Block – Tutorial focuses on bringing that narrative to life. By utilizing specific folding and layering techniques, this block creates a three-dimensional effect that catches the light and adds a professional depth to any quilt top. We will explore how to select the right fabrics to make your star “pop” and how to manage the bulk of the seams to ensure a perfectly flat finish.
In this comprehensive Cathedral Star Block – Tutorial, we are going to prioritize accuracy and creative flair, ensuring your final product is both durable and beautiful. We will cover the essential materials, the step-by-step assembly of the star units, and the “fussy cutting” secrets that can elevate a simple pattern into a work of art. Get your rotary cutters ready and let’s dive into the intricate world of star blocks that stand the test of time and style.
1. Choosing the Right Materials for Your Cathedral Star Block – Tutorial
When starting your Cathedral Star Block – Tutorial, the first step is selecting high-quality 100% cotton fabric. Because this block involves multiple layers and precise folding, using a fabric with a stable weave prevents warping. You will need a primary focal fabric for the star points and a contrasting background fabric to create that “cathedral window” illusion.
To achieve the best results in this Cathedral Star Block – Tutorial, you must have a sharp rotary cutter and a reliable self-healing cutting mat. Precision is the backbone of this pattern; even a 1/8-inch deviation can throw off the alignment of your star’s center. Ensure your blades are fresh to avoid jagged edges on your fabric squares.
A clear acrylic ruler is another non-negotiable tool for this project. Look for one with clear 45-degree angle markings, as these are vital for squaring up your blocks. In our Cathedral Star Block – Tutorial, we emphasize “measuring twice and cutting once” to save both fabric and frustration during the assembly phase.
Don’t forget the importance of a high-quality thread, preferably a 50-weight cotton. Since the Cathedral Star Block – Tutorial requires sewing through several layers of fabric at certain intersections, a thin but strong thread helps reduce seam bulk. Choose a neutral color like grey or tan that blends seamlessly with most fabric palettes.
Proper pressing is a secret weapon in any Cathedral Star Block – Tutorial. A steam iron and a firm ironing board will help you set your seams and keep your folds crisp. Some quilters also find a tailor’s clapper useful for flattening thick intersections, ensuring the block lays perfectly flat for the final quilt assembly.
Lastly, consider using lightweight interfacing if you are working with particularly delicate or thin fabrics. While not always necessary, it can provide the extra stability needed to maintain the sharp points of the star. Following this Cathedral Star Block – Tutorial correctly means preparing your workspace with all these essentials before the first stitch is even taken.
2. Cutting and Preparing Units for the Cathedral Star Block – Tutorial
The foundation of a successful Cathedral Star Block – Tutorial lies in the preparation of the individual units. You will typically start by cutting large squares for the background and smaller squares for the star points. The ratio between these sizes determines the final “reach” of your star’s arms, so follow your pattern measurements strictly.
In this Cathedral Star Block – Tutorial, we utilize the HST (Half-Square Triangle) method for many of the corner units. To do this, place two contrasting squares right sides together and draw a diagonal line. Sewing 1/4-inch away from this line on both sides allows you to create two perfect units at once, saving time and fabric.
Organization is key during the Cathedral Star Block – Tutorial cutting phase. Use small labels or pins to keep track of your “Fabric A” and “Fabric B” piles. It is very easy to mix up the orientation of the triangles, which can lead to a lopsided star rather than the symmetrical beauty we are aiming for.
One advanced tip in this Cathedral Star Block – Tutorial is to use starch on your fabric before cutting. Starching makes the cotton stiffer and less likely to stretch on the “bias” (the diagonal grain of the fabric). This is especially helpful when you are working with the many diagonal seams required for a star block.
As you cut your pieces, pay close attention to fabric directionality. If you are using a print with a specific orientation, like stripes or floral stems, ensure they are all facing the same way. This Cathedral Star Block – Tutorial encourages “fussy cutting” to place a specific motif right in the center of the star for a customized look.
Once all your pieces are cut, do a “dry fit” on your design wall or table. This allows you to see the Cathedral Star Block – Tutorial coming to life before you commit to sewing. It’s the perfect time to swap colors or adjust the layout to ensure the visual balance is exactly where you want it to be.
3. Piecing the Center and Points in the Cathedral Star Block – Tutorial
Now we reach the heart of the Cathedral Star Block – Tutorial: assembling the center. The center is usually a square-in-a-square unit, which serves as the anchor for the entire design. You will sew triangles to the four sides of a central square, being careful not to “chop off” the points when you add the next layer.
The “Star Points” are the most iconic feature of the Cathedral Star Block – Tutorial. These are often created using flying geese units. A flying geese unit consists of one large rectangle and two smaller squares. Mastering this unit is essential because it creates the sharp, reaching points that give the star its dramatic, soaring appearance.
When sewing these units together, the 1/4-inch seam allowance is your golden rule. In this Cathedral Star Block – Tutorial, even a tiny error in seam width can multiply across the block, resulting in a center that won’t lay flat. We recommend using a patchwork foot on your sewing machine to maintain a consistent distance.
To get those “perfect points” mentioned in every Cathedral Star Block – Tutorial, aim your needle to sew exactly through the “X” created by previous seams. This ensures that when you flip the fabric over, the point of the star touches the edge of the seam perfectly without being buried or left hanging in space.
Pressing direction is vital in this Cathedral Star Block – Tutorial. Generally, you should press seams toward the darker fabric to prevent them from showing through the lighter sections. However, at the very center where eight points meet, you might want to “spin” the seams to reduce the “bump” and make the block easier to quilt later.
Slow and steady wins the race in the Cathedral Star Block – Tutorial. Don’t be afraid to use the seam ripper if a point looks blunted. Taking the time to fix a small misalignment now will make the final assembly of the quilt top much smoother and more professional-looking in the long run.
4. Final Assembly and Squaring Up the Cathedral Star Block – Tutorial
The final stage of our Cathedral Star Block – Tutorial is joining the rows together. Typically, a star block is assembled in a nine-patch grid (three rows of three squares). Match your “intersections” carefully by pinning at every junction where seams meet to ensure your lines stay straight across the entire block.
Using the nesting seams technique is a pro-level move in this Cathedral Star Block – Tutorial. By pressing the seams of Row 1 to the left and Row 2 to the right, the fabric “locks” together at the junctions. This prevents the layers from sliding while you sew, giving you those crisp, professional corners every time.
After the rows are joined, your Cathedral Star Block – Tutorial might look a little wavy. This is where squaring up comes in. Use your large square ruler to trim the outer edges so the block is perfectly square. Be careful to leave at least 1/4 inch of fabric beyond the star points so they don’t disappear when you sew blocks together.
If you find that your block is slightly smaller than intended, don’t panic. This Cathedral Star Block – Tutorial suggests adding a small coping strip or border of background fabric. This can bring the block up to the correct size without distorting the internal geometry of the star itself.
The “Cathedral” look is often finalized by adding curved top-stitching or applique folds over the seams. In some versions of the Cathedral Star Block – Tutorial, you actually fold back the edges of the “windows” to reveal a hidden fabric underneath. This adds a wonderful texture and a truly unique “stained-glass” finish.
Give your finished block one final, heavy press. You have now completed the Cathedral Star Block – Tutorial! Take a moment to admire the symmetry and the interplay of colors. Whether you make one block for a pillow or twenty for a king-sized quilt, you now possess the skills to create a masterpiece of geometric design.
Frequently Asked Questions (FAQ)
What is the best fabric for a Cathedral Star Block?
The best fabric is high-quality quilting cotton. It has a high thread count and minimal stretch, which is crucial for maintaining the sharp points and complex folds required in this pattern.
How do I prevent my star points from being “cut off”?
Always sew with a precise 1/4-inch seam. When joining units, look for the “V” or “X” intersection on the back of your fabric and sew exactly through the peak of that intersection.
Can a beginner attempt this Cathedral Star Block – Tutorial?
Yes! While it looks complex, it is essentially a combination of squares and triangles. If you can sew a straight line and measure accurately, you can definitely succeed with this tutorial.
Do I need a special sewing machine for this?
No special machine is needed. Any machine that can perform a reliable straight stitch will work. However, using a 1/4-inch quilting foot can make the process much easier and more accurate.
How long does it take to make one block?
For a beginner, it might take 1 to 2 hours to cut and sew one block carefully. As you become more familiar with the “flying geese” and “HST” units, you can significantly speed up the process.
Why is my block not lying flat?
This usually happens due to inconsistent seam allowances or not pressing the seams properly. Try “spinning” the center seams to distribute the bulk or using a tailor’s clapper to flatten the intersections.
Conclusion
This Cathedral Star Block – Tutorial has provided you with the foundational knowledge to create a truly breathtaking quilt design. We have covered everything from selecting the right cotton fabrics and precision tools to the intricate methods of sewing flying geese and nesting seams.
By following these structured steps, you can transform simple geometric shapes into a complex, “stained-glass” inspired work of art that showcases your technical skill and creative eye. Remember that quilting is a journey of patience; each block you create will be better than the last as your muscle memory for those perfect 1/4-inch seams develops.