The Checkerboard Star – Quilt Pattern is a striking design that combines geometric shapes with traditional quilting techniques.
Known for its vibrant and visually dynamic appearance, this quilt pattern is both eye-catching and fun to make.
The pattern’s combination of stars and checkerboard elements creates a visually balanced design that can be customized in numerous ways.
Whether you’re a beginner quilter or a more advanced one looking to try a new challenge, the Checkerboard Star – Quilt Pattern offers a rewarding project that will enhance your quilting skills.
Incorporating both square and star-shaped blocks, this quilt pattern offers a unique take on the classic checkerboard pattern. The use of contrasting fabrics enhances the design’s bold, graphic appeal, while the star elements bring a sense of structure and symmetry to the quilt. This quilt pattern works well in a variety of settings and can be made in different sizes, making it a versatile choice for any quilter looking to add a personalized touch to their collection.
The Checkerboard Star – Quilt Pattern can be customized in endless ways. You can use a combination of solid colors, prints, or even scrap fabrics to create a one-of-a-kind design. Whether you are crafting a quilt for a special occasion or simply want to enjoy the process of creating something beautiful, this pattern provides a fantastic opportunity to experiment with color, layout, and fabric choices.
1. Materials Needed for the Checkerboard Star Quilt Pattern
Before you begin working on your Checkerboard Star – Quilt Pattern, it’s important to gather the necessary materials. Having the right tools and fabrics ready will make the process much smoother and more enjoyable. Here’s a list of what you will need to get started:
- Fabric: Choose a variety of fabrics to create both the checkerboard and star patterns. For the checkerboard, you’ll need a selection of contrasting fabrics in both light and dark tones. For the stars, consider using bold, vibrant fabrics that will stand out. The fabric requirements may vary depending on the size of your quilt.
- Quilt Batting: Quilt batting provides the soft, cushioned layer that sits between the quilt top and backing. You’ll need enough batting to match the finished size of your quilt. Cotton or polyester batting works well for most quilts.
- Quilt Backing Fabric: For the back of the quilt, choose a fabric that complements the front design. The backing fabric can be a single piece of fabric or pieced together for added interest.
- Sewing Machine: A sewing machine with a straight stitch and a quarter-inch foot is ideal for quilting. While hand quilting is an option, using a machine will speed up the process and create a more uniform result.
- Rotary Cutter and Mat: A rotary cutter and self-healing cutting mat will help you achieve precise cuts for all of your quilt pieces. This is especially important when working with small pieces like those in the Checkerboard Star – Quilt Pattern.
- Quilting Ruler: A quilting ruler, preferably with a non-slip surface, will allow you to measure and cut accurate fabric pieces for both the checkerboard and star blocks.
Once you have all of these materials gathered, you’re ready to start assembling your quilt. The Checkerboard Star – Quilt Pattern may take some time, but with the right supplies and a little patience, you’ll end up with a beautiful, handmade quilt that showcases your creativity and quilting skills.
2. Step-by-Step Instructions for Creating the Checkerboard Star Quilt Pattern
Now that you have your materials ready, let’s dive into the process of making the Checkerboard Star – Quilt Pattern. This quilt pattern consists of two main components: the checkerboard blocks and the star blocks. Follow these steps to create each part of the quilt:
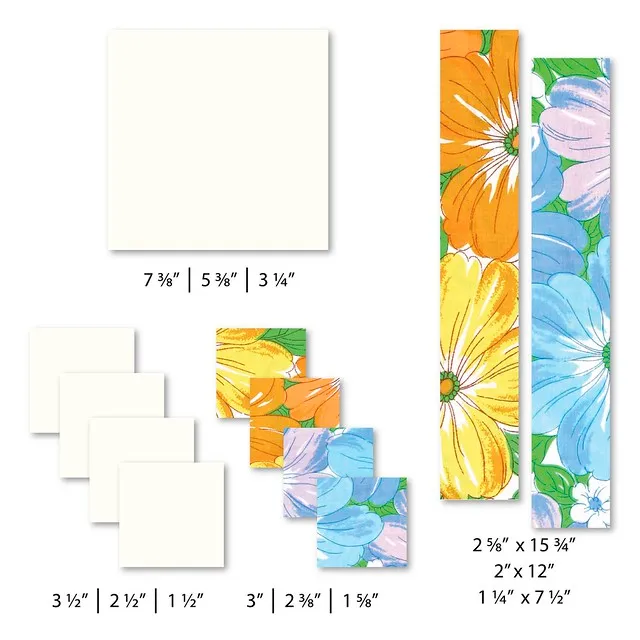
- Cutting the Fabric: Begin by cutting your fabric into strips and squares for both the checkerboard and star blocks. The standard size for each checkerboard square is typically 2.5 inches, while the star pieces can be cut into various sizes depending on the desired size of your star blocks.
- Assembling the Checkerboard Blocks: Start by sewing your fabric squares together to create the checkerboard pattern. Alternate between light and dark squares, ensuring that they align perfectly. You’ll need to repeat this step several times to create enough checkerboard blocks to fill the quilt top.
- Making the Star Blocks: The next step is to create the star blocks. These blocks are typically made by combining triangles and square pieces to form the points of the stars. Follow the pattern instructions to piece together the fabric in such a way that the star design becomes visible. Make sure to press each seam carefully as you go to avoid any wrinkles or misalignment.
- Arranging the Blocks: Once you have enough checkerboard and star blocks, begin laying them out on a flat surface. Arrange the blocks in a layout that alternates between checkerboard and star blocks. You can experiment with different placements to create a unique look for your quilt.
- Sewing the Blocks Together: After you’re satisfied with the arrangement, start sewing the blocks together in rows. Make sure that the seams are aligned as you sew, and press each row after sewing to keep everything flat and neat.
- Joining the Rows: Once all the rows are complete, join them together to form the quilt top. Take care to match the seams where the checkerboard and star blocks meet to maintain the design’s symmetry. Press all the seams as you go to ensure a smooth finish.
These steps will guide you through creating the body of your Checkerboard Star – Quilt Pattern. With patience and attention to detail, you’ll have a stunning quilt top ready for the next stages of finishing.
3. Tips for Customizing Your Checkerboard Star Quilt
While the Checkerboard Star – Quilt Pattern has a traditional design, there are countless ways to make it your own. Here are some tips for customizing your quilt and adding your personal touch:
- Experiment with Fabric Choices: Don’t be afraid to mix and match different fabric styles. You can create a modern twist on the pattern by using geometric prints or solid fabrics. Alternatively, try using a more vintage fabric selection for a nostalgic feel.
- Adjust the Size of the Blocks: If you want a quilt with larger or smaller blocks, feel free to adjust the size of your fabric squares and triangles. This will change the overall look and feel of the quilt, making it even more unique.
- Try Different Color Schemes: While classic checkerboard patterns often feature black and white, you can explore a wide range of color palettes. Consider using pastels for a softer, more serene quilt, or bright, bold colors for a statement piece.
- Add Border Fabric: A border can frame your quilt beautifully and give it a finished look. Use a coordinating fabric to create a border around the quilt top, or experiment with contrasting colors to make the quilt pop.
- Incorporate Embellishments: You can add extra elements like embroidery, applique, or even small beads to your Checkerboard Star – Quilt Pattern for added texture and visual interest.
- Change the Layout: While the traditional layout alternates checkerboard blocks and star blocks, you can try different arrangements. For example, you could create diagonal lines or a more randomized layout for a unique effect.
By incorporating these customization ideas, you can make your Checkerboard Star – Quilt Pattern truly one-of-a-kind and a perfect reflection of your style.
4. Common Mistakes to Avoid When Making a Checkerboard Star Quilt
Even experienced quilters can sometimes make mistakes while working on a quilt pattern like the Checkerboard Star – Quilt Pattern. Here are some common pitfalls to avoid during the quilting process:
- Inaccurate Cutting: One of the most important steps in quilting is cutting your fabric accurately. If your fabric pieces are not cut to the right size, it can lead to misaligned seams and an uneven quilt. Make sure to use a rotary cutter, quilting ruler, and cutting mat to get precise cuts.
- Uneven Seam Allowances: A consistent seam allowance is crucial to achieving a neat and professional-looking quilt. If your seam allowances are too small or too large, it can affect the overall size and fit of your quilt. Use a quarter-inch foot on your sewing machine to maintain a consistent seam allowance.
- Ignoring Pressing: Pressing your seams after every step is essential for achieving a flat quilt top. Skipping this step can lead to wrinkles and an uneven quilt. Take the time to press each seam carefully as you go along.
- Not Checking Block Sizes: Before sewing your blocks together, double-check that all your blocks are the same size. If they’re slightly off, it can cause problems when piecing them together. Trim any blocks that are too large to ensure they fit together properly.
- Skipping Fabric Pre-Washing: Some fabrics shrink after washing. Pre-washing your fabric before starting the quilt will prevent shrinkage and ensure that your quilt maintains its size after it’s finished.
- Not Checking for Fabric Placement: When laying out your blocks, take the time to check the placement of your fabrics. A mismatch in color placement or pattern can disrupt the overall design. Arrange your blocks before sewing them together to get a feel for how the quilt will look.
By avoiding these common mistakes, you can ensure that your Checkerboard Star – Quilt Pattern turns out beautifully and is a joy to create.
FAQ: Frequently Asked Questions About the Checkerboard Star Quilt Pattern
Q1: How do I choose the right fabrics for the Checkerboard Star Quilt?
When selecting fabrics, aim for a contrast between the checkerboard and star blocks. For example, use light and dark fabrics for the checkerboard and bold, vibrant fabrics for the star elements. Be sure to choose fabrics that complement each other.
Q2: What size quilt can I make using the Checkerboard Star pattern?
The size of your quilt depends on the number of blocks you make and their individual dimensions. You can adjust the pattern to create a small throw, a large bedspread, or anything in between.
Q3: Can I make the Checkerboard Star quilt by hand?
Yes, it’s possible to make this quilt by hand, but it will require more time and patience. Many quilters prefer to use a sewing machine to speed up the process, but hand-sewing can add a unique touch to your quilt.
Q4: How can I quilt the finished quilt top?
Once your quilt top is finished, you can quilt it by hand or machine. Common quilting methods include stitch-in-the-ditch, free-motion quilting, or quilting in a grid pattern. The choice depends on your personal preference and skill level.
Q5: Can I use the Checkerboard Star pattern for smaller projects?
Yes, you can adapt the Checkerboard Star – Quilt Pattern for smaller projects like pillows, table runners, or wall hangings. Simply reduce the size of the blocks to suit the smaller scale.
Conclusion
The Checkerboard Star – Quilt Pattern is a beautiful and versatile quilting project that offers endless possibilities for creativity. By following the steps outlined in this article, you can create a stunning quilt that showcases your quilting skills and personal style. Whether you choose to stick with a traditional color scheme or add your own unique twists, the Checkerboard Star Quilt is sure to be a cherished addition to your home.
We hope this guide has inspired you to begin your own quilting journey. If you have any questions, suggestions, or feedback, feel free to share them in the comments section below. We’d love to hear from you!