Creating a Christmas Tree Block – Pattern is a wonderful way to add handmade charm and festive spirit to your holiday décor or quilt projects.
Whether you’re making a full holiday quilt, a table runner, or even a set of cheerful potholders, this block design brings the season to life with creativity and warmth.
The Christmas Tree Block – Pattern is especially popular among quilters during the winter months due to its symbolic nature and visual appeal.
Simple to construct yet full of character, this block is a great way to use up scraps or feature beautiful holiday fabrics. It’s also a beginner-friendly project that can be scaled or customized to suit your needs.
In this guide, we’ll walk through everything you need to know to sew your own Christmas Tree Block – Pattern. You’ll learn about selecting fabrics, cutting and piecing techniques, layout ideas, and more. Whether you’re new to quilting or a seasoned crafter, you’ll find inspiration and clear steps to help bring your holiday block to life.
1. Choosing Fabrics and Planning Your Block
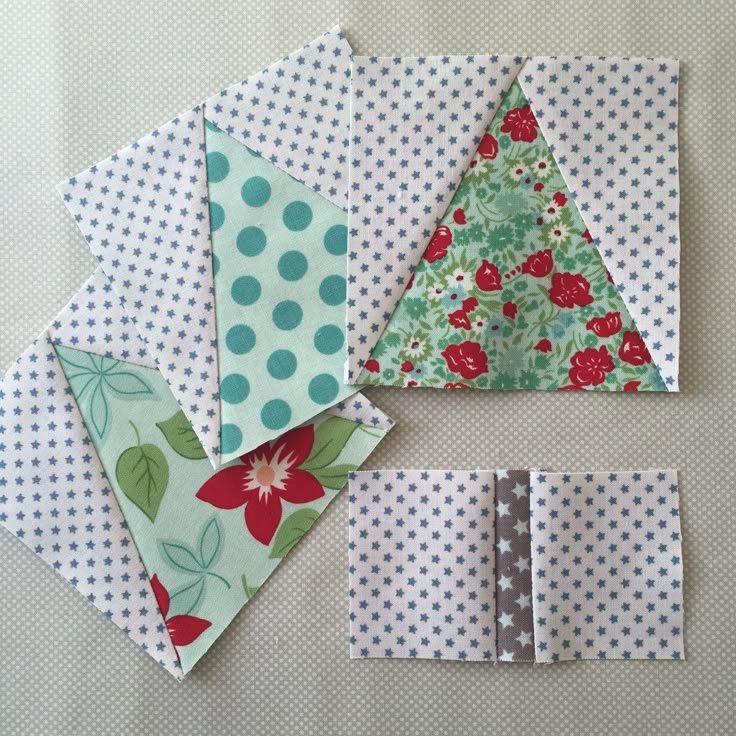
Before you begin cutting and sewing your Christmas Tree Block – Pattern, it’s important to choose the right materials. Fabric selection is what will bring your block to life and make it stand out in your final quilt or project.
Start by selecting greens for the tree. You can use a single fabric for a classic look or choose multiple shades for a scrappy, textured effect. Holiday prints like holly, snowflakes, or stars can make your block feel even more festive and personal.
For the background of your Christmas Tree Block – Pattern, choose light or neutral tones like white, cream, or pale blue to simulate a snowy backdrop. These colors will make your tree stand out and give the entire block a clean and bright appearance.
You’ll also need fabric for the tree trunk. Browns work best, but you can also use woodgrain prints or even metallics for a whimsical twist. A trunk adds grounding to the design and helps balance the vertical composition of the tree shape.
Don’t forget to prewash your fabric if you’re concerned about shrinkage or bleeding, especially with deep greens and reds. This step ensures your finished project stays vibrant and consistent after washing.
Once your fabrics are selected, draw a simple layout or sketch of your Christmas Tree Block – Pattern. Planning ahead helps you visualize how your pieces will fit together and where you want to place each color.
2. Cutting and Piecing the Tree Shape
The magic of the Christmas Tree Block – Pattern lies in its shape and structure. Piecing this block involves careful cutting and thoughtful assembly, but it’s a satisfying process once you get started.
Begin by cutting triangles or rectangles that will form the branches of your tree. Most Christmas Tree Blocks are built using simple geometric shapes, often starting with small triangles at the top and increasing in width as you move down.
You can use templates or rely on your quilting ruler to create symmetrical pieces. For example, three stacked triangles can be used to represent the foliage of the tree. Add a small rectangle at the bottom for the trunk, and you’ve got the basic shape complete.
Next, cut your background pieces. These are often triangles or rectangles that fit around your tree branches. Carefully sew the background pieces to the tree sections using a ¼ inch seam allowance. Press your seams well after each step.
Continue adding rows, building the tree from the top down. Make sure to align the center point of each row with the one above it. This keeps the Christmas Tree Block – Pattern neat and symmetrical as you sew.
Once your tree shape is assembled, check the block’s overall size. Trim any uneven edges and square up the block to your desired dimensions—typically 12.5 inches square before quilting.
If you’re making multiple blocks, repeat the same cutting and piecing process, or vary your fabric choices slightly for visual interest across your quilt.
3. Creative Variations and Layout Ideas
While the classic Christmas Tree Block – Pattern is beautiful on its own, there are countless ways to personalize and enhance your block. Let your imagination guide you as you explore different styles and layouts.
One fun variation is to add decorative “ornaments” using small appliqué circles, buttons, or embroidered accents. These can mimic holiday lights, baubles, or stars, giving your block a cheerful and custom look.
You might also experiment with adding a star at the top of the tree. A small yellow or gold triangle, or a fussy-cut star fabric, can crown your tree and emphasize the holiday theme. Some quilters even add a pieced or appliqué angel instead.
If you’re making a quilt with multiple Christmas Tree Blocks, try alternating tree directions or mirror-imaging some of them. This adds movement and visual interest to your finished piece.
Consider using sashing between blocks to give each tree space to shine. You can use holiday-themed fabrics or even make mini tree trunks as sashing connectors to tie the blocks together creatively.
Another idea is to combine the Christmas Tree Block – Pattern with other seasonal blocks, like snowflakes, gift boxes, or stars. This creates a full holiday sampler quilt that tells a festive story.
Finally, think about scaling your blocks. A larger block makes a great pillow front, while smaller ones work beautifully for placemats or wall hangings. Adjusting the size lets you use this versatile pattern in endless ways.
4. Finishing Touches and Project Ideas
Once your Christmas Tree Block – Pattern is complete, you can turn it into a wide range of finished projects. This block isn’t just for quilts—it works wonderfully in other crafts too.
For a quick project, turn your finished block into a quilted pillow cover. Simply add a backing, insert a pillow form, and enjoy a cozy holiday decoration for your living room or guest space.
You can also use these blocks as part of a holiday table runner. Stitch several together in a row, add a border, and quilt them for a beautiful handmade centerpiece for your Christmas table.
Wall hangings are another great option. A vertical strip of Christmas Tree Blocks can be quilted, bound, and hung on a door or wall to add instant seasonal flair to any room.
If you’re making gifts, consider using the Christmas Tree Block – Pattern for potholders, fabric gift bags, or even tote bags. Handmade gifts like these are always appreciated and show a personal touch.
Don’t forget the quilting stage! Use free-motion designs, simple echo quilting, or stitch-in-the-ditch techniques to enhance the look of your block. Choose threads that complement or highlight your fabric choices.
Finally, label your finished piece with the date and your name. Holiday quilts become heirlooms, and adding a label ensures your handmade work will be remembered for years to come.
FAQ – Christmas Tree Block – Pattern
Q: What size is a standard Christmas Tree Block?
A common size is 12.5 inches square (unfinished), but you can scale it to suit your project.
Q: Is the Christmas Tree Block – Pattern good for beginners?
Yes! It uses basic shapes and straight-line sewing, making it great for those new to quilting.
Q: Can I use scrap fabric for this pattern?
Absolutely. The tree sections are perfect for using up small green fabric pieces, and the background can be scrappy too.
Q: Do I need special tools to make this block?
Basic quilting tools like a rotary cutter, ruler, and sewing machine are all you need. Triangle templates can be helpful but are not required.
Q: How can I make my tree look more festive?
Add appliqué ornaments, a fabric star, or decorative stitching to make your block more holiday-themed.
Q: What projects can I make using this block?
Besides quilts, this block is great for pillows, wall hangings, table runners, tote bags, and more.
Conclusion
We hope this guide to the Christmas Tree Block – Pattern has inspired you to create something joyful, festive, and handmade this holiday season. From selecting fabrics to piecing and finishing, this block offers endless creative possibilities for both beginner and experienced quilters alike.
Whether you’re making a single block or an entire quilt full of trees, the joy is in the process as much as the final result. Don’t be afraid to experiment with layouts, colors, or embellishments to make your block uniquely yours.
If you enjoyed this article or have any ideas, we’d love to hear from you. Please leave a sincere opinion and suggestions in the comments. Your feedback helps us improve and share even more creative quilting content with fellow enthusiasts. Happy sewing and happy holidays!