The Diamond Cathedral Pincushion – pattern is a beautiful and practical sewing project that combines charm and utility.
Whether you’re a seasoned quilter or just starting your sewing journey, this pattern offers a rewarding experience that results in a functional tool for your craft table.
This pincushion design is inspired by the traditional cathedral window quilt block, reimagined into a compact, diamond-shaped form perfect for holding pins and needles.
By using the Diamond Cathedral Pincushion – pattern, you can explore creative fabric combinations, improve your precision sewing skills, and produce a stunning final product that reflects your personal style. This project also makes excellent use of fabric scraps, allowing you to reduce waste while crafting something unique and handmade. It’s an ideal pattern for those looking to create gifts, sell handmade crafts, or simply add a personal touch to their sewing kit.
In this article, we’ll walk you through everything you need to know to create the Diamond Cathedral Pincushion – pattern, from materials to step-by-step instructions and expert tips. This guide is written in a humanized tone, easy to follow, and optimized for SEO best practices to ensure it’s not only informative but also friendly for Google AdSense compliance. Let’s dive into this creative journey and discover the joys of crafting your own diamond-shaped pincushion.
1. What is the Diamond Cathedral Pincushion Pattern?
The Diamond Cathedral Pincushion – pattern is based on the elegant cathedral window quilting technique, which uses folded fabric to create a dimensional, geometric design. Unlike traditional pincushions, this version stands out due to its intricate appearance and handcrafted charm. Each diamond is formed by folding and stitching layers of fabric, resulting in a cushion that is as decorative as it is useful.
This design is perfect for quilters who enjoy both precision and creativity. The folds and seams create natural compartments that enhance the pincushion’s texture while maintaining its practicality. Its compact size makes it ideal for travel or on-the-go sewing, while its sturdiness ensures it holds up over time.
One of the most appealing aspects of this pattern is its versatility. You can choose bright, modern fabrics for a contemporary look or go with muted tones and florals for a vintage feel. With just a few fabric scraps, you can bring the Diamond Cathedral Pincushion – pattern to life in a way that reflects your personal taste and style.
Beyond aesthetics, this pattern is an excellent way to build your sewing confidence. Because the pincushion is small, it’s manageable even for beginners. Yet the techniques involved—folding, topstitching, stuffing—offer enough complexity to challenge more experienced sewists.
Additionally, it’s a fantastic project for using up leftover quilting cotton or repurposing old fabric pieces. It’s eco-friendly and economical, helping you reduce waste while crafting something new and functional.
Lastly, the Diamond Cathedral Pincushion – pattern also makes a thoughtful, handmade gift. Whether for a fellow crafter, a sewing teacher, or a friend, this pincushion is a heartfelt present that showcases your creativity and attention to detail.
2. Materials You’ll Need to Get Started
To begin your Diamond Cathedral Pincushion – pattern project, you’ll need a few essential materials. These items are easy to find at any fabric or craft store, and many may already be in your sewing kit.
Start with fabric scraps. Choose three to five coordinating cotton fabrics in different colors or prints. These will form the layers of your diamond design. Lightweight quilting cotton is best as it’s easy to fold and stitch.
You’ll also need batting or interfacing to give your pincushion structure. Batting makes the pincushion soft and squishy, while interfacing gives it a firmer shape. Either works, depending on your personal preference.
Next, gather thread and a needle, or use your sewing machine. A coordinating thread is ideal, especially for topstitching, which will be visible in the finished product. Hand stitching adds a lovely, rustic touch, but machine stitching speeds up the process.
For the filling, consider crushed walnut shells, polyester fiberfill, or even rice. Crushed walnut shells are preferred by many because they help keep pins sharp. However, polyfill is soft and widely available.
You’ll also need scissors or a rotary cutter, pins, and an iron. Precise cuts and clean folds are essential in this project, and pressing your fabric helps achieve those sharp lines and accurate folds.
Lastly, you may want to add optional embellishments such as a decorative button in the center or some hand embroidery around the edges. These touches make each pincushion unique and showcase your creative flair.
3. Step-by-Step Instructions for Making the Pincushion
Creating the Diamond Cathedral Pincushion – pattern is a rewarding experience, and following these steps will help you achieve the best results. Take your time and enjoy the process of building something beautiful from scratch.
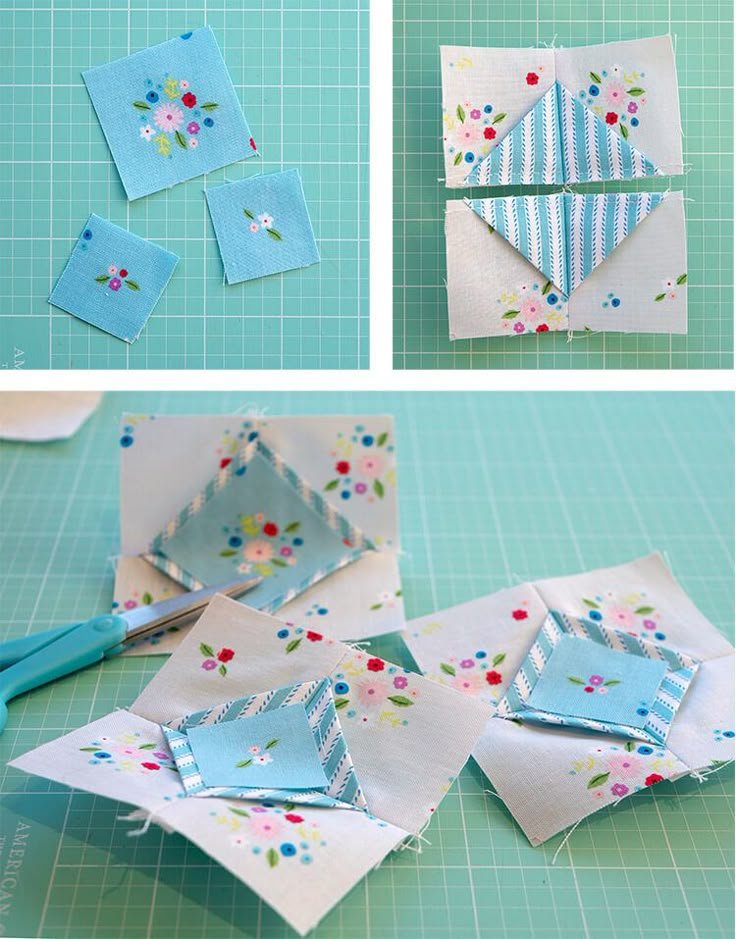
Start by cutting your fabric into squares—usually around 4” each. You’ll need one for the backing and multiple for the top layer. Iron each square flat to prepare them for folding.
Fold each top layer square in half diagonally, then again, creating a triangle. Place these triangles on your backing fabric in a diamond pattern, overlapping the edges slightly. Pin them in place to prevent shifting.
Sew along the outer edges of the triangles, securing them to the backing. Be precise with your stitching, especially around the points, to ensure the diamond shapes remain clean and sharp.
Next, add the batting or interfacing behind the stitched piece and sew it to a matching backing square, leaving a small opening for turning. Turn the piece right side out, gently pushing out the corners for a crisp shape.
Fill the pincushion with your chosen stuffing. If using walnut shells or rice, consider using a small funnel or spoon for easier filling. Once it’s full, sew the opening closed with a ladder stitch or topstitch around the edges for extra strength.
Finally, embellish your pincushion with a button in the center or a ribbon loop for hanging. You can also quilt additional designs on top or add decorative stitches for extra flair.
4. Tips, Variations, and Best Practices
To make your Diamond Cathedral Pincushion – pattern truly stand out, here are some expert tips and fun variations you can try. Each suggestion is designed to personalize your project and enhance your sewing experience.
First, experiment with fabric textures. Try mixing quilting cotton with linen or even silk scraps for a luxurious feel. Just make sure all fabrics are easy to fold and not too bulky.
Second, play with color contrast. Using high-contrast fabrics for the diamond layers helps the geometric design pop. You can also stick to a monochromatic palette for a more subtle, elegant look.
Third, use decorative stitches. If your sewing machine offers built-in embroidery or decorative stitches, use them around the edges of your diamonds. This adds a special touch that makes your pincushion one-of-a-kind.
Fourth, add practical features. Sew a small loop of ribbon to one side so the pincushion can hang from your sewing machine or pegboard. You can also add a small pocket on the back for storing a thimble or small scissors.
Fifth, consider scaling the pattern. Make a larger version to use as a pattern weight or a smaller one to attach to a keychain. The basic construction remains the same, so you can adapt the size without altering the technique too much.
Lastly, gift your pincushion. Wrap it in tissue paper and add a handwritten tag with your name and the date. It’s a thoughtful gift for birthdays, holidays, or sewing swaps that shows time, care, and creativity.
FAQ – Diamond Cathedral Pincushion – Pattern
What is the Diamond Cathedral Pincushion pattern used for?
It’s a decorative and functional pincushion design that helps store and organize pins and needles while adding beauty to your sewing space.
Is this pattern beginner-friendly?
Yes! While it involves some folding and precision stitching, the small size and clear steps make it perfect for beginners looking to learn new techniques.
Can I use this pattern to sell handmade items?
Absolutely. Handmade pincushions using this pattern are great for craft fairs or online shops. Just be sure to check if the pattern is under any commercial restrictions if you’re following a specific designer’s instructions.
What are the best materials for filling the pincushion?
Crushed walnut shells are ideal because they help sharpen pins. Polyester fiberfill is also common and easy to find. Rice or lentils can be used but may break down over time.
How can I make the pincushion more durable?
Use quality fabrics, stitch securely, and double-stitch any areas under pressure, such as the corners and edges. Adding interfacing can also increase strength.
What fabric types work best with this pattern?
Lightweight to medium cotton fabrics are best. Avoid very thick or stretchy materials, which are harder to fold and may distort the design.
Conclusion
The Diamond Cathedral Pincushion – pattern is a beautiful blend of form and function, perfect for quilters and sewists of all levels. It uses classic quilting techniques in a modern way, turning scraps into something useful and artistic. From selecting fabrics to finishing touches, each step allows for creativity and personalization.
We’ve walked through what makes this pattern special, how to gather the right materials, and the steps to bring your pincushion to life. We also explored ways to customize your project and keep it durable and beautiful for years to come.
Have you tried making your own Diamond Cathedral Pincushion?
We’d love to hear from you! Share your thoughts, experiences, or suggestions in the comments below. Your feedback helps other crafters and inspires creativity in our community.