Creating your own DIY Iron Storage Bag – Pattern is not just a fun project—it’s also a practical way to keep your iron organized and portable. Whether you’re a sewing enthusiast or just someone looking for a safe, stylish way to store your iron, this guide will walk you through everything you need to know.
From choosing the right fabric to the final stitch, you’ll learn how to make a functional and attractive iron storage bag right at home.The popularity of DIY storage solutions is growing rapidly, especially for those involved in crafting, quilting, or sewing.
Not only does making your own storage bag save money, but it also allows you to tailor it exactly to your needs. A DIY Iron Storage Bag – Pattern is especially useful if you attend sewing workshops, travel with your supplies, or just want a tidy sewing space.
In this comprehensive tutorial, we’ll explore how to design, cut, and assemble your custom iron storage bag. We’ll also cover the benefits of making it yourself, key materials, tips for durability, and even safety considerations. This project is perfect for beginners and seasoned crafters alike.
1. Benefits of Making Your Own DIY Iron Storage Bag – Pattern
Creating your own DIY Iron Storage Bag – Pattern comes with several advantages that extend beyond mere aesthetics.
Firstly, one of the most obvious benefits is customization. You can choose your own colors, fabrics, and even add your name or logo. This means you’re not limited to generic store-bought options.
Secondly, DIY storage bags tend to be more durable. You control the quality of the materials, such as the inner lining and zippers, ensuring your bag holds up under repeated use.
Another great benefit is cost-efficiency. While buying a pre-made iron storage bag can be expensive, making one at home with affordable materials significantly reduces your costs.
The fourth benefit is the satisfaction that comes from crafting something useful with your own hands. It’s rewarding to create a product that meets your exact needs.
In addition, DIY bags are often designed with better functionality. You can add pockets, extra padding, or heat-resistant fabric—features often missing in commercial models.
Finally, for eco-conscious individuals, making your own bag means you can choose sustainable fabrics or even upcycle materials, helping reduce waste and support the environment.
2. Essential Materials and Tools You’ll Need
Before you begin crafting your DIY Iron Storage Bag – Pattern, it’s crucial to gather all the right materials and tools.
Start with a sturdy outer fabric such as canvas, denim, or upholstery fabric. These provide durability and protection for your iron during transport or storage.
You’ll also need heat-resistant lining or insulated batting. This is especially important if you plan to store your iron shortly after use.
A quality zipper or velcro is essential to keep the bag securely closed. If you prefer a flap design, magnetic snaps can also be a good choice.
Other tools include scissors or a rotary cutter, measuring tape or ruler, pins or clips, and a sewing machine with heavy-duty needles.
Don’t forget thread that matches or complements your fabric, and optionally, you may want to use binding tape to finish off the edges neatly.
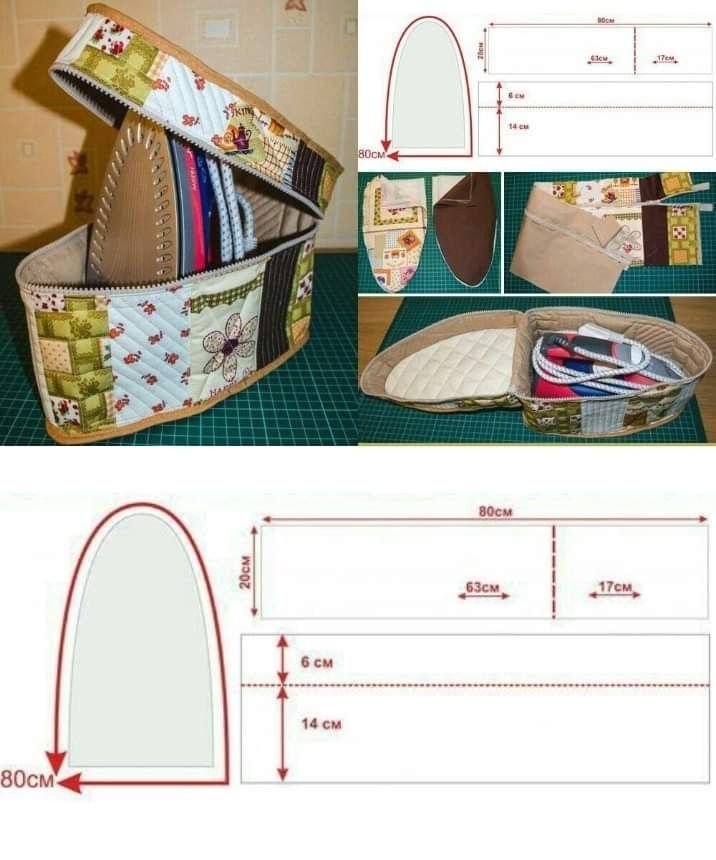
Finally, print or sketch out your DIY Iron Storage Bag – Pattern in advance. There are many templates available online, or you can design your own based on your iron’s dimensions.
3. Step-by-Step Instructions to Create Your Iron Storage Bag
Follow these steps to bring your DIY Iron Storage Bag – Pattern to life. Don’t rush—precision is key to making a high-quality finished product.
Begin by measuring your iron. Note the length, width, and height. Add an inch to each dimension for seam allowance and ease of fitting.
Cut your chosen fabric and lining according to your pattern. You’ll need two main body pieces, a base, and possibly side panels depending on your design.
Next, sew the lining pieces together first. Use heat-resistant batting between the outer fabric and the lining for added protection.
After assembling the lining, stitch the outer fabric pieces, matching them carefully at corners and seams. Don’t forget to add any pockets or straps at this stage.
Insert the lining into the outer shell, wrong sides together, and top-stitch the seams to hold them in place. This not only strengthens the structure but also gives a professional finish.
Finally, add the zipper or flap closure, and reinforce the handles if you’ve added them. Your DIY Iron Storage Bag – Pattern is now ready to use!
4. Pro Tips for Durability and Style
While making your DIY Iron Storage Bag – Pattern, a few professional tips can enhance both the function and appearance of your finished product.
Always pre-wash and iron your fabric before cutting. This prevents shrinkage and ensures smoother sewing.
Use interfacing for extra structure. This helps the bag maintain its shape, especially when your iron is stored inside.
Reinforce stress points such as handle attachments and zipper ends with extra stitching. This will make the bag last longer and withstand more weight.
For style, consider color blocking or adding decorative stitching. You can also personalize it with embroidered initials or iron-on patches.
If you travel with your iron, include an extra pocket for the cord or water reservoir. This keeps everything neatly stored in one place.
Lastly, test the heat resistance by placing a warm (not hot) iron inside the bag for a short period. This ensures your materials can handle residual heat safely.
FAQ: DIY Iron Storage Bag – Pattern
Q1: Is a DIY iron storage bag safe for a warm iron?
A: Yes, if you use heat-resistant materials like insulated batting or thermal fabric lining, your bag will safely store a warm iron. However, always allow your iron to cool for a few minutes before storage.
Q2: Can beginners make this bag?
A: Absolutely! This DIY Iron Storage Bag – Pattern is suitable for beginners. Start with a simple design and fewer pockets, then add complexity as your skills improve.
Q3: Where can I find free patterns?
A: Many craft blogs, sewing forums, and Pinterest boards offer free printable patterns. You can also trace the shape of your own iron and build a custom pattern from scratch.
Q4: What size should I make the bag?
A: Measure your iron and add about 1 inch for seam allowance and breathing space. If you have a steam iron or travel iron, adjust the dimensions accordingly.
Q5: Can I wash the bag?
A: Yes, if you use washable fabrics. Just make sure your lining and interfacing are also machine-wash safe, and wash on a gentle cycle.
Q6: How long does it take to complete the project?
A: For most people, this project takes 2–3 hours, depending on skill level and design complexity.
Conclusion
In this article, we explored how to make a DIY Iron Storage Bag – Pattern from scratch, including the benefits, required materials, step-by-step instructions, and expert tips for a professional result. Not only is this a useful project for storing your iron safely, but it’s also a creative and enjoyable sewing challenge that adds a personal touch to your crafting space.
We hope this guide helps you create a durable, stylish, and functional iron storage bag. If you’ve tried it out or have your own tips and tricks, please leave a sincere opinion and share your suggestions in the comments. Your feedback helps others in the community and improves future DIY content!