Looking for a thoughtful, stylish, and eco-friendly way to present a bottle of wine? A DIY wine bag – pattern is the perfect solution. Whether you’re crafting for the holidays, birthdays, weddings, or just as a kind gesture, making a wine bag by hand adds a special personal touch.
It’s simple, creative, and allows you to tailor the design to the occasion or the recipient’s personality.Unlike store-bought options, a DIY wine bag can be customized using different fabrics, closures, and decorations. From elegant velvet to rustic burlap, the style choices are endless.
Plus, you can reuse these handmade bags again and again, making them a sustainable alternative to disposable wrapping paper or plastic gift bags. It’s a small project with big charm—and it makes a lasting impression.
In this guide, we’ll walk you through how to choose the right DIY wine bag – pattern, materials you’ll need, step-by-step sewing tips, and creative ways to personalize your creation. Whether you’re an experienced sewer or just starting out, you’ll find this project enjoyable and highly rewarding.
1. Choosing the Best DIY Wine Bag Pattern
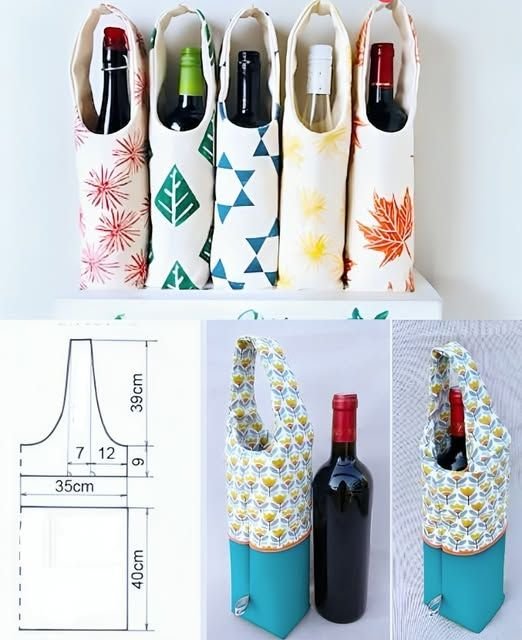
Finding the right DIY wine bag – pattern is essential for achieving the look and functionality you want. There are various types of patterns available, from simple drawstring pouches to more structured tote-style designs with handles or bottle neck holders.
Start by identifying the purpose of your wine bag. Is it for gifting? For storage? For display? Each use case might require a slightly different shape or design. For instance, a holiday gift might benefit from a more festive style with decorative accents, while a practical storage bag can be more minimalist.
If you’re new to sewing or crafting, opt for a beginner-friendly pattern. Many simple designs use just one or two pieces of fabric and require only basic straight-line stitching. These patterns usually include helpful diagrams or printable templates to guide you.
Intermediate or advanced crafters can explore more complex patterns with added compartments, interfacing for structure, or embellishments like embroidery or appliqué. These allow for more creativity and a polished finish that can rival store-bought options.
You can find free and paid patterns online on craft blogs, Etsy, and sewing platforms like SewCanShe or Craftsy. Look for patterns with good reviews and clear instructions to ensure a smooth crafting experience.
No matter your skill level, choosing a DIY wine bag – pattern that matches your needs will make the process more enjoyable and the final product more satisfying.
2. Materials and Tools You’ll Need
Once you’ve chosen your DIY wine bag – pattern, it’s time to gather your supplies. The beauty of this project is that it requires only a few basic materials, many of which you may already have at home.
The main item you’ll need is fabric. Popular choices include cotton for a clean, classic look, linen for a natural texture, or velvet and satin for an upscale appearance. You can also use denim, canvas, or even upcycled clothing for a rustic or eco-friendly option.
Next, consider your lining material, especially if you want the bag to feel more durable or luxurious inside. Coordinating or contrasting fabrics can add an extra flair when the bag is opened.
You’ll need thread that matches or complements your fabric, as well as a sewing machine (or a needle for hand-sewing). A rotary cutter or scissors, pins, and a ruler or measuring tape are also must-haves for accuracy.
For closures, options include drawstrings, ribbons, buttons, or Velcro. A drawstring is one of the easiest to install and adds a classic gift-bag style. For a more secure or stylish finish, you might choose snap buttons or fabric loops.
Optional decorative elements like lace, fabric paint, iron-on transfers, or even embroidery thread can help personalize your wine bag. Add a monogram, quote, or holiday greeting to make your gift even more meaningful.
With all materials in place, you’re ready to follow your chosen DIY wine bag – pattern and begin stitching a unique creation from scratch.
3. Step-by-Step: Sewing Your Wine Bag
Now comes the most exciting part: bringing your DIY wine bag – pattern to life. With just a few steps, you can turn plain fabric into a reusable, beautiful wine bottle holder that’s sure to impress.
Begin by cutting your fabric according to the pattern dimensions. Most wine bags require a main outer piece and a lining piece, both rectangular and approximately 14 inches wide by 17 inches tall. Always double-check the size of your wine bottle to ensure a snug fit.
Pin the right sides of the fabric together and start stitching along the sides and bottom edges, leaving the top open. If you’re using a drawstring closure, make sure to leave a small gap about 1.5 inches from the top where the cord can be threaded through.
After stitching, trim any excess seam allowance and clip the corners to reduce bulk. Then, turn the fabric right side out and press it flat with an iron to create crisp edges. Repeat this for the lining if you’re using one.
If your pattern includes a drawstring casing, fold down the top edge of the fabric twice (about ½ inch each time) and stitch around to form a tube. Use a safety pin to thread the cord or ribbon through the casing smoothly.
Once the casing is in place, insert the lining into the outer bag and stitch the top edge closed (unless you’re using a reversible design). Tie a knot in the drawstring, and your wine bag is ready for its debut!
This simple process shows how easy it is to transform fabric into a custom gift wrap using a DIY wine bag – pattern, making your present feel extra thoughtful and unique.
4. Personalization and Creative Variations
One of the biggest advantages of using a DIY wine bag – pattern is the ability to personalize every detail. With a few small tweaks, you can create bags that feel as special as the wine they hold.
Add embroidered initials, names, or messages for a personalized touch. If you’re gifting for a wedding or anniversary, embroider the couple’s last name or a special date for a keepsake they’ll cherish.
Try using seasonal fabrics or holiday themes. Plaids and deep reds are perfect for Christmas, while florals and pastels work beautifully for spring celebrations or Mother’s Day. Don’t forget Halloween-themed wine bags with spooky appliqués!
You can also vary the shape and size. Make a shorter, wider version for champagne bottles, or a tall, slim one for specialty wine. Adjusting the pattern to accommodate different bottle sizes adds flexibility to your crafting skills.
Add pockets to the outside of the bag for small cards, corkscrews, or gift tags. These simple additions increase the functionality and show an extra level of care and creativity.
Consider creating matching sets. If you’re making multiple wine bags, you can use a shared color palette or fabric pattern but change the ribbon or label for each recipient. This makes your gifts cohesive but still personalized.
Finally, experiment with closures. While drawstrings are classic, adding magnetic snaps, wrap ties, or even zippers can give your wine bag a different look and elevate it from simple to sophisticated.
With endless ways to personalize, each DIY wine bag – pattern becomes an opportunity to showcase your style and thoughtfulness.
FAQ: Frequently Asked Questions
Q1: Can I make a wine bag without a sewing machine?
Yes! Many simple DIY wine bag – pattern options can be sewn by hand. It may take longer, but it’s definitely possible, especially for drawstring designs with straight stitches.
Q2: What fabric is best for a wine bag?
Cotton and canvas are the most commonly used fabrics for durability and ease of sewing. For a more elegant look, consider velvet, satin, or linen.
Q3: Can I wash a DIY wine bag?
Yes, but always check the fabric care instructions. Most cotton or linen wine bags can be hand-washed or machine-washed on a gentle cycle. Avoid washing bags with glued embellishments.
Q4: How do I size my wine bag correctly?
A standard wine bottle is about 12 inches tall and 3 inches wide. Add an extra inch or two to the height and width in your pattern to allow room for seams and a comfortable fit.
Q5: Can I sell wine bags made from DIY patterns?
Yes, but be sure to check the copyright terms of the DIY wine bag – pattern you’re using. Some designers allow commercial use, while others permit personal use only.
Q6: Are DIY wine bags eco-friendly?
Absolutely. Reusable wine bags reduce waste and can be made from sustainable or upcycled materials, making them a great choice for environmentally conscious gifting.
Conclusion
Creating a DIY wine bag – pattern is more than just a fun crafting project—it’s a way to give meaningful, reusable, and personalized gifts that show you care. From choosing the right materials and pattern to stitching and decorating your bag, every step lets you add your own creative flair.
Whether you’re a beginner or a seasoned crafter, the process is simple, affordable, and endlessly customizable. Plus, the end result is something that not only looks beautiful but can be reused for years to come.
We hope this guide has inspired you to try making your own DIY wine bag. If
you’ve enjoyed this project or have any ideas, suggestions, or feedback, we’d love to hear from you! Please leave your honest opinion in the comments and let us know how your wine bag turned out.