Creating a hexagon pincushion – pattern is not only a fun and relaxing sewing project, but it also results in a charming and functional accessory for your crafting space.
Whether you’re a beginner looking to build skills or an experienced quilter in need of a creative break, this simple yet elegant project has something for everyone.
The hexagon pincushion – pattern is widely loved for its geometric appeal and the flexibility it offers in fabric choices and personalization.
The growing popularity of English paper piecing (EPP) has made hexagon pincushion – pattern projects more accessible and appealing. These pincushions are often assembled using small fabric scraps, making them a perfect eco-friendly craft idea. Additionally, the portability of this project allows you to sew almost anywhere — on your couch, during travel, or while waiting for an appointment.
Using a hexagon pincushion – pattern allows crafters to experiment with color combinations and design layouts while keeping the construction process simple. The hexagon shape offers a lovely symmetry and lends itself well to layering, embellishments, and even embroidery. Let’s dive deeper into how you can make your own and why it’s a must-try sewing activity.
1. Understanding the Basics of a Hexagon Pincushion
To begin with any hexagon pincushion – pattern, it’s essential to understand the structure of a hexagon and how it works in a fabric setting. A hexagon has six equal sides, which makes it perfect for patchwork and modular sewing. The shapes interlock neatly, forming beautiful patterns without gaps.
The process usually begins with choosing your hexagon size. Smaller hexagons result in a more intricate look, while larger ones are easier and faster to work with. Most crafters begin with 1-inch or 1.5-inch sides for their pincushions.
You’ll typically use paper templates for the hexagons, especially if you’re doing English paper piecing. These templates help you fold and sew the fabric pieces with precision, ensuring clean, sharp edges and uniformity throughout the project.
Once the templates are ready, fabric pieces are basted over the paper shapes using either thread basting or glue basting. Both methods are valid, and the choice often comes down to personal preference. Thread basting is more traditional and allows the paper to be reused, while glue basting is quicker and preferred by many modern sewists.
The basted hexagons are then whip-stitched together along their edges. This is where you begin to see the hexagon pincushion – pattern come to life, as the individual fabric hexies start forming a larger piece.
Finally, once the top layer is complete, it’s time to assemble the back piece and add filling. Common choices include polyester fiberfill, crushed walnut shells (for extra weight and sharpening pins), or cotton stuffing.
2. Materials You Need for a Hexagon Pincushion
Before you start your hexagon pincushion – pattern, gather all necessary materials. Having everything prepared ensures a smooth and enjoyable crafting session without interruptions.
First and foremost, you’ll need fabric. This is a great opportunity to use fabric scraps or charm packs. Cotton fabrics are the most common choice due to their stability and ease of handling during sewing.
Next, you need paper templates for the hexagons. These can be purchased online, printed at home, or even cut manually using a stencil. Consistency in size is key, so take your time during this step.
A good sewing needle and thread are essential. If you’re hand-stitching your hexagons, opt for a fine, strong thread in a neutral color that won’t show between stitches.
For filling, polyester fiberfill is light and fluffy, ideal for basic pincushions. Crushed walnut shells are popular among experienced crafters for their weight and pin-sharpening properties. They also give the cushion a satisfying, tactile feel.
Other helpful items include scissors, a rotary cutter, a fabric glue stick (if using glue basting), and pins or clips to hold your pieces in place. If you want to embellish your pincushion, consider buttons, beads, or embroidery floss.
Lastly, some choose to use a sewing machine for the final assembly, while others prefer to stitch the entire project by hand. Either method works — it’s all about your comfort level and desired aesthetic.
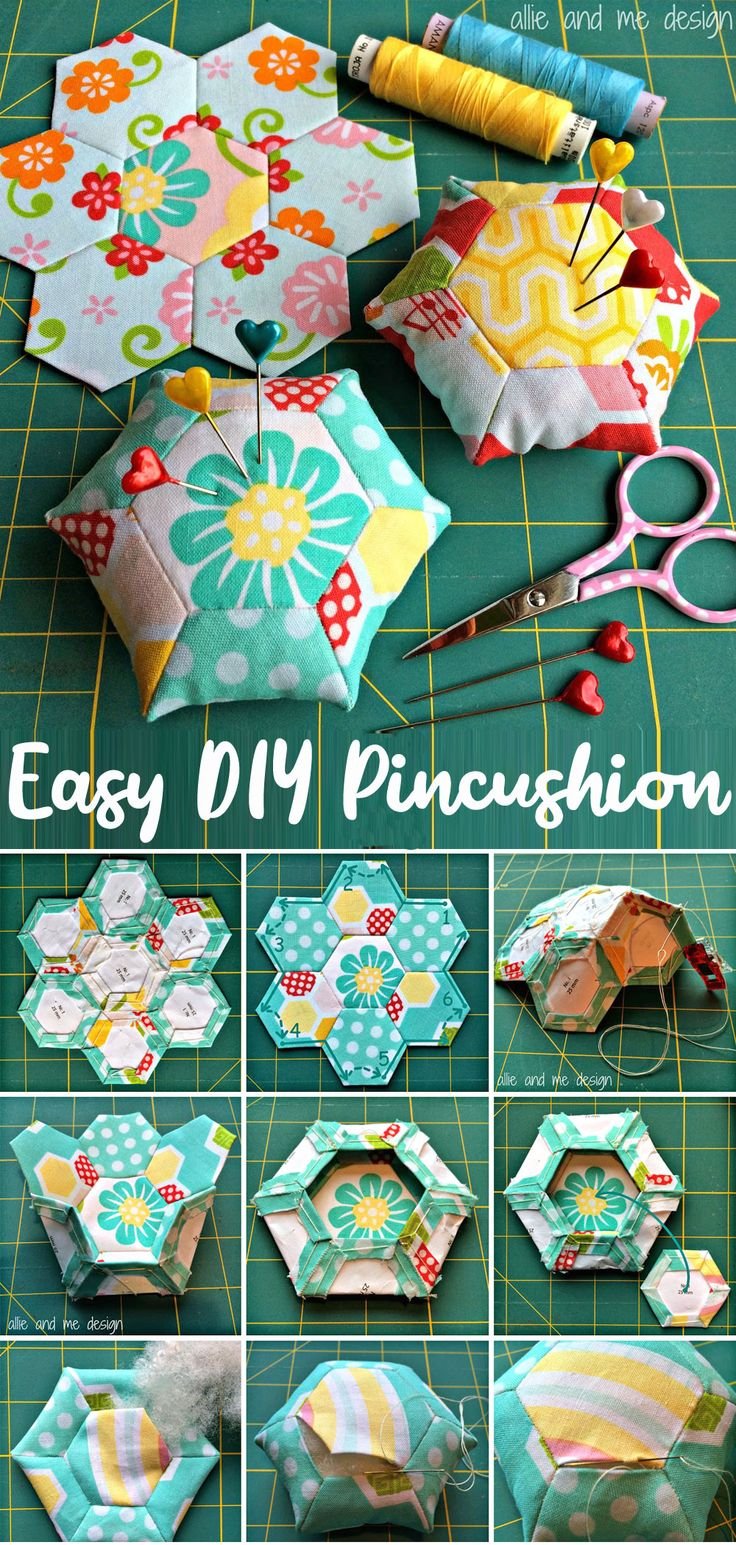
3. Step-by-Step Guide to Making a Hexagon Pincushion
Crafting your own hexagon pincushion – pattern is both fulfilling and creative. Follow this step-by-step guide to get started on your very own handmade treasure.
Start by selecting six to seven hexagon templates. You’ll need one for the center and six surrounding pieces for a classic flower layout. Cut your fabric pieces about ¼ inch larger than your templates to allow for seam allowance.
Baste the fabric to the paper templates. You can do this with small stitches on the back or use a fabric glue stick for a quicker process. Ensure the fabric is taut but not overstretched around the paper.
Whipstitch the hexagons together. Begin by joining the center hexagon to one outer piece, then add the remaining five around it. Take small, tight stitches to keep the seams secure and nearly invisible from the front.
After sewing all hexagons into a flower shape, prepare the back of the pincushion. You can use another hexagon flower or a solid piece of fabric cut to the same shape. Align the front and back pieces carefully.
Stitch around the outer edge of the cushion, leaving a small opening. Turn the piece inside out through this gap, making sure all edges are properly pushed out and smooth. Fill the pincushion with your chosen stuffing material.
Finish by closing the opening with a ladder stitch or invisible stitch. Optionally, sew a button through the center to give your pincushion a tufted look. Now you have a beautiful, custom-made hexagon pincushion – pattern to use or gift.
4. Creative Variations and Personal Touches
Once you master the basic hexagon pincushion – pattern, you can start adding creative variations to make each piece truly your own. These ideas help you explore more techniques and personalize every project.
Try experimenting with different sizes. Miniature hexagon pincushions are adorable and great as gifts or travel companions, while larger ones can double as small pillow décor or pattern weights.
Consider using themed fabrics. For instance, holiday prints, floral designs, or novelty patterns can add a fun seasonal twist to your pincushion, making them perfect for gifting throughout the year.
Mix in other shapes like diamonds or triangles. Combining different geometric shapes can give your pincushion a quilt-like appearance and elevate the design complexity without much extra effort.
Add embellishments such as embroidery, beads, or lace. Embroidered initials, stitched floral vines, or beadwork around the edges give your project a luxurious and personalized touch.
For those with some quilting experience, try quilting the front and back layers before assembly. This adds texture and durability to your pincushion, enhancing both look and function.
Finally, don’t be afraid to upcycle. Use fabric from an old favorite shirt, or incorporate vintage buttons and trims. This not only makes the pincushion unique but also sustainable and sentimental.
FAQ – Hexagon Pincushion – Pattern
Q1: What size hexagon should I use for a pincushion?
Most beginners start with 1-inch to 1.5-inch hexagon sides. Smaller sizes offer more detail, while larger ones are easier to handle and quicker to assemble.
Q2: What’s the best filling for a hexagon pincushion?
Polyester fiberfill is lightweight and soft. Crushed walnut shells are heavier and help sharpen pins. Cotton stuffing is another eco-friendly choice.
Q3: Can I use a sewing machine for this project?
Yes, although many prefer hand-stitching for precision. A sewing machine can be used for the final assembly or for quilting layers before construction.
Q4: How long does it take to make a hexagon pincushion?
Depending on your sewing speed and experience, it can take anywhere from 1 to 3 hours. Beginners may need a little more time initially.
Q5: Are hexagon pincushions good for beginners?
Absolutely! They’re a great way to practice English paper piecing and basic hand sewing. The project is small, manageable, and very rewarding.
Q6: Where can I find free hexagon templates?
There are many websites that offer printable hexagon templates in various sizes. You can also create your own using graph paper or design software.
Conclusion
Creating your own hexagon pincushion – pattern is a delightful way to explore sewing, practice precision, and add a handmade touch to your craft room. This project balances simplicity with elegance, and its adaptability means you can continue evolving your style and technique with each new pincushion.
We’ve covered everything from the materials needed and step-by-step construction to creative ideas for customization. With so many ways to personalize your pincushion, each one you make can be a unique work of art.
If you enjoyed this tutorial, feel free to share your thoughts in the comments! We’d love to hear about your experiences, see your creations, and know what other patterns or tips you’d like to read next. Your opinion helps improve our content and keeps our community growing.