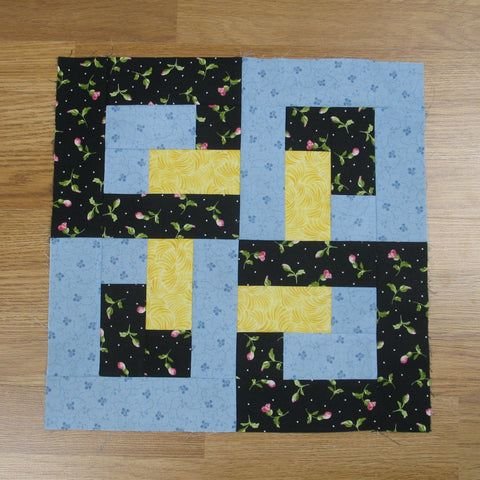
The Interlocking O’s Quilt Block is a charming and unique pattern that has captivated quilters for generations.
This block features a series of interlocking circles that create a visually striking design, making it perfect for various quilting projects.
The beauty of the Interlocking O’s Quilt Block lies in its simplicity and versatility, allowing quilters to experiment with color combinations, fabric types, and block arrangements to create stunning quilts.
Whether you are a seasoned quilter or just starting, this block is an excellent choice to add depth and interest to your quilt.
The Interlocking O’s Quilt Block is not only a visual delight but also offers an opportunity to learn new quilting techniques. By mastering this block, quilters can sharpen their skills in piecing and precision, which are essential for creating professional-quality quilts. The interlocking circle design can be adapted to various sizes, making it suitable for quilts of different dimensions, from small wall hangings to large bed quilts. In this article, we will explore the history of the Interlocking O’s Quilt Block, provide a step-by-step guide to creating it, and share ideas for incorporating it into your quilting projects.
As with any quilt block, the key to success is choosing the right materials and following a clear and methodical approach. The Interlocking O’s Quilt Block can be made with a range of fabric options, from traditional solids to bold prints, giving quilters the freedom to express their creativity. Let’s dive into the details of this block and learn how to make it a part of your next quilt.
1. The History of the Interlocking O’s Quilt Block
The Interlocking O’s Quilt Block has a rich history rooted in traditional quilting. Its origins can be traced back to the early days of quilting, where geometric patterns were often used to create visually appealing designs. The use of interlocking shapes, such as circles and squares, was a popular technique that quilters embraced to add movement and flow to their quilts. The Interlocking O’s Quilt Block is a perfect example of this technique, featuring interconnected circles that create a sense of unity and continuity across the quilt.
Historically, quilt blocks with interlocking designs were seen as symbols of community and connection. Quilters would often share patterns with each other, passing down techniques and designs from generation to generation. The Interlocking O’s Quilt Block became popular because of its simplicity and elegance, making it a favorite among quilters who wanted to create intricate-looking quilts without requiring complex techniques. Over the years, this block has evolved, with quilters adding their personal touches and adapting the design to suit modern tastes and trends.
Today, the Interlocking O’s Quilt Block is a beloved design that continues to be used in a variety of quilt projects. It is often included in sampler quilts, which feature a collection of different quilt blocks, showcasing a quilter’s skill and creativity. The timeless appeal of this block ensures that it remains a staple in both traditional and contemporary quilting.
2. Materials Needed for the Interlocking O’s Quilt Block
Before you begin creating the Interlocking O’s Quilt Block, it’s important to gather the right materials. Having the proper tools and fabrics will ensure that your quilt block turns out as planned. Here is a list of the essential materials you’ll need:
1. Fabric: Cotton fabric is the most commonly used material for quilting, and it is ideal for the Interlocking O’s Quilt Block. Choose two contrasting colors to highlight the interlocking circles. You may want to use solid fabrics for a classic look or choose patterned fabrics to create more visual interest.
2. Quilting Ruler: A quilting ruler is essential for accurately measuring and cutting your fabric pieces. It helps ensure that your cuts are straight and precise, which is crucial for achieving the proper fit when piecing the block together.
3. Rotary Cutter: A rotary cutter allows you to make clean and accurate cuts through fabric, making the process quicker and more efficient than using scissors. It’s especially useful for cutting straight lines and trimming pieces to size.
4. Cutting Mat: A self-healing cutting mat provides a safe surface for using your rotary cutter. It also protects your work surface from damage and ensures that your fabric remains in place while cutting.
5. Sewing Machine: A sewing machine is required to stitch the pieces of the Interlocking O’s Quilt Block together. It’s essential to use a quarter-inch seam allowance to ensure the block pieces fit together properly.
6. Thread: Use a strong quilting thread in a color that complements your fabrics. Cotton thread is a popular choice for quilting, as it is durable and easy to work with.
With these materials, you are ready to start working on your Interlocking O’s Quilt Block. The next step is to begin the process of cutting and piecing the block together.
3. Step-by-Step Guide to Making the Interlocking O’s Quilt Block
Now that you have your materials ready, let’s go through the process of creating the Interlocking O’s Quilt Block. Follow these steps to make your own block:
1. Cut Your Fabric Pieces
Start by cutting your fabric into squares and rectangles. You will need to cut the main fabric into larger squares for the background and smaller pieces for the interlocking O’s. The size of the fabric pieces will depend on the final size you want your quilt block to be. For a 12-inch block, cut two squares (one for the background and one for the O’s), each measuring 6 inches.
2. Make the O’s
To create the interlocking circles, you will need to cut smaller circles from contrasting fabric. You can either use a template to trace the circles or use a circle cutter to make them more precisely. Once the circles are cut out, set them aside for later.
3. Sew the O’s to the Background Fabric
Place the fabric circles onto the background fabric, ensuring that they are arranged in the desired interlocking pattern. Sew the circles onto the background fabric using a straight stitch or a zigzag stitch to secure them in place.
4. Piece the Squares Together
Once the circles are attached to the background fabric, cut the squares of the interlocking design into smaller pieces that fit together to form the final quilt block. Carefully sew the pieces together, ensuring that the seams are accurate and the block remains square.
5. Press the Seams
After you have sewn the pieces together, press the seams to ensure they are flat and even. Pressing helps the fabric lie smoothly and ensures that your block maintains its shape.
6. Trim the Block to Size
Finally, use your quilting ruler to trim the block to the correct size. For a 12-inch block, ensure that the edges are straight and all corners are aligned. This will give your Interlocking O’s Quilt Block a polished, professional look.
Now you have a finished Interlocking O’s Quilt Block! Repeat the process to create additional blocks, and soon you will have enough blocks to assemble your quilt.
4. Creative Ideas for Using the Interlocking O’s Quilt Block
The Interlocking O’s Quilt Block can be used in various ways to create beautiful and unique quilts. Here are some ideas for incorporating this block into your quilting projects:
1. Create a Sampler Quilt
The Interlocking O’s Quilt Block works well in a sampler quilt, where multiple different blocks are used together to form one cohesive design. Combine the Interlocking O’s with other traditional blocks, such as the Nine-Patch or Log Cabin, to create a stunning quilt.
2. Experiment with Color Combinations
Try using different color combinations for the circles and background fabric. Bold, contrasting colors can make the interlocking circles pop, while softer, complementary tones create a more subtle effect.
3. Make a Modern Quilt
While the Interlocking O’s Quilt Block has traditional roots, it can be updated with modern fabrics and patterns. Opt for geometric prints or use a monochromatic color scheme for a contemporary feel.
4. Use in a Table Runner or Pillow
The Interlocking O’s Quilt Block doesn’t have to be used for large quilts. It works well in smaller projects such as table runners, throw pillows, or wall hangings, where the block’s intricate design can be showcased in a more compact form.
5. Create a Baby Quilt
The playful and circular nature of the Interlocking O’s Quilt Block makes it ideal for baby quilts. Use soft pastels or bright, fun colors to create a cheerful and welcoming quilt for a little one.
6. Combine with Appliqué
For added texture and dimension, consider adding appliqué elements to your Interlocking O’s Quilt Block. This could include flowers, stars, or other decorative motifs that complement the interlocking circles.
FAQ
Q: What is the Interlocking O’s Quilt Block?
A: The Interlocking O’s Quilt Block is a quilt design that features interconnected circles, creating a visually striking pattern. It is a popular design for both traditional and modern quilts.
Q: How do I make the Interlocking O’s Quilt Block?
A: To make the Interlocking O’s Quilt Block, cut fabric into squares and circles, sew the circles onto the background fabric, and piece the block together using accurate seams.
Q: What fabrics should I use for the Interlocking O’s Quilt Block?
A: Cotton fabric is ideal for the Interlocking O’s Quilt Block. Use contrasting colors for the circles and background
fabric to make the design stand out.
Q: Can I use the Interlocking O’s Quilt Block in smaller projects?
A: Yes! The Interlocking O’s Quilt Block works well in smaller projects like table runners, pillows, or wall hangings.
Q: How can I incorporate the Interlocking O’s Quilt Block into a larger quilt?
A: The Interlocking O’s Quilt Block can be combined with other blocks, such as the Nine-Patch or Log Cabin, to create a larger quilt with diverse patterns.
Conclusion
In this article, we explored the beauty and versatility of the Interlocking O’s Quilt Block. From its history to the step-by-step process of making it, we have provided you with the tools to create this timeless quilt design. The Interlocking O’s Quilt Block can be used in a variety of quilting projects, from sampler quilts to small accessories. If you enjoyed this article, we encourage you to share your thoughts and suggestions in the comments below. Happy quilting!