The Love in a Bowl Potholder- Tutorial is the perfect project for anyone who wants to combine practical kitchen utility with a heartfelt, handmade aesthetic. In this guide, we will explore how to create a charming and heat-resistant accessory that brings a touch of warmth to your cooking space. Whether you are looking to brighten up your own kitchen or crafting a thoughtful gift for a loved one, this Love in a Bowl Potholder- Tutorial provides all the necessary steps to ensure a professional and durable result.
Crafting your own kitchen gear allows for complete customization, and the Love in a Bowl Potholder- Tutorial focuses on using high-quality materials to ensure safety and style. Traditional potholders can often feel generic, but by following a specialized Love in a Bowl Potholder- Tutorial, you can incorporate vibrant cotton fabrics, decorative stitching, and even personalized appliqué designs. This project is specifically designed to be beginner-friendly while still offering enough detail to satisfy experienced sewists who enjoy detailed quilted kitchen accessories.
As we dive into this Love in a Bowl Potholder- Tutorial, it is important to remember that functionality is just as vital as beauty. A potholder must protect your hands from high temperatures, which is why we emphasize the use of heat-resistant batting and thick layers of fabric. Throughout this Love in a Bowl Potholder- Tutorial, we will cover everything from the initial cutting of the fabric to the final binding process, ensuring that your finished product is both a work of art and a reliable tool for handling hot pots and pans.
1. Choosing the Right Materials for Your Potholder
The foundation of any successful Love in a Bowl Potholder- Tutorial starts with selecting the proper materials. Since this item will be in close contact with heat, you must use 100% cotton fabric. Synthetic fibers like polyester can melt when they touch a hot burner or oven rack, so sticking to natural fibers is a critical safety requirement for your handmade potholder.
In addition to the outer fabric, this Love in a Bowl Potholder- Tutorial requires specialized internal padding. We highly recommend using a layer of Insul-Bright, which is a needle-punched material that reflects heat back to the source. Pairing this with a layer of traditional cotton batting will provide the thickness and insulation necessary to keep your hands safe while moving heavy ceramic bowls or baking sheets.
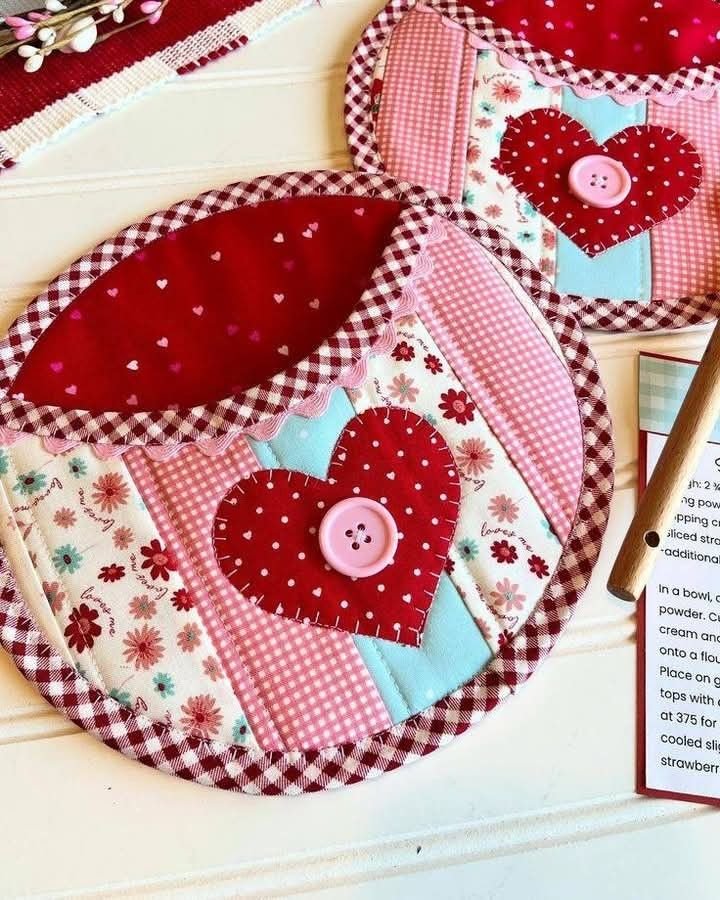
Color coordination is where the Love in a Bowl Potholder- Tutorial truly becomes fun and creative. You might choose a “bowl” fabric that features a fun kitchen print and a “love” fabric in a contrasting solid red or pink. Using high-contrast threads for quilting can also add a professional touch to the design, making the “love” theme stand out beautifully against the background.
Don’t forget the importance of the hanging loop in your Love in a Bowl Potholder- Tutorial. A sturdy loop made from matching bias tape or a scrap of fabric allows you to display your work on a kitchen hook, keeping it within reach. This small detail adds both convenience and a decorative element to the finished Love in a Bowl Potholder- Tutorial project.
Before you begin sewing, ensure your sewing machine is fitted with a fresh needle, preferably a size 90/14. Because this Love in a Bowl Potholder- Tutorial involves stitching through multiple thick layers, a stronger needle will prevent skipped stitches or breakage. Having your rotary cutter and a sharp pair of fabric scissors ready will also make the preparation phase much smoother.
Lastly, pre-washing your fabrics is a wise step in this Love in a Bowl Potholder- Tutorial. Cotton is prone to shrinking, and since potholders will inevitably get dirty and need washing, pre-shrinking the fabric ensures the quilt lines and shapes remain crisp after the first laundry cycle. This attention to detail is what separates a standard craft from a high-quality Love in a Bowl Potholder- Tutorial result.
2. Cutting and Preparing the Pattern Pieces
The second stage of our Love in a Bowl Potholder- Tutorial involves the precise cutting of your shapes. You will typically need two large squares for the front and back, measuring approximately 9 inches by 9 inches. For the “bowl” and “heart” appliqué elements, using a paper template can help maintain symmetry and ensure the pieces fit perfectly within the square boundaries.
When cutting the insulation layers for the Love in a Bowl Potholder- Tutorial, it is often helpful to cut them slightly smaller than the outer fabric. This reduces bulk in the seam allowances, making it much easier to attach the binding later on. Accuracy at this stage ensures that the “Love in a Bowl” motif remains centered and visually appealing on the finished potholder.
If you are following this Love in a Bowl Potholder- Tutorial to create a gift, consider using fusible web for the appliqué pieces. Fusible web allows you to “glue” the bowl and heart shapes onto the background fabric with an iron before you even start sewing. This prevents the pieces from shifting, which is a common challenge for those new to the Love in a Bowl Potholder- Tutorial.
Organization is key during the cutting phase of the Love in a Bowl Potholder- Tutorial. Keep your “bowl” pieces in one pile and your “heart” pieces in another, especially if you are making a set of four or more. Marking the center point of your background fabric with a washable fabric pen will help you align the appliqué motifs perfectly every time.
For those who want a more textured look in their Love in a Bowl Potholder- Tutorial, consider using denim scraps or heavy canvas for the “bowl” part of the design. This upcycling approach not only adds durability but also aligns with eco-friendly crafting practices. Just ensure the material is 100% cotton to maintain the heat-resistance standards of the Love in a Bowl Potholder- Tutorial.
Once all your pieces are cut, the Love in a Bowl Potholder- Tutorial moves into the stabilization phase. Lay your back fabric face down, place the batting and Insul-Bright on top, and then place your front fabric face up. Use quilting clips or long pins to hold this “sandwich” together, preparing it for the decorative quilting process that defines the potholder’s structure.
3. Quilting and Appliqué Techniques
The heart of the Love in a Bowl Potholder- Tutorial lies in the decorative stitching. Start by sewing around the edges of your bowl and heart appliqué using a blanket stitch or a tight zigzag stitch. This not only secures the fabric but also adds a beautiful “handmade” border to the shapes, reinforcing the theme of love and care in your kitchen.
Quilting the background is the next vital step in the Love in a Bowl Potholder- Tutorial. You can choose a simple cross-hatch pattern or go for a more modern look with straight vertical lines. This quilting serves two purposes: it keeps the internal layers from bunching up during use and adds a professional, finished texture to the Love in a Bowl Potholder- Tutorial project.
If you find that your fabric is “creeping” or shifting while you quilt, the Love in a Bowl Potholder- Tutorial recommends using a walking foot. A walking foot feeds the top and bottom layers of fabric through the machine at the same speed, which is essential when working with the thick batting layers required for a functional DIY potholder.
In this Love in a Bowl Potholder- Tutorial, don’t be afraid to experiment with decorative threads. A variegated thread that changes colors can add a whimsical feel to the bowl, while a metallic-look (but cotton-based) thread can make the heart motif pop. The goal is to make the “Love in a Bowl” design the focal point of the entire piece.
Safety is paramount, so during the quilting phase of the Love in a Bowl Potholder- Tutorial, ensure your stitches are not too far apart. A maximum of 1 to 2 inches between quilt lines is ideal. This ensures the insulating materials remain flat and provide consistent protection across the entire surface of the potholder, leaving no “cold spots” where heat could penetrate.
As you finish the quilting section of the Love in a Bowl Potholder- Tutorial, trim away any excess batting or uneven fabric edges. Your goal is to have a perfect square with crisp edges, ready for the final step of binding. This trimming process is the secret to getting those perfectly mitered corners that make your Love in a Bowl Potholder- Tutorial project look like it came from a high-end boutique.
4. Binding and Final Details
The final assembly of the Love in a Bowl Potholder- Tutorial involves applying the binding to the raw edges. Binding can be a bit intimidating, but by using 2.5-inch fabric strips folded in half, you create a durable and attractive frame for your work. This is where you also incorporate the hanging loop that we mentioned earlier in the Love in a Bowl Potholder- Tutorial.
When sewing the binding onto your Love in a Bowl Potholder- Tutorial project, start on one of the straight sides, leaving a tail of a few inches. Sew toward the corner, stop a quarter-inch from the end, and fold the fabric to create a mitered corner. This technique is a staple of quilting and gives your potholder a clean, professional finish that is highly durable.
Once the binding is sewn to the front, flip it to the back and secure it. In this Love in a Bowl Potholder- Tutorial, you can choose to machine-stitch the back for speed or hand-stitch it with a blind hem stitch for a cleaner look. Hand-stitching is often preferred for gift items, as it adds an extra layer of personal touch to the Love in a Bowl Potholder- Tutorial.
The hanging loop is added by extending the binding strip at the final corner or by inserting a separate loop of fabric before closing the binding. This small feature ensures that your Love in a Bowl Potholder- Tutorial creation isn’t just hidden in a drawer but can be a part of your kitchen’s decor. Make sure to double-stitch the loop for extra strength.
Give your finished Love in a Bowl Potholder- Tutorial a final press with a steam iron. This helps the binding lay flat and “sets” the stitches into the fabric. If you have used a water-soluble marking pen to guide your quilting, now is the time to dab those lines away with a damp cloth, revealing the clean design of your completed potholder.
Congratulations on finishing your Love in a Bowl Potholder- Tutorial! You now have a unique, functional, and beautiful kitchen accessory. Take a moment to inspect your work and perhaps even start on a matching second potholder, as these always look best in pairs. Following this Love in a Bowl Potholder- Tutorial ensures that your kitchen will always have a little extra “love” in every bowl.
FAQ – Frequently Asked Questions
1. Can I use regular polyester batting for the Love in a Bowl Potholder- Tutorial?
It is not recommended. Polyester can melt at high temperatures. For safety, always use 100% cotton batting or a specialized heat-reflective material like Insul-Bright as suggested in this Love in a Bowl Potholder- Tutorial.
2. What size should the finished potholder be?
Most people find that an 8-inch or 9-inch square is the perfect size. It is large enough to protect your hand but small enough to maintain a good grip on handles. The Love in a Bowl Potholder- Tutorial is easily scalable if you prefer a different size.
3. How do I wash my handmade potholder?
Since we used 100% cotton in this Love in a Bowl Potholder- Tutorial, you can machine wash it on a cold, gentle cycle. Tumble dry on low or air dry to prevent excessive shrinkage and keep the appliqué shapes looking sharp.
4. Is this project suitable for a complete sewing beginner?
Yes! The Love in a Bowl Potholder- Tutorial is a fantastic “first project” because it covers basic cutting, straight-line sewing, and simple appliqué. It’s a great way to build confidence before moving on to larger quilts.
5. Can I use this design for a hot pad (trivet) as well?
Absolutely. The construction taught in this Love in a Bowl Potholder- Tutorial is identical to a trivet. In fact, many people make a matching set to use on their dining table.
6. Do I need a special foot for the appliqué part of the tutorial?
While a standard foot works, an open-toe embroidery foot is very helpful. it allows you to see exactly where the needle is hitting the edge of the “bowl” and “heart” shapes, ensuring more precise stitching in your Love in a Bowl Potholder- Tutorial.
Conclusion
This Love in a Bowl Potholder- Tutorial has guided you through the entire journey of creating a high-quality, heat-resistant kitchen accessory. We have covered the importance of selecting safe materials, the precision required in cutting patterns, the creative process of quilting and appliqué, and the final steps of binding for a professional finish.
By mastering these techniques, you’ve not only made a useful tool but also practiced essential quilting skills that can be applied to many other projects. Handmade items like these bring a special energy to the home, making everyday tasks feel a bit more intentional and filled with care.