If you love sewing or crafting while relaxing on the couch, then you know the struggle of misplaced scissors, wandering thread spools, and needles lost between cushions.
One practical and stylish solution is to make your own sofa sewing caddy – pattern included! This creative and functional DIY project is perfect for organizing your essential tools right at your fingertips.The beauty of a sofa sewing caddy lies in its simplicity and customizability.
Whether you’re an experienced seamstress or a beginner with a sewing machine, this project is manageable and enjoyable. Plus, it adds a personal touch to your living space and keeps everything tidy during your creative sessions.
In this article, we’ll guide you step by step on how to make your own sofa sewing caddy – pattern, including what materials to use, how to structure your design, clever ideas to personalize it, and common FAQs. Ready to create something practical and beautiful? Let’s get started.
1. Materials and Tools You’ll Need
To successfully make your own sofa sewing caddy – pattern, it’s essential to gather the right materials and tools. Having everything prepped beforehand makes the crafting process smooth and more enjoyable.
First, choose your fabric. Medium to heavy-weight cotton, denim, or canvas are excellent choices for durability. You’ll want something sturdy enough to hold items like scissors and thread without sagging or tearing.
You’ll need two pieces of fabric: one for the outer layer and one for the lining. Consider using coordinating prints or colors for a stylish, polished look. Fusible interfacing is also recommended to give the caddy added structure and strength.
For tools, you’ll need a sewing machine, fabric scissors, pins or clips, measuring tape, an iron, and thread to match or contrast with your fabric. A rotary cutter and cutting mat can also help achieve precise edges, especially for straight cuts.
Optional but useful additions include a magnetic snap or Velcro closure, bias tape for a finished edge, and extra trim like ribbon or lace for decoration. You can also use elastic or buttons to create tool loops and pocket closures.
Finally, have your sewing supplies on hand so you can design the pockets and layout around the tools you actually use—such as seam rippers, needle threaders, embroidery floss, or measuring tapes.
2. Cutting and Assembling the Main Pieces
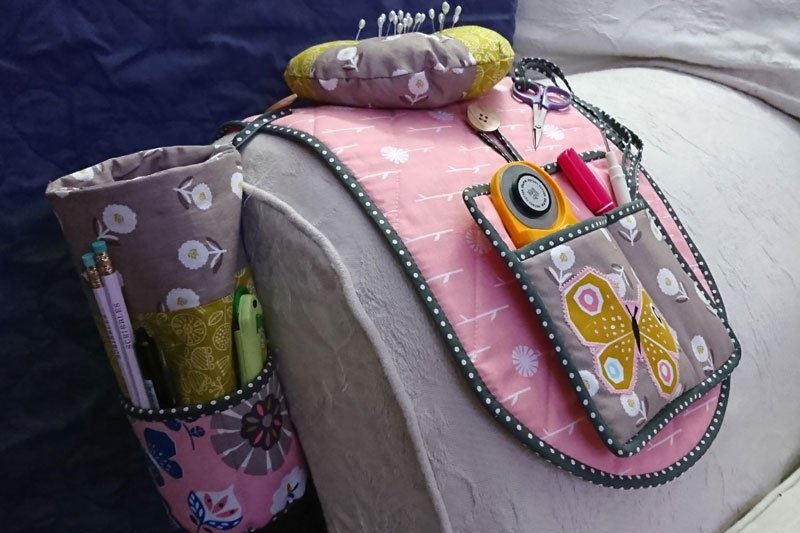
Once you’ve gathered your materials, it’s time to cut and prepare your fabric. The design of the sofa sewing caddy is usually an L-shape—one long flap to tuck under the sofa cushion and the other section hanging over the arm to hold tools.
Start by measuring your sofa arm and deciding on the size of your caddy. A good average is 12 inches wide and 30 inches long. Cut two rectangles of this size: one for the front and one for the lining. If you’re adding interfacing, cut that to the same size and iron it to the back of the outer fabric.
Next, decide on the pocket arrangement. Cut smaller rectangles of fabric to create individual or layered pockets. Think about the sizes you need for different tools—some long and narrow for scissors, others short and wide for thread spools.
Hem the top edge of each pocket piece by folding it down twice and stitching it for a clean edge. Then, place and pin the pocket pieces onto the outer fabric before sewing along the bottom and sides. To create compartments, stitch vertical lines within the pocket pieces as needed.
Once all pockets are attached, place the lining and outer fabric pieces right sides together. Sew around the edges with a ½-inch seam allowance, leaving a 3-inch opening to turn the caddy right side out.
After turning it right side out, press it with an iron, and topstitch around the entire edge to close the opening and give it a crisp, finished look. At this stage, your basic sofa sewing caddy shape should be complete.
3. Adding Details and Functional Touches
This is where your sofa sewing caddy becomes truly unique. Adding functional details can improve usability and turn a simple piece into a personalized organizer that fits your exact needs.
If you want your caddy to stay in place on the arm of your sofa, consider adding small weights to the flap that goes under the cushion. Flat washers sewn into the seam or quilted in can add just enough heft without being bulky.
Add a pin cushion section near the top corner. You can make a small rectangle filled with stuffing and sew or Velcro it onto the caddy. This keeps pins and needles handy and safe from falling into the furniture.
Use elastic bands or loops sewn into the pockets to hold things like spools or markers in place. This is especially helpful if you plan to move the caddy around or take it with you to sewing group or classes.
Want a removable pouch? Add snaps or a zipper to one pocket so you can detach a mini bag to take with you or organize smaller items like buttons, snaps, or measuring tape.
If you enjoy embroidery, hand-stitch your initials or a decorative pattern onto the front pocket. This not only adds a personal flair but also gives your caddy a beautiful, handmade feel.
Lastly, consider using waterproof or wipeable lining fabric for the inside. This makes it easier to clean and helps protect your tools from spills or dirt if the caddy sits on the floor or sofa edge.
4. Creative Uses Beyond Sewing
Although it’s designed for sewing tools, a sofa sewing caddy can be used for so much more. Once you’ve mastered the make your own sofa sewing caddy – pattern, try adapting it for other household needs or loved ones.
Use it as a remote control holder. Replace the pocket layout with wider pouches that can hold remote controls, phones, chargers, or reading glasses. It’s ideal for anyone who enjoys a cozy movie night setup.
For knitters and crocheters, modify the pocket sizes to fit yarn balls, crochet hooks, and patterns. You can even add a grommet or eyelet hole to thread yarn through, making it a mini yarn station.
Turn it into a bedside organizer. Instead of draping it over the sofa, slide it between your mattress and bed frame to hold books, glasses, pens, and journals—perfect for nighttime readers or writers.
It also makes a great craft caddy for kids. Add larger pockets and label them for markers, glue sticks, scissors, and paper. Place it over the side of a child’s chair or crafting table.
If you’re gifting it, choose custom fabric themes: floral for quilters, superhero prints for kids, or farmhouse-style for rustic décor lovers. Include small sewing tools or notions in the pockets for an extra-special present.
No matter how you use it, the sofa sewing caddy pattern is a practical and creative way to keep your tools—and your space—organized.
FAQ: Make You Own Sofa Sewing Caddy – Pattern
Q1: Is this project beginner-friendly?
Yes! This pattern is ideal for beginners. It involves basic straight-line sewing and simple fabric handling, making it a great entry-level project.
Q2: What’s the best fabric for a sofa sewing caddy?
Sturdy fabrics like cotton canvas, denim, or quilted cotton are best. They offer structure while being easy to sew and customize.
Q3: Can I wash the finished sewing caddy?
Yes, most are machine washable if you use cotton or similar fabrics. Spot clean or hand wash if you use decorative elements like buttons or interfacing.
Q4: How long does it take to make a sofa sewing caddy?
You can complete it in 2–4 hours depending on your experience and the number of pockets or customizations you add.
Q5: Can I modify the size of the caddy?
Absolutely. Measure your furniture and tailor the dimensions accordingly. The pattern is flexible and scalable for various uses.
Q6: Is this a good gift idea?
Yes! Handmade sewing caddies are thoughtful gifts for crafters, readers, or anyone who loves an organized space. Personalize it for added charm.
Conclusion
Learning how to make your own sofa sewing caddy – pattern is not just a fun DIY project—it’s a way to bring functionality and creativity into your daily routine. Whether you use it for sewing supplies, remote controls, or kid’s crafts, this customizable organizer keeps everything within reach and adds a handmade touch to your home.
We hope this guide inspired you to create a caddy that suits your style and needs. If you enjoyed this tutorial, please share your thoughts, suggestions, or photos of your finished piece. Your feedback helps us grow and inspires others to start their own creative projects!
Let me know if you’d like this article formatted as a downloadable PDF, turned into a printable tutorial, or optimized for blog publishing!