If you’re a fan of nostalgic video games and love crafting, then the Mario Pixel Quilt Block. Pattern and Tutorial – Pattern is the perfect creative project for you.
Combining the charm of classic 8-bit video game graphics with the satisfaction of quilting, this project is ideal for anyone looking to merge pop culture with fabric artistry.
The iconic pixelated look of Mario makes it easy to translate into a quilting block, and the finished result is a fun and vibrant piece that stands out.
The Mario Pixel Quilt Block. Pattern and Tutorial – Pattern transforms the legendary Mario character into a quilted design made from square fabric pieces, mimicking the pixel structure of retro video game art. Whether you’re creating a pillow, a wall hanging, or a full quilt, this pattern is sure to bring joy to gamers and crafters alike. The design is simple enough for beginners yet customizable enough for experienced quilters to add their own flair.
In this guide, we’ll explore how to create your own Mario Pixel Quilt Block from start to finish. We’ll cover essential materials, layout planning, cutting and piecing techniques, and provide helpful tips to ensure your block is as iconic as the character himself. Using Google-recommended SEO strategies and a warm, human tone, this article is optimized to help crafters find exactly what they need to succeed with this unique project.
1. What Is the Mario Pixel Quilt Block. Pattern and Tutorial – Pattern?
The Mario Pixel Quilt Block. Pattern and Tutorial – Pattern is a quilting design inspired by the 8-bit version of Mario from the early Nintendo games. Using a grid-based layout of small fabric squares, this pattern recreates Mario’s iconic look, one pixel at a time. It’s a fun way to incorporate fandom into your fabric crafts.
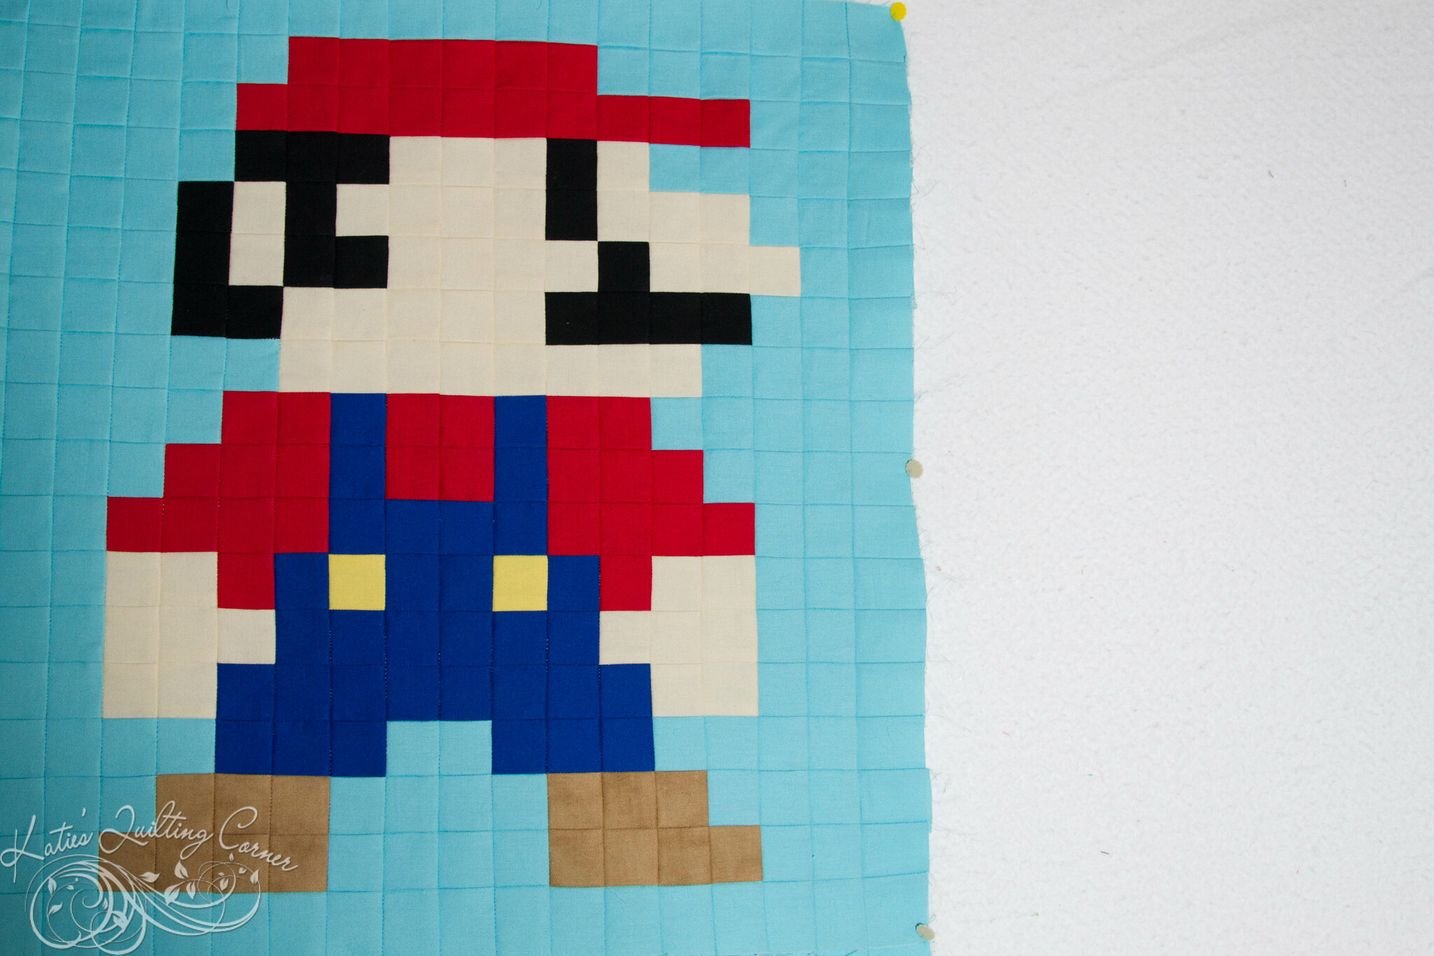
Each block is built on a grid—commonly 16×16 or 18×18 squares—where each square represents a pixel. You assign a color to each square, just like pixels on a screen, using red for his hat, blue for his overalls, brown for his shoes, and so on. This modular style makes it very beginner-friendly, especially if you’ve ever worked with pixel art or mosaic-style projects.
The pattern typically uses 2.5″ squares (unfinished) that finish at 2″ after seam allowances. This means your block will be about 32″ square if you use a 16×16 layout. Of course, you can scale the block size by adjusting the square dimensions to suit your project.
While the basic Mario face is the most popular design, there are countless versions available—jumping Mario, fire flower Mario, and even Luigi or Princess Peach if you want to build a themed quilt series. These designs often come with templates that show which color goes in each square.
In this tutorial, we focus on the standard standing Mario pose. It’s instantly recognizable and uses a limited color palette, making it easier for beginners to manage. Once you understand how it works, you can branch out into more complex designs or even create your own characters.
Ultimately, the Mario Pixel Quilt Block. Pattern and Tutorial – Pattern isn’t just a craft project—it’s a way to blend nostalgia, art, and storytelling through fabric.
2. Materials and Preparation for Your Mario Quilt Block
To begin your Mario Pixel Quilt Block. Pattern and Tutorial – Pattern, you’ll need a few basic quilting supplies. Because this is a grid-based project, accuracy is key, so it helps to have tools that assist with precision. Here’s a simple list of what you’ll need:
- Cotton quilting fabric in red, blue, brown, peach or beige, black, white, and yellow
- Rotary cutter and self-healing cutting mat
- Quilting ruler
- Sewing machine with a 1/4″ foot (optional, but helpful)
- Iron and ironing board
- Thread (neutral or matching)
- Design board or printable pixel layout
Start by printing or sketching your pixel layout. There are many free Mario Pixel Quilt Block templates online, or you can create your own using graph paper. Each square on the grid represents one fabric square, so color in your plan accordingly.
Next, calculate how many squares you need for each color. For example, you might need 20 red squares for the hat, 30 blue squares for the overalls, etc. Add a few extras of each color in case of cutting errors. Precision in counting and cutting now will save time later.
Cut your fabric into 2.5″ squares. Accuracy matters, so use your rotary cutter and ruler carefully. Once everything is cut, organize your squares by color in small trays or bowls. This helps keep the process efficient when you’re piecing the rows together.
Now it’s time to lay out your block. Use a design wall, floor, or even a large sheet of fusible interfacing. Some quilters like to iron their fabric squares onto lightweight fusible interfacing to stabilize the layout before sewing, which can make assembly easier and more accurate.
Finally, make sure your sewing machine is threaded and adjusted properly. Practice sewing a few sample seams with your 1/4″ foot to ensure your seam allowances are consistent. The uniform size of your fabric squares depends on consistent seam allowances.
3. Assembling the Mario Pixel Quilt Block Step by Step
Once your materials are prepped and laid out, it’s time to sew your Mario Pixel Quilt Block. Pattern and Tutorial – Pattern together. The best approach is to work row by row to maintain the integrity of your layout and avoid mixing up the pixel colors.
Begin with the first row of squares. Align each square edge-to-edge, right sides together, and sew with a 1/4″ seam allowance. After sewing the entire row, press the seams to one side, alternating directions for each row to reduce bulk when joining the rows later.
Repeat the process for each row, carefully checking your layout after each one. This helps you avoid misplacing colors or flipping squares. As you move down the grid, your Mario design will begin to take shape more clearly.
Once all rows are completed, it’s time to sew them together. Start with the top two rows. Align them so the seams nest (interlock) at each junction, which helps create crisp corners. Pin if needed, and sew with a consistent 1/4″ seam.
Press the new seam carefully, again alternating directions. Continue adding rows one at a time, pressing in between. This step takes patience but ensures that your Mario Pixel Quilt Block lies flat and looks sharp.
After assembling the full block, give it a final press with steam to help set all the seams. Trim the outer edges if needed to square up the block. At this stage, your Mario block is ready to become part of a larger quilt, wall hanging, or even a pillow cover.
If desired, you can add a thin border around the block to frame Mario and stabilize the edges before quilting. Black or grey works well for contrast and gives the block a finished, graphic look.
4. Creative Ideas and Uses for the Mario Pixel Quilt Block
The Mario Pixel Quilt Block. Pattern and Tutorial – Pattern is more than just a fun crafting challenge—it can be used in countless ways to express your love for gaming and handmade artistry. Whether you use it alone or as part of a bigger project, it always makes a bold statement.
One of the most popular uses is to turn the block into a pillow cover. Simply add a backing, a zipper or envelope closure, and some quilt batting. This is a great gift idea for gamers or kids who love classic Nintendo characters.
You can also use multiple Mario blocks (or add Luigi, Toad, and other characters) to create a full video game-themed quilt. Combine blocks with solid colors or star sashing for a cohesive look. This makes an unforgettable bedspread for a game room or kid’s bedroom.
Wall hangings are another great use. Mount your completed Mario block with batting and backing and hang it with a dowel rod. This turns your quilt block into a piece of textile art that brings color and character to your walls.
For a practical and fun twist, make mini versions of the Mario Pixel Quilt Block and turn them into hot pads, placemats, or coasters. Smaller pixel art still retains its charm and is easier to complete quickly—perfect for gifts or themed events.
You can also turn this block into a unique quilted tote bag panel. Use it as the front piece of a bag or backpack, and finish the rest in coordinating fabrics. This gives you a functional item that showcases your creative side and personal fandom.
Lastly, consider using the concept to teach kids or new crafters about quilting. The clear, grid-based layout makes it easier to grasp concepts like piecing, color placement, and seam allowance. Plus, working with a character they love makes learning more engaging.
FAQ – Frequently Asked Questions About Mario Pixel Quilt Block. Pattern and Tutorial – Pattern
Is the Mario Pixel Quilt Block suitable for beginners?
Yes! It uses only square pieces and straight seams, making it very accessible. The biggest challenge is keeping the pieces organized, but with a layout plan and patience, beginners can definitely succeed.
What size should my squares be?
2.5″ squares are common (finishing at 2″ after seams), but you can use smaller or larger sizes depending on the finished block size you want.
Do I need a pattern to follow?
While you can create your own layout, it’s helpful to use a printable Mario Pixel Quilt Block. Pattern and Tutorial – Pattern template to get the colors and layout accurate.
Can I machine quilt this block?
Yes. After assembling the block, you can quilt it using straight lines or free-motion quilting. Just be sure to baste the layers carefully so the seams don’t shift.
**What type of
fabric should I use?**
100% cotton quilting fabric is best. It’s easy to cut, sew, and press, and comes in a wide variety of colors needed for the pixel effect.
How long does this project take?
Depending on your experience level, it can take 4–8 hours total from cutting to final pressing. Smaller versions or simpler designs take less time.
Conclusion
The Mario Pixel Quilt Block. Pattern and Tutorial – Pattern brings together creativity, nostalgia, and craftsmanship in a way that few projects can. Whether you’re a seasoned quilter or new to the hobby, this pixelated tribute to an iconic character offers both challenge and fun.
In this guide, we covered what makes the pattern unique, the materials and steps required, how to assemble your block, and creative ways to use it. The possibilities are nearly endless—from wall art to tote bags to full quilts.
If you’ve tried this pattern or have suggestions for improvement, we’d love to hear from you. Please leave a sincere comment or suggestion below, and let us know how your Mario quilting adventure went. Happy stitching!