Creating your own On Point Pincushion – Pattern is a perfect sewing project for both beginners and experienced quilters.
Not only is it an enjoyable craft that can be completed in a short amount of time, but the result is a practical, stylish item that every sewing space needs.
A well-designed pincushion can help keep your needles and pins organized, accessible, and even add personality to your workspace.
The On Point Pincushion – Pattern gets its name from the clever way it is sewn—placed “on point,” or at a 45-degree angle—which gives it a unique geometric look compared to traditional pincushions. This small shift in orientation transforms a simple square into an eye-catching diamond shape that stands out on your sewing table.
In this article, we’ll walk through how to sew your own On Point Pincushion – Pattern from start to finish. We’ll explore the best fabrics to use, how to stuff it properly, different techniques to personalize it, and how to make it long-lasting and durable. Whether you’re sewing for yourself or making thoughtful gifts, this project is a beautiful way to express your creativity.
1. Selecting Materials and Preparing the Fabric
Before diving into stitching, you’ll want to gather all necessary supplies to bring your On Point Pincushion – Pattern to life. Choosing the right materials makes the process smoother and ensures the finished product is both attractive and functional.
Start with fabric. You’ll need two contrasting squares—one for the main top and one for the back. Quilting cotton is a favorite due to its durability and ease of use. If you want something a little fancier, consider using linen or canvas for a rustic or modern aesthetic.
Batting or fusible interfacing is optional but adds firmness and structure to the pincushion. It also prevents needles from poking all the way through. Cut the batting to match your fabric square and iron it onto the wrong side before stitching.
Stuffing is essential. Polyester fiberfill is the most common choice for pincushions, but crushed walnut shells are another great option. They give a more weighted feel and can help keep your pins sharpened over time.
Basic tools include a rotary cutter, cutting mat, ruler, pins, scissors, sewing machine, and hand needle. For beginners, a template or printable On Point Pincushion – Pattern is very helpful in ensuring accurate cuts.
If you want to embellish your pincushion, now’s the time to gather extras like buttons, embroidery floss, or decorative trim. These details will give your pincushion a unique, personal touch that reflects your style.
Finally, iron your fabric well to remove creases. Accurate measuring and pressing at every stage will help create a neat, professional-looking finish for your On Point Pincushion – Pattern.
2. Assembling and Sewing the Pincushion
With your materials prepped and your pattern in hand, it’s time to start sewing the On Point Pincushion – Pattern. This is the most satisfying part, where your project really begins to take shape.
Start by placing your fabric squares right sides together. Align all corners carefully. If you’ve added interfacing, make sure that layer is facing outward, not inward, to maintain structure.
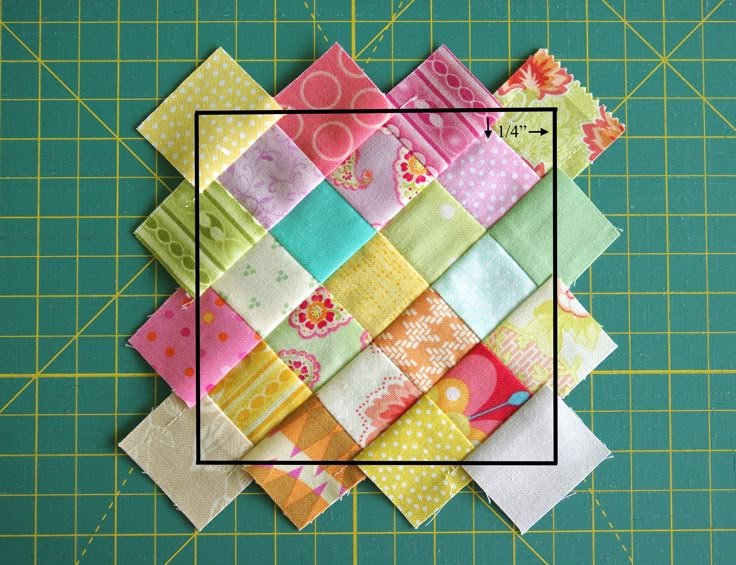
Pin the squares together and stitch around all four sides using a 1/4-inch seam allowance, leaving a 2-inch gap on one side for turning and stuffing. Backstitch at the beginning and end to reinforce the seam.
Once stitched, trim the seam allowances slightly and clip the corners to reduce bulk. This will help the finished corners turn out nice and sharp when flipped right side out.
Turn the piece inside out through the gap. Use a point turner or the blunt end of a pencil to gently push out each corner so they’re crisp and well-defined. Give it another press with an iron to flatten the seams.
Now rotate the square so it’s placed “on point”—with a corner pointing up, down, left, and right. This is what gives the On Point Pincushion – Pattern its signature look. Fold the lower corner upward, bringing it to meet the top corner. You now have a diamond shape.
Sew along two sides of this diamond, leaving the last open for stuffing. Once filled to your preference, sew the final seam closed by hand using a ladder stitch for an invisible finish.
3. Stuffing, Shaping, and Finishing Touches
The way you stuff and finish your On Point Pincushion – Pattern can make a big difference in how it looks and performs. Here are some tips to make it perfect and polished.
Stuffing should be firm, but not so tight that the seams strain. A well-filled pincushion provides a solid surface to insert and remove pins easily, and it holds its shape over time. Fill slowly and evenly, massaging the stuffing into the corners.
Crushed walnut shells can be added for weight. If you’re using these, make a small inner pouch to hold them and insert that into your pincushion before sewing the final seam. This keeps the shells secure and prevents leakage.
After stuffing, close the gap with a ladder stitch. This invisible hand stitch blends into the seam and provides a neat closure. Take your time here—it’s the last step, and precision matters.
Now for the fun part: embellishments! Add a button to the center, securing it through both sides to give the cushion a tufted look. This not only looks great but also helps shape the pincushion more firmly.
Decorate with embroidery or ribbon along the seams for extra flair. Some crafters like to add tiny felt flowers or even a name tag if it’s being gifted. These details give your On Point Pincushion – Pattern personality and charm.
Consider spraying a light starch to set the shape or using fabric protector if it will be handled often. A little extra care in finishing ensures your pincushion stays beautiful and useful for a long time.
4. Creative Variations and Gift Ideas
One of the most enjoyable parts of sewing the On Point Pincushion – Pattern is experimenting with different variations. Once you’ve made one, you’ll likely want to try a few more with unique designs and uses.
Try making a mini version for travel sewing kits. A 3″ or 4″ square is ideal for portability and still functional. These are perfect for retreats or as small thank-you gifts for fellow crafters.
Use themed fabrics for holidays or seasons. Floral prints for spring, plaids for fall, or festive reds and greens for Christmas add seasonal flair and are always well-received as gifts.
Make a matching needle book or scissor case using the same fabrics. A coordinated set is not only practical but also visually appealing when displayed together in your sewing space.
Add pockets or elastic bands to one side of the pincushion to hold sewing clips or small tools. This makes the pincushion even more functional and can be a great upcycling idea for scraps.
For an eco-friendly approach, consider using recycled fabric or vintage linens. These add character and charm while also reducing waste. A well-loved fabric carries memories and adds a sentimental layer to your project.
If you sell handmade goods or attend craft fairs, the On Point Pincushion – Pattern is a great item to offer. It’s quick to make, lightweight, and always in demand among sewing enthusiasts.
FAQ: Frequently Asked Questions
Q1: What size should I cut my fabric squares for this pincushion?
A: Most standard On Point Pincushion – Pattern tutorials start with 5″ to 6″ fabric squares. You can scale up or down depending on the desired finished size.
Q2: Can I machine wash my pincushion?
A: It’s best to spot clean, especially if it’s filled with walnut shells. If using polyester stuffing and cotton fabric, gentle handwashing is usually safe.
Q3: What’s the best stuffing for pincushions?
A: Polyester fiberfill is lightweight and easy to find. Crushed walnut shells offer weight and help sharpen pins. A blend of both is also a great option.
Q4: How do I make the corners sharp?
A: Clip the seam allowance at each corner before turning the piece right side out, and use a point turner to gently shape them.
Q5: Can I sew this by hand instead of with a machine?
A: Yes! You can hand sew the entire On Point Pincushion – Pattern using backstitch for strength. It takes more time but works just as well.
Q6: Is this a good project for beginners?
A: Absolutely! It teaches basic sewing skills like turning corners, stuffing, hand stitching, and working with layers, all on a small, manageable scale.
Conclusion
The On Point Pincushion – Pattern is a delightful and practical sewing project that fits any skill level and occasion. Its unique angled design, simple construction, and endless customization options make it a must-try for any sewing enthusiast. From selecting your favorite fabrics to adding thoughtful embellishments, each step allows for personal creativity and handmade pride.
Whether you’re making one for yourself, preparing gifts, or simply looking for a useful project to practice your sewing skills,
this pattern offers the perfect balance of form and function.
Have you tried the On Point Pincushion – Pattern yet? We’d love to hear your thoughts, see your creations, or get your ideas for new variations. Leave your honest opinion and suggestions below to help others in the sewing community get inspired! Happy stitching!