An On-Point Table Runner – Pattern is more than just a decorative accessory—it’s a statement piece that brings elegance, symmetry, and a touch of handmade charm to any dining or coffee table.
Whether you’re a quilting enthusiast or someone looking for a creative project to elevate your home décor, mastering the On-Point Table Runner – Pattern offers a fulfilling and functional way to express creativity.
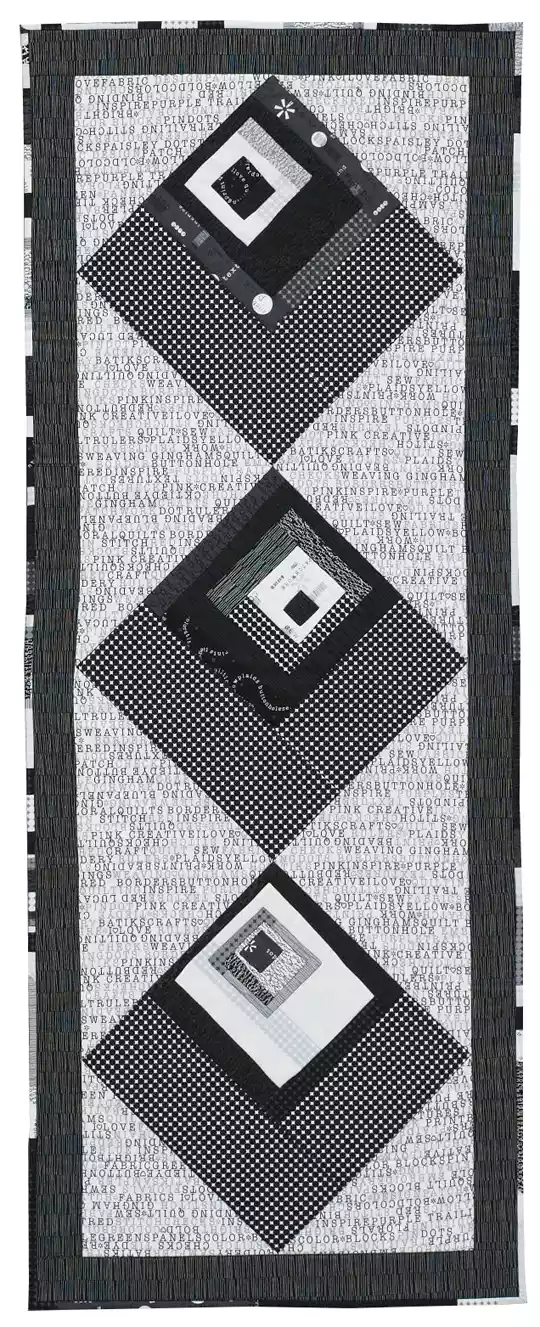
This style of table runner stands out due to its unique diamond or diagonal layout, making it “on-point” rather than laid out in traditional horizontal or vertical blocks. This distinctive structure can turn even the simplest fabrics into eye-catching masterpieces. It’s no surprise that the On-Point Table Runner – Pattern has grown in popularity across the crafting and interior design communities.
In this guide, we’ll walk you through everything you need to know—from the design concept and fabric selection to assembly tips and common mistakes to avoid. We’ll also explore how to incorporate these patterns into seasonal or themed decorations, making them as versatile as they are beautiful.
1. Understanding the On-Point Table Runner – Pattern Design
One of the key features that sets the On-Point Table Runner – Pattern apart is its layout. Instead of straight-aligned blocks, the squares or rectangles in the design are rotated 45 degrees to form diamonds. This creates a dynamic and flowing visual movement.
This pattern isn’t just stylish—it’s strategic. The on-point format adds depth and dimension, which can help small tables appear larger and make long tables feel more elegant. It’s a classic quilting technique that instantly upgrades the feel of any setting.
For beginners, the structure might look complex, but with a bit of practice, it becomes surprisingly manageable. Understanding the grid layout, diagonal cuts, and seam allowances are essential skills that improve both the appearance and durability of your finished piece.
Choosing the right fabrics is another critical step. To make the on-point layout stand out, select high-contrast or complementary fabrics that highlight each diamond. Light and dark contrasts or themed color palettes (such as autumn tones or holiday patterns) work particularly well.
Another benefit of this pattern is its adaptability. You can make it formal with rich tones and metallic thread or keep it casual with linen and cotton prints. The On-Point Table Runner – Pattern serves as a canvas for your personal taste.
Lastly, don’t overlook the backing and binding. These elements are often an afterthought but can frame the design beautifully and add strength to the finished piece. Binding with a pop of color can accentuate the angles in your on-point layout.
2. Materials and Tools You’ll Need
Before starting your On-Point Table Runner – Pattern, gather all the necessary tools and materials. Proper preparation will save time and reduce frustration later.
First, you’ll need fabric for the front, backing, and binding. Choose 100% cotton quilting fabric, as it’s easy to work with and holds shape well. Fat quarters are ideal for experimenting with color layouts.
Next, you’ll need a rotary cutter, self-healing cutting mat, and quilting ruler. These tools are essential for achieving the precise diagonal cuts required for the on-point blocks.
Sewing machine setup is also crucial. Use a ¼ inch quilting foot to maintain consistent seam allowances. Consistency is key when aligning diamond shapes in an On-Point Table Runner – Pattern.
Marking tools, such as chalk pencils or water-soluble markers, will help with layout. Since you’ll be dealing with angles, clear marking ensures accurate alignment during stitching.
Batting is used between the front and back layers to give the table runner thickness and structure. Thin, low-loft batting is usually preferred for runners, as it lies flatter on the table.
Lastly, thread choice matters. Cotton thread works best for quilting, while polyester can be used for stronger seams. Try using a thread color that either blends with or contrasts your design for added flair.
3. Step-by-Step Assembly Guide
Creating your On-Point Table Runner – Pattern is a satisfying process that blends geometry and artistry. Follow these steps to bring your vision to life.
Start by cutting your fabric into squares or rectangles, then rotate them to form diamonds. Lay them out in the desired order to get a visual of the final pattern before stitching.
Begin sewing the blocks row by row, aligning the diagonal edges. Because you’re working on-point, each row will be offset slightly. Pin pieces carefully to avoid shifting.
Once the top is complete, press all seams flat. Ironing may seem minor, but crisp seams improve the overall finish and make quilting easier.
Layer the backing fabric, batting, and quilt top. Use safety pins or basting spray to hold the sandwich layers together. This step ensures everything stays in place while you quilt.
Quilt as desired—either by stitching in the ditch (along the seams) or using decorative patterns. Make sure to stabilize the corners and edges, where the fabric may stretch due to the on-point layout.
Finish by adding binding around the edges. This final touch cleans up the raw fabric edges and adds a polished look. Hand-stitch or machine-stitch the binding based on your skill level and available time.
4. Creative Ways to Style Your On-Point Table Runner
Once your On-Point Table Runner – Pattern is complete, it’s time to showcase it. These runners can transform a simple setting into something memorable.
Use seasonal fabrics to create holiday-themed table runners. Think pumpkins and leaves for fall, snowflakes and plaid for winter, or florals for spring and summer. One pattern can serve multiple occasions with the right fabric swaps.
Pair your runner with matching or contrasting placemats for a cohesive look. You can even create a full table set using the same fabric family for a designer-level aesthetic.
Incorporate candles, centerpieces, or fresh greenery over the runner for added texture. The diamonds in the pattern naturally guide the eye, so placing decorative items at these junctions enhances the visual effect.
Don’t limit your runner to dining tables. Use it on consoles, coffee tables, sideboards, or even at the foot of a bed for a layered, artistic look.
For gifting, personalize the runner with embroidered names or dates. It’s a thoughtful handmade present that’s both practical and sentimental.
Lastly, consider using your finished piece in craft fairs or online shops. The On-Point Table Runner – Pattern is highly marketable due to its visual appeal and usefulness, especially around the holidays.
FAQ: Frequently Asked Questions About On-Point Table Runner – Pattern
Q1: What is the difference between a regular table runner and an on-point table runner?
A regular table runner is made with straight-aligned blocks, while an On-Point Table Runner – Pattern features diagonal or diamond-shaped layouts, offering more visual interest.
Q2: Is the on-point table runner suitable for beginners?
Yes, while the design looks advanced, it’s achievable for beginners with basic quilting knowledge. Patience and precise measurements are key.
Q3: What size should my on-point table runner be?
It depends on your table size. A standard runner is 12–18 inches wide and 36–72 inches long. Adjust based on your needs and the scale of your fabric blocks.
Q4: How do I prevent stretching when sewing diagonal pieces?
Use starch or fabric stabilizer and avoid handling the bias edges too much. Always pin securely and sew slowly.
Q5: Can I quilt by hand instead of using a machine?
Absolutely. Hand quilting adds a personal touch and is great for detailed designs. It does take more time, so plan accordingly.
Q6: What are some common mistakes to avoid?
Common errors include uneven cutting, mismatched seams, and not pressing seams properly. Always double-check measurements and layout before stitching.
Conclusion
Creating an On-Point Table Runner – Pattern is a rewarding way to bring beauty, balance, and creativity into your living space. From fabric selection to final styling, each step offers a chance to personalize and refine your home décor or gift-giving approach. We explored what makes the on-point pattern unique, how to choose the right materials, the assembly process, and ways to decorate using your finished piece.
If you’ve tried this project or are planning to, we’d love to hear from you! Please leave a sincere opinion about this guide and share any suggestions you have for making it even better. Your feedback helps us continue providing valuable, creative content for crafters like you.