
Patchwork Quilt with Flamingos Pattern is a delightful quilting project that combines elegant tropical inspiration with the timeless beauty of fabric piecing and appliqué. This eye-catching design features a graceful flamingo created from multiple coordinated fabric prints, making it an excellent choice for quilters who enjoy mixing colors, textures, and creative layouts. Whether you are making a decorative wall hanging, a table centerpiece, or a unique quilt block, this Patchwork Quilt with Flamingos Pattern allows you to showcase your creativity while improving your quilting skills.
One of the greatest advantages of this project is the flexibility it offers. You can personalize the flamingo using various shades of pink, burgundy, floral prints, polka dots, stripes, and textured fabrics, just like the inspiration shown in the project photo. By carefully selecting complementary fabrics, every flamingo becomes completely unique while maintaining a cohesive and elegant appearance. This makes the project suitable for beginners who want to practice appliqué techniques as well as experienced quilters looking for a sophisticated decorative design.
Another reason why the Patchwork Quilt with Flamingos Pattern remains so popular is its versatility. The finished design can be transformed into a wall quilt, cushion cover, table topper, baby quilt centerpiece, or even incorporated into a larger tropical-themed quilt. Throughout this guide, you will learn every essential step needed to recreate this beautiful project, from choosing fabrics to preparing templates, assembling the appliqué pieces, quilting the background, and adding the finishing touches that bring the flamingo to life.
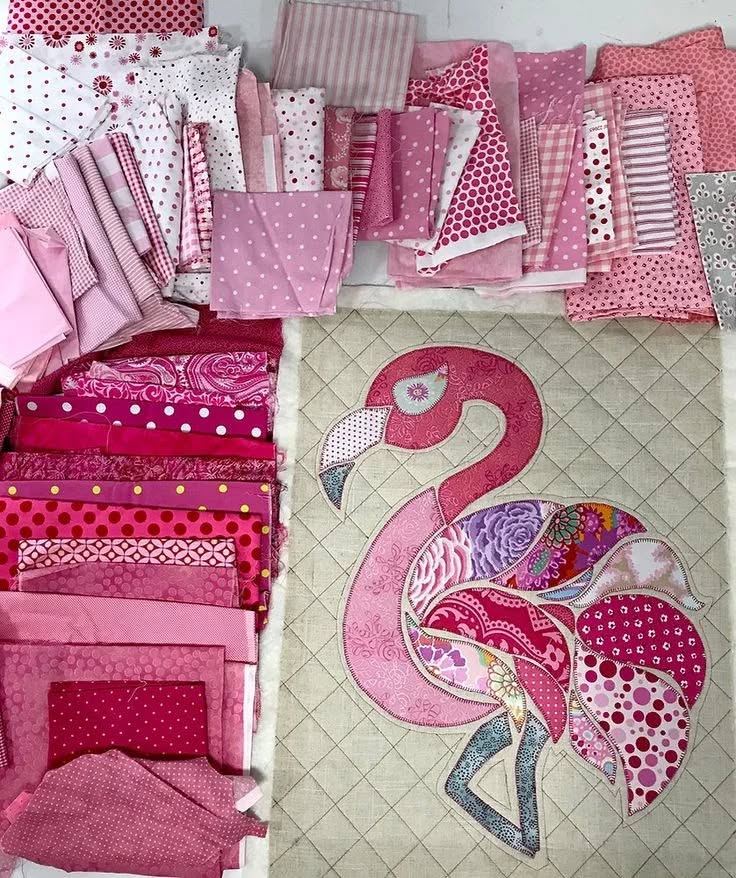
Choosing Fabrics and Preparing Your Patchwork Quilt with Flamingos Pattern
The first step in creating your Patchwork Quilt with Flamingos Pattern is selecting fabrics that complement one another. Since the flamingo is built from numerous individual fabric sections, variety is one of the keys to achieving an attractive result. Collect floral prints, dots, geometric patterns, tone-on-tone fabrics, stripes, and solid pinks in different shades to create depth and movement.
Choose a neutral background fabric such as light beige, cream, ivory, or soft gray. A subtle background allows the colorful flamingo to become the focal point of the project without overwhelming the overall composition. Many quilters also enjoy quilting simple diagonal crosshatch lines across the background before attaching the appliqué.
Gather all the necessary quilting tools before starting. You will need a rotary cutter, cutting mat, quilting ruler, fabric scissors, appliqué paper or fusible web, coordinating thread, quilting pins, an iron, sewing machine, and hand-sewing needles for finishing details if desired.
Print or draw the flamingo template at the desired size. Separate every individual body section into numbered template pieces. Labeling each piece will make the assembly process much easier once cutting begins.
Iron every fabric before cutting. Pressed fabric produces cleaner edges and improves cutting accuracy. Accurate preparation will significantly reduce assembly problems later in the project.
Organize your fabric pieces according to color families. Group darker pinks together, medium shades together, and lighter fabrics separately. This organization makes balancing the overall design much easier as you assemble the flamingo.
Cutting, Arranging, and Assembling the Flamingo Appliqué
After preparing the templates, begin transferring each individual section onto fusible web or template paper. Carefully cut each template while maintaining smooth curves and clean edges. Precision during this stage helps every section fit together perfectly.
Place each template onto the selected fabric, paying attention to print direction. Floral motifs, stripes, or polka dots may appear more balanced if oriented consistently throughout the design. This simple detail contributes greatly to the professional appearance of the finished project.
Cut each fabric piece with approximately a ¼-inch seam allowance if using traditional appliqué methods, or follow the recommended instructions if using fusible appliqué techniques. Keep every piece labeled until assembly is complete.
Lay all the flamingo pieces onto your background fabric before permanently attaching anything. This “dry layout” allows you to evaluate color distribution, contrast, and overall balance. Rearranging fabrics at this stage is much easier than after stitching begins.
Begin attaching the larger body pieces first. Work from the center outward, gradually adding smaller decorative sections until the complete flamingo shape is assembled. This sequence helps maintain proper alignment throughout the process.
Complete the flamingo by adding the beak, eye, legs, and wing sections. These smaller details bring personality and realism to the design while emphasizing the graceful silhouette that makes flamingos so recognizable.
Quilting the Background and Adding Decorative Details
Once the appliqué is secured, prepare the quilt sandwich by layering the quilt top, batting, and backing fabric. Smooth each layer carefully to eliminate wrinkles and ensure even quilting throughout the project.
Many quilters choose a simple diagonal grid quilting pattern for the background. This classic quilting design complements the elegant flamingo without competing with the colorful appliqué. Mark the quilting lines using a removable fabric marker before stitching.
Select quilting thread that coordinates with your background rather than the flamingo itself. Neutral thread allows the appliqué to remain the primary visual focus while adding attractive texture across the quilt surface.
Quilt slowly around the curved edges of the flamingo using smaller stitch lengths. Gentle curves require patience, but careful stitching produces a smooth professional finish that enhances every appliqué section.
If desired, add decorative embroidery after quilting. Simple feather stitches, satin stitches, or hand embroidery around selected fabric sections can create additional texture and artistic character while emphasizing the layered construction of the bird.
Finish by trimming excess batting and backing evenly before preparing the binding. Accurate trimming ensures neat edges and helps the final binding sit smoothly around the entire quilt.
Finishing, Binding, and Creative Display Ideas
Cut binding strips measuring approximately 2½ inches wide and join them into one continuous strip. Press the binding lengthwise before attaching it around the quilt edges for a clean professional finish.
Sew the binding to the front of the quilt using a consistent seam allowance. Carefully miter each corner to achieve crisp, attractive points that elevate the finished appearance of the project.
Fold the binding toward the back and secure it either by machine or hand stitching. Many quilters prefer hand-finishing because it creates an almost invisible edge while adding a refined handcrafted touch.
After binding is complete, give the quilt a final press using appropriate heat settings for your fabrics. This final pressing removes minor wrinkles and helps every appliqué section lie perfectly flat.
Your completed Patchwork Quilt with Flamingos Pattern can be displayed in many creative ways. It works beautifully as a wall hanging in a sewing room, beach-themed home, sunroom, nursery, or tropical-inspired living space. The design also adapts well into pillow covers, tote bags, table runners, or larger quilts featuring multiple flamingos.
Finally, remember that every version of the Patchwork Quilt with Flamingos Pattern becomes a reflection of your own creativity. Experiment with unexpected color palettes, modern prints, vintage florals, or even batik fabrics to create a quilt that is truly one of a kind.
FAQ
Is the Patchwork Quilt with Flamingos Pattern suitable for beginners?
Yes. Beginners who have basic rotary cutting and sewing experience can successfully complete this project by working slowly and organizing the appliqué pieces before stitching.
What fabrics work best for this project?
High-quality 100% cotton quilting fabric is recommended because it is stable, easy to cut, presses well, and produces crisp appliqué shapes.
Can I use fabric scraps?
Absolutely. This pattern is ideal for using leftover quilting fabrics since the flamingo consists of many small individual sections.
Should I use hand appliqué or fusible appliqué?
Both methods work well. Fusible appliqué is faster and beginner-friendly, while hand appliqué provides a softer traditional appearance.
What batting should I choose?
A lightweight cotton batting helps maintain a flat decorative finish while still providing beautiful quilt texture.
Can I resize the flamingo?
Yes. The template can easily be enlarged or reduced depending on whether you want a wall hanging, pillow, table topper, or full-size quilt.
Which quilting design works best for the background?
Simple crosshatch quilting, diagonal grid quilting, or gentle free-motion quilting all complement the flamingo without distracting from the appliqué.
How do I keep the appliqué pieces aligned?
Lay out every piece first, photograph the arrangement if necessary, and attach the pieces from the center outward while checking alignment frequently.
Can I wash the finished quilt?
Yes. Wash using a gentle cycle with mild detergent and dry on low heat or lay flat to preserve the appliqué and quilting.
What makes this pattern unique?
Its combination of colorful patchwork fabrics, elegant tropical design, and artistic appliqué creates a stunning decorative quilt that showcases both quilting skill and creative fabric selection.
Conclusion
The Patchwork Quilt with Flamingos Pattern is a rewarding quilting project that combines traditional patchwork techniques with elegant appliqué to create a stunning tropical-inspired design. Throughout this guide, you learned how to select harmonious fabrics, prepare accurate templates, organize and assemble the flamingo appliqué, quilt the background, apply professional binding, and finish the project with beautiful decorative details.
By taking your time during each stage and paying close attention to color placement, you can create a unique quilt that reflects your own personal style while showcasing your quilting skills. Whether displayed as wall art, incorporated into home décor, or gifted to someone special, this beautiful flamingo quilt is sure to become a treasured handmade piece. If you enjoyed this tutorial, please leave your honest opinion and share your suggestions. Your feedback helps inspire new quilting projects and allows future tutorials to become even more helpful for makers around the world.