Learning how to create a pie holder sewing – pattern is not only a fun DIY project but also a practical way to add style and safety to your kitchen. Whether you’re a beginner looking for your first sewing project or an experienced crafter in search of a quick and functional creation, mastering the art of sewing a pie holder is both rewarding and useful.
The demand for custom pie holders has grown, especially as people lean into sustainable, homemade kitchen solutions. With the right pattern, you can craft pie holders that keep your baked goods warm, protect your hands and tables, and even serve as thoughtful handmade gifts. And the best part? You don’t need to be a professional sewer to start creating.
This guide covers everything from understanding the basic tools required to tips on how to adjust your pie holder sewing – pattern for different pie sizes. If you’ve been searching for a sewing project that’s both creative and functional, you’re in the right place.
1. Understanding the Basics of Pie Holder Sewing – Pattern
Before diving into cutting fabric or threading needles, it’s essential to understand what a pie holder sewing – pattern entails. This sewing project is more than just aesthetics—it’s about crafting a heat-resistant, washable, and convenient item that complements your kitchen routine.
A pie holder typically consists of two to three layers: a decorative outer fabric, an insulating inner layer (like batting or thermal fleece), and sometimes a moisture-resistant inner lining. The pattern helps you maintain consistent sizing and shape, ensuring your pie holder fits most standard-sized pie dishes.
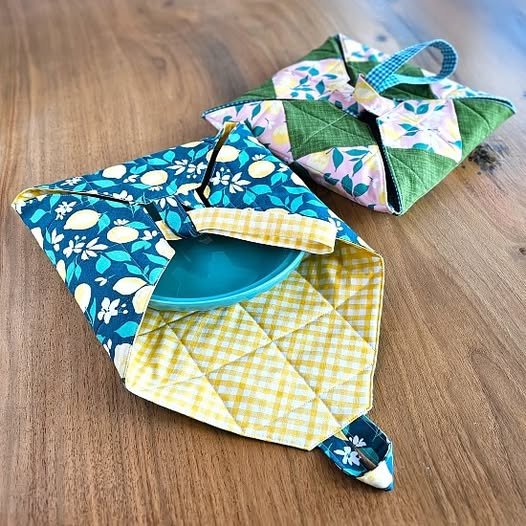
When choosing your pattern, look for reusable, printable patterns available online or in sewing books. Most designs are circular with flaps or “arms” that help wrap around the pie dish. These arms usually come together at the top and may include a loop or button to secure the pie.
Keep in mind, the materials you choose play a significant role in the final product. Cotton is a favorite for its durability and washability, while insulated batting like Insul-Bright adds essential heat resistance. Matching or contrasting threads can enhance the design.
Another crucial factor is ensuring that your pie holder sewing – pattern is safe. Use only materials that can withstand heat, especially if the pie holder will go from oven to table. Avoid any synthetic materials that may melt under heat.
Lastly, don’t forget the purpose behind the pie holder: it should be functional. Ensure your pattern includes enough depth and flexibility to accommodate different pie dish sizes. A tight fit might damage your pies, while a loose one can be ineffective.
2. Essential Materials and Tools for Your Project
To begin your pie holder sewing – pattern project, gather all your supplies to streamline your workflow. Having everything within reach not only saves time but also prevents errors that could compromise the final product.
First, select your fabric. Opt for 100% cotton for both the outer and lining layers. It’s breathable, easy to clean, and safe for hot surfaces. If you want your pie holder to stand out, choose printed or themed fabric designs to add a personal touch.
Next, you’ll need insulated batting. This is the core layer that provides heat protection. Insul-Bright is highly recommended because it reflects heat and helps maintain the temperature of your pie, whether hot or cold.
In addition to fabric and batting, pick up some bias tape. This will help you finish the edges of your pie holder neatly. Bias tape can match or contrast with your fabric, depending on the design you’re aiming for.
Basic sewing tools are also necessary. Make sure you have sharp fabric scissors, pins or clips, a sewing machine, a measuring tape, and marking tools. A rotary cutter and mat can make cutting circles more precise.
It’s also helpful to use a printed pattern as a guide. Many are available online for free or at a small cost. Ensure it includes instructions and visual guides if you’re a beginner. A downloadable pie holder sewing – pattern in PDF format is ideal.
Lastly, always pre-wash and iron your fabric before sewing. This step prevents shrinking and ensures a smoother final result. Preparing your materials properly is key to a professional-looking finish.
3. Step-by-Step Guide to Sewing a Pie Holder
Now that you have your pie holder sewing – pattern and materials ready, it’s time to begin sewing. Follow these simple steps to ensure accuracy and functionality.
Start by printing and cutting out your pattern. Lay the pattern pieces onto your fabric and trace around them. Cut two pieces of outer fabric, one piece of insulated batting, and two pieces of lining fabric if your pattern includes it.
Next, layer your materials. Place one piece of outer fabric right side down, add the batting in the middle, and place the second outer fabric on top right side up. If using lining, adjust your layers accordingly. Pin everything in place carefully.
Using your sewing machine, sew around the edge of your layered pieces, leaving a small opening. Once sewn, trim any excess fabric and carefully turn the holder right side out through the opening. Press the seams flat with an iron.
Sew a topstitch around the entire edge to secure the layers and close the opening. This not only reinforces your pie holder but also gives it a professional, finished look.
If your pie holder sewing – pattern includes arms or flaps, now’s the time to attach them. Sew along the guidelines provided in the pattern. Ensure they’re evenly spaced so the holder wraps securely around your pie dish.
Finally, add any closures, like buttons, snaps, or fabric loops, depending on the style you chose. These help keep your pie holder wrapped tightly, making it easy to transport or store your dish safely.
4. Customization Ideas and Practical Uses
One of the best aspects of sewing your own pie holder is the opportunity to customize it to fit your personality or kitchen theme. With a little creativity, you can make your pie holder truly one-of-a-kind.
Start with fabric customization. Use seasonal prints for holidays, florals for spring, or neutral tones for everyday use. Personalizing your fabric choices makes the pie holder a perfect gift for friends and family.
Add monograms or embroidery for a special touch. If you have an embroidery machine, stitch initials, family names, or fun messages onto the holder. It’s a fantastic way to make your piece feel extra special.
Change up the shape and size of the pattern depending on the dish you plan to use. While most pie holder sewing – patterns are circular, square or oval versions work for casserole dishes and quiches.
Use contrasting thread for decorative topstitching. It not only adds a pop of color but also enhances the design of your finished piece. Consider using metallic or neon thread for a bold look.
You can also make matching kitchen accessories like oven mitts, pot holders, or apron sets using the same fabrics and patterns. Creating a coordinated set makes for a lovely gift bundle.
Lastly, use your finished pie holder in multiple ways. Besides carrying hot dishes, it can serve as a trivet on your dining table or a protective wrap when transporting food to a potluck or picnic.
FAQ – Pie Holder Sewing – Pattern
Q1: Can beginners make a pie holder using sewing patterns?
Absolutely! Many pie holder sewing – pattern designs are simple and beginner-friendly. Look for patterns labeled “easy” and follow step-by-step guides.
Q2: What size should a pie holder be?
Most patterns fit 9-inch pie dishes, which is standard. However, many patterns are adjustable or come in multiple sizes.
Q3: Do I need a sewing machine to make a pie holder?
While a sewing machine speeds up the process, you can sew a pie holder by hand. It just takes a bit more time and patience.
Q4: What type of batting is best for pie holders?
Insulated batting like Insul-Bright is best because it reflects heat and adds safety when handling hot dishes.
Q5: Can I wash pie holders in the washing machine?
Yes, if you use washable cotton fabric and batting. Always read the care instructions for your specific materials.
Q6: Where can I find a good pie holder sewing – pattern?
Many websites offer downloadable PDF patterns, including crafting blogs, Etsy shops, and DIY forums. Choose one with clear instructions and visuals.
Conclusion
Creating your own pie holder sewing – pattern is a rewarding project that combines practicality with creativity. From selecting the right materials to stitching it all together, you now have the knowledge to make a functional, beautiful accessory for your kitchen or as a handmade gift.
This DIY guide walked you through the entire process—from understanding what makes a good pattern to customizing your holder with flair. Don’t forget to share your finished creations online or gift them to someone special!
If you found this guide helpful, please leave a sincere opinion in the comments below. Your feedback and suggestions help us improve future tutorials. Happy sewing!