The Pigeon Toes Quilt Block is a charming and intricate quilting pattern that combines precision with creativity.
This block design has been a favorite among quilters for years, offering both a challenge and a reward with its detailed piecing.
It’s perfect for anyone looking to add a unique touch to their quilt projects, whether you’re a beginner or an experienced quilter.
The beauty of the Pigeon Toes Quilt Block lies in its geometric elegance and the flexibility it offers in terms of color choices and layout designs.
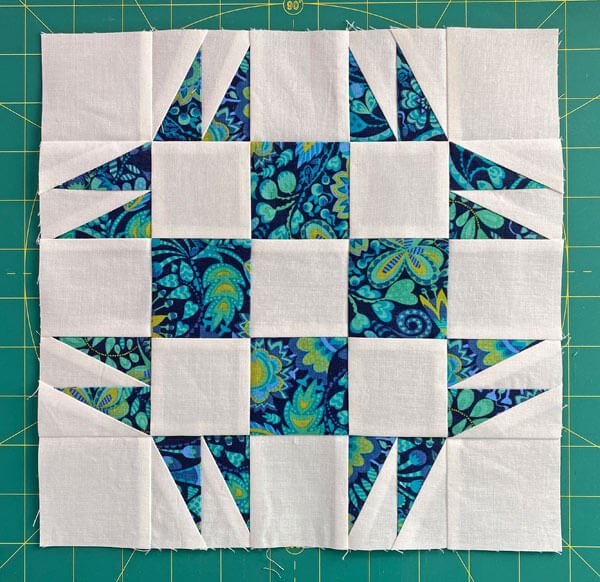
The name “Pigeon Toes” refers to the way the pattern appears to mimic the shape of a bird’s feet, where the toes point inward. This makes the design especially visually interesting and adds an element of motion to your quilt. Whether you’re working on a bed quilt, wall hanging, or a smaller project like a table runner, the Pigeon Toes Quilt Block adds a distinctive, yet approachable, design element.
In this article, we will explore how to create the Pigeon Toes Quilt Block, the materials you need, tips for successful piecing, and how to incorporate this block into various quilt layouts. By the end, you’ll be equipped to make your own Pigeon Toes Quilt Block and understand how to play with this versatile pattern to make a project that is uniquely yours.
1. Understanding the Basics of the Pigeon Toes Quilt Block
Before diving into the specifics of making the Pigeon Toes Quilt Block, it’s essential to understand the basic structure of this design. This block features several pieces sewn together in a precise pattern, creating a stunning geometric effect. At its core, the Pigeon Toes Quilt Block is made up of squares and triangles, all arranged carefully to create the characteristic inward-pointing toes.
The block is typically 9 inches in size, although it can be adjusted to suit larger or smaller quilt projects. It’s important to note that while the design may seem complex at first glance, the Pigeon Toes Quilt Block is manageable with some basic quilting techniques. The key is to work with accurate measurements and maintain consistent seam allowances.
The block’s unique arrangement gives the illusion of depth and movement. As the toes point inward, the entire quilt takes on a dynamic look that draws the viewer’s eye. This can be especially impactful when using bold colors or patterns for the blocks. Now, let’s look at the specific steps involved in creating the Pigeon Toes Quilt Block.
2. Materials Needed for the Pigeon Toes Quilt Block
To begin creating your own Pigeon Toes Quilt Block, you’ll need a few essential materials. While this pattern is simple enough for a beginner to tackle, it does require some precision to get the clean, sharp lines that give the design its beauty. Here’s what you’ll need:
- Fabric: Select a fabric for the block that complements your overall quilt design. You’ll need a variety of fabrics: one for the background, a contrasting color for the “toes,” and possibly a different fabric for the outer triangles. If you want to create a scrappy quilt, mix and match different fabrics for a more eclectic feel.
- Rotary Cutter and Mat: A rotary cutter and self-healing mat will help you make clean, straight cuts. This is crucial for achieving the accuracy needed to ensure the pieces of your block fit together perfectly.
- Ruler: Use a quilting ruler to measure and cut your fabric pieces. A ruler with a ¼-inch seam allowance will be helpful for maintaining the correct dimensions throughout the block.
- Thread: Choose a high-quality quilting thread that matches or contrasts with your fabric. Matching the thread to the fabric will help create a seamless look, whereas a contrasting thread can highlight the design.
- Sewing Machine: A reliable sewing machine will help you stitch your pieces together quickly and accurately. Make sure to set your machine to a quarter-inch seam allowance to ensure the correct fit of your pieces.
- Iron and Ironing Board: Pressing your seams is a crucial step in quilting. An iron will help you flatten your seams, ensuring they lie flat and don’t add bulk to your block. This will help with the overall precision of your block.
Once you’ve gathered all your materials, you’ll be ready to start cutting and sewing your Pigeon Toes Quilt Block!
3. Step-by-Step Instructions for Making the Pigeon Toes Quilt Block
Now that you have your materials, let’s dive into the process of creating the Pigeon Toes Quilt Block. Follow these steps carefully to create a block that’s as accurate as it is beautiful:
- Cut the Fabric: Start by cutting all the necessary pieces. For a standard 9-inch Pigeon Toes Quilt Block, you’ll need:
- 1 square for the center (typically 3.5 inches by 3.5 inches).
- 4 small triangles for the “toes” (cut from a square of fabric, typically 3 inches by 3 inches, and then cut diagonally).
- 4 large triangles for the outer parts of the block.
- Assemble the Center: Begin by piecing the four small triangles around the central square. To do this, align each triangle’s edge with the edges of the square, creating a four-pointed star-like shape. Press each seam as you go, making sure the corners align correctly.
- Attach the Outer Triangles: Next, sew the large triangles to the four sides of the central square. These triangles will form the “feet” of the Pigeon Toes Quilt Block, giving the block its final shape. Be sure to measure and pin carefully to ensure the pieces fit together snugly.
- Press the Seams: After each step, press the seams flat to prevent them from becoming bulky. This will help ensure that the block lies flat and the edges are sharp and crisp.
- Trim the Block: Once all the pieces are sewn together, trim any excess fabric to ensure your block is an even 9 inches in size. This will make it easier to join with other blocks when you assemble your quilt.
- Repeat for Additional Blocks: If you’re making a full quilt, repeat the process to create as many blocks as needed for your design. You can use different fabrics for each block to create a scrappy effect or repeat a color scheme for a more uniform look.
4. Tips for Perfecting Your Pigeon Toes Quilt Block
Creating the Pigeon Toes Quilt Block can be a fun and rewarding experience, but achieving the perfect block requires some attention to detail. Here are a few tips to help you make a flawless block every time:
- Use Accurate Measurements: The key to making the Pigeon Toes Quilt Block work is accuracy. Be sure to measure and cut your fabric pieces carefully. Use a rotary cutter and ruler to get clean, straight edges.
- Consistent Seam Allowance: Make sure to use a consistent ¼-inch seam allowance throughout the block. This is crucial for making sure all the pieces fit together neatly and the block maintains the correct dimensions.
- Press Seams as You Go: Pressing your seams as you work is an important step in quilting. It helps to reduce bulk and ensures that each seam lays flat. Press your seams in opposite directions to ensure that the pieces align well when sewn together.
- Trim Excess Fabric: After each step, trim any excess fabric or threads. This will help keep the block neat and avoid any issues when piecing it together with other blocks.
- Experiment with Colors: The Pigeon Toes Quilt Block is incredibly versatile, so feel free to experiment with different color combinations. Play with contrasting colors for the “toes” and the background, or use a gradient effect to create a more dynamic look.
- Take Your Time: Don’t rush through the process. Quilting is about precision, and taking your time will ensure that your block turns out perfectly. Enjoy the creative process and have fun with the project!
FAQ
- What is the Pigeon Toes Quilt Block? The Pigeon Toes Quilt Block is a traditional quilting pattern made up of squares and triangles arranged to form a geometric design resembling a bird’s feet. It creates a beautiful, intricate look that’s perfect for various quilt projects.
- How big is a standard Pigeon Toes Quilt Block? A standard Pigeon Toes Quilt Block is typically 9 inches in size, but it can be resized to fit your specific quilt design.
- Can I use different fabrics for the Pigeon Toes Quilt Block? Yes! Feel free to experiment with different fabrics. The Pigeon Toes Quilt Block is highly customizable, so you can mix and match fabrics to create a unique and personalized quilt.
- How do I join multiple Pigeon Toes Quilt Blocks together? Once you’ve finished making your Pigeon Toes Quilt Blocks, you can join them using a quarter-inch seam allowance. Use the same technique you used for making the individual blocks to sew them together in rows and columns.
- What are some creative ways to use the Pigeon Toes Quilt Block? The Pigeon Toes Quilt Block is versatile and can be used for various quilt projects. You can make a full quilt, use the blocks for a table runner, or even create smaller items like pillows or wall hangings.
Conclusion
The Pigeon Toes Quilt Block is a classic quilting pattern that offers both beauty and versatility. Whether you’re a beginner or an experienced quilter
, this block is a great way to add an intricate design to your projects. By following the instructions and tips in this article, you’ll be able to create your own stunning Pigeon Toes Quilt Blocks. Remember to experiment with different fabrics and colors to make your quilt truly unique. We’d love to hear your thoughts and suggestions – happy quilting!