A well-made pincushion is more than just a handy sewing tool—it’s a charming, personal touch to any crafter’s space. Whether you’re a seasoned seamstress or just learning to sew, this Pincushion tutorial – Pattern offers a simple, satisfying project that blends creativity and function. In this guide, you’ll learn how to create beautiful, custom pincushions using easy-to-follow steps and helpful tips.
The great thing about following a Pincushion tutorial – Pattern is that it’s accessible to all skill levels. You can make them by hand or with a sewing machine, and the size, shape, and fabric combinations are endless.
They’re also fantastic scrap-busting projects—perfect for using leftover fabric pieces you’ve been saving for “something special.”
Whether you’re crafting one for your sewing table, gifting to a fellow maker, or even planning to sell handmade items at a market, this project delivers both charm and usefulness. Let’s dive into the techniques, design ideas, and helpful tips to make your own custom pincushion truly stand out.
1. Getting Started with Your Pincushion Tutorial – Pattern
Before you begin your Pincushion tutorial – Pattern, you’ll want to gather the right materials. Fortunately, pincushions require only a few simple supplies: fabric, stuffing, a needle and thread, and optional embellishments like buttons or ribbons.
Choose a fabric that’s durable but soft enough to be sewn and pierced with pins. Cotton quilting fabric is ideal, and you can also experiment with linen, denim, or felt depending on the look you want. Keep in mind that tighter weaves will hold their shape better over time.
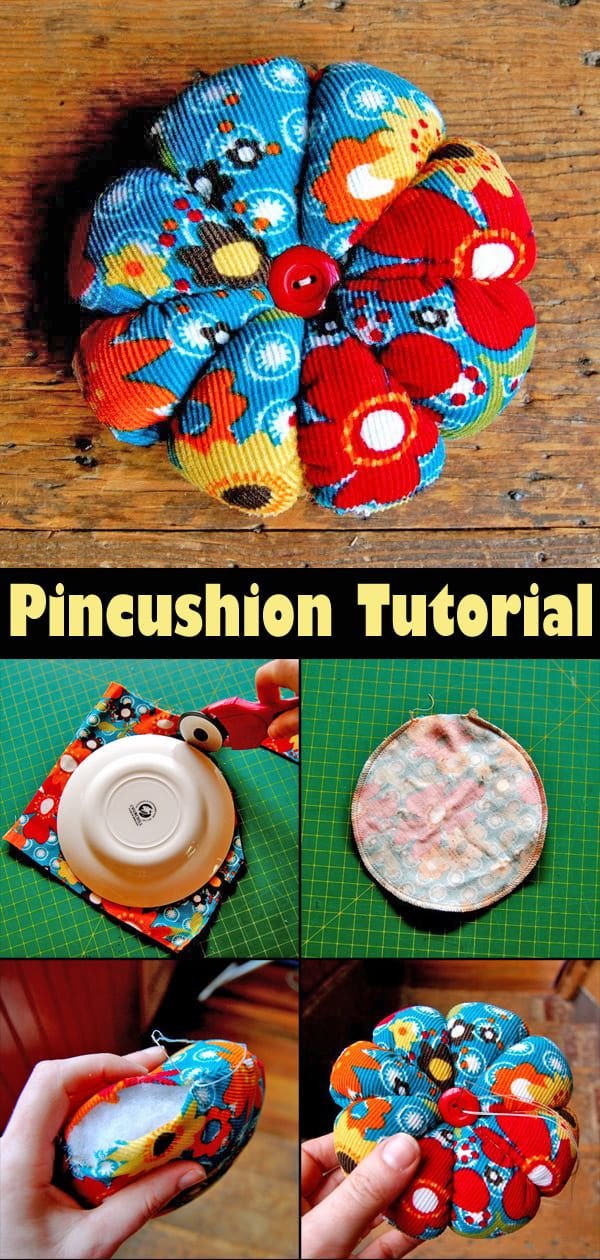
Cut your fabric according to your preferred shape. The most common are round, square, and tomato-style pincushions, but you can get creative with hearts, stars, or even animal shapes. For beginners, a basic square or circle is a great place to start.
Stuffing is a key part of this Pincushion tutorial – Pattern. Use polyester fiberfill, fabric scraps, or even steel wool (which helps sharpen pins). Just make sure it’s packed firmly enough to hold pins upright without being too hard to use.
Use a needle and matching thread (or a sewing machine) to stitch your pieces together. If you’re sewing by hand, a backstitch works well for durability. Leave a small opening for turning your fabric right side out and stuffing it before closing it securely.
Add embellishments last. Buttons at the center of round pincushions, ribbon edges, or a loop for hanging all make great finishing touches. Personalizing your pincushion will not only make it special but also practical and stylish.
2. Design Ideas for Unique Pincushion Projects
When using a Pincushion tutorial – Pattern, it’s easy to customize the project to match your style, space, or sewing tools. There are endless ways to make your pincushion reflect your creativity while staying functional.
One fun idea is to make themed pincushions. You can create seasonal designs like pumpkins for fall or snowflakes for winter. These are great not only for personal use but also as holiday gifts or decor.
Try using upcycled fabric from old clothing, curtains, or tablecloths. This adds a touch of sustainability to your sewing and gives new life to old textiles. Denim, for example, makes a sturdy pincushion that’s great for heavy-duty needles.
Patchwork pincushions are also a favorite. By sewing small scraps together into a single piece, you can create a colorful and eclectic design. This is a great way to experiment with color combinations or use tiny fabric remnants.
You can also design novelty-shaped pincushions like owls, cats, or cupcakes. These not only brighten up your workspace but also make adorable handmade gifts. Just make sure they’re stable and balanced enough to sit securely on a surface.
Another practical variation is the wrist pincushion. Attach a small cushion to an elastic or fabric band, and you’ll always have your pins within reach while working. This is especially helpful for quilters or seamstresses working on large pieces.
Don’t forget about magnetic pincushions. Although this involves a bit more craftwork, adding a strong magnet inside allows you to easily catch and hold pins, especially when dropped. It’s a great hybrid of functionality and modern design.
3. Practical Tips for a Perfect Finish
Every great Pincushion tutorial – Pattern includes a few pro tips to help your final result look polished and professional. These tips will ensure your pincushion is as functional as it is beautiful.
Always prewash and press your fabric before cutting. This removes sizing, prevents shrinking, and helps the fabric handle more easily. Smooth, wrinkle-free fabric leads to neater stitches and a cleaner finish.
If using a round shape, try using a small plate or bowl as a template to trace a perfect circle. Consistency is key, especially if you’re making multiple pincushions as gifts or for sale.
Use double thread when hand-stitching for added strength, especially when closing the final seam. Pincushions are handled frequently, so a secure seam will help them last longer and resist tearing.
Stuff the pincushion evenly and firmly. A lightly stuffed cushion may look cute but won’t hold pins well. Use a pencil or chopstick to help distribute the filling and press it into corners or edges.
To create the signature “buttoned center” in many round pincushions, use a long needle and strong thread (like upholstery thread) to pass through the center several times, pulling tight and adding a decorative button on either side.
If making multiple pincushions, batch your work. Cut all fabric pieces first, then move through steps like sewing, stuffing, and embellishing as a group. This is more efficient and helps maintain consistency.
4. How to Use and Care for Your Pincushion
Once your Pincushion tutorial – Pattern is complete, knowing how to use and care for your pincushion properly will keep it in great shape for years to come.
Use your pincushion to store sewing pins, needles, and even small clips. Keeping them in a visible and accessible place helps speed up your workflow and keeps your work area tidy.
If you used steel wool or emery powder in your stuffing, your pincushion can help sharpen your needles with regular use. This adds an extra layer of function and ensures your tools stay in top condition.
To clean your pincushion, spot clean with a damp cloth if using cotton or linen. Avoid soaking it, as the filling may clump or break down. If needed, create a removable cover or pouch-style cushion for easy washing.
Store your pincushion away from direct sunlight or damp environments to preserve the fabric color and texture. Keeping it in your sewing kit or on a shelf works well and prevents unnecessary wear.
If you’re gifting or selling pincushions, consider adding a care card explaining how to use and clean the item. This helps the recipient appreciate your handmade product even more and ensures long-lasting use.
Over time, if your pincushion loses shape or the stuffing compresses, you can open a small seam and add more filling. This easy repair extends the life of your pincushion and keeps it functional for years to come.
FAQ: Pincushion Tutorial – Pattern
Q1: What’s the best fabric for making pincushions?
Cotton quilting fabric is a top choice due to its durability and ease of sewing. Felt and linen are also good options depending on the design.
Q2: What should I use to stuff a pincushion?
Common fillers include polyester fiberfill, fabric scraps, rice, walnut shells, and steel wool. Steel wool is especially useful for sharpening pins.
Q3: Can beginners follow this pincushion tutorial – pattern?
Absolutely! This is an ideal beginner sewing project. Simple shapes like squares or circles are easy to make, even by hand.
Q4: How do I keep pins from rusting inside a pincushion?
Use rust-free pins and avoid stuffing materials like rice in humid climates. Store the pincushion in a dry place for best results.
Q5: Can I wash my pincushion?
You can spot clean most pincushions. However, avoid soaking unless the filling is washable. Removable covers are a great solution for regular washing.
Q6: How can I add weight to my pincushion so it doesn’t move?
Add a small amount of rice, pebbles, or weighted beads to the base before stuffing. This helps it stay in place during use.
Conclusion
Creating your own Pincushion tutorial – Pattern is a delightful and rewarding sewing project. It combines function, creativity, and the joy of handmade crafting in a small but impactful item. From choosing your favorite fabrics and shapes to exploring embellishments and fillings, every step of the process allows you to express your style and skill.
Whether you’re making a gift, organizing your sewing space, or selling at local markets, a well-crafted pincushion adds charm and practicality. Plus, it’s a great way to use up scraps and improve your sewing techniques.
Have you tried this Pincushion tutorial – Pattern? We’d love to hear from you!
Please leave a sincere opinion or any tips you’d like to share in the comments. Your feedback helps others in the crafting community and makes the experience even more enjoyable for everyone.