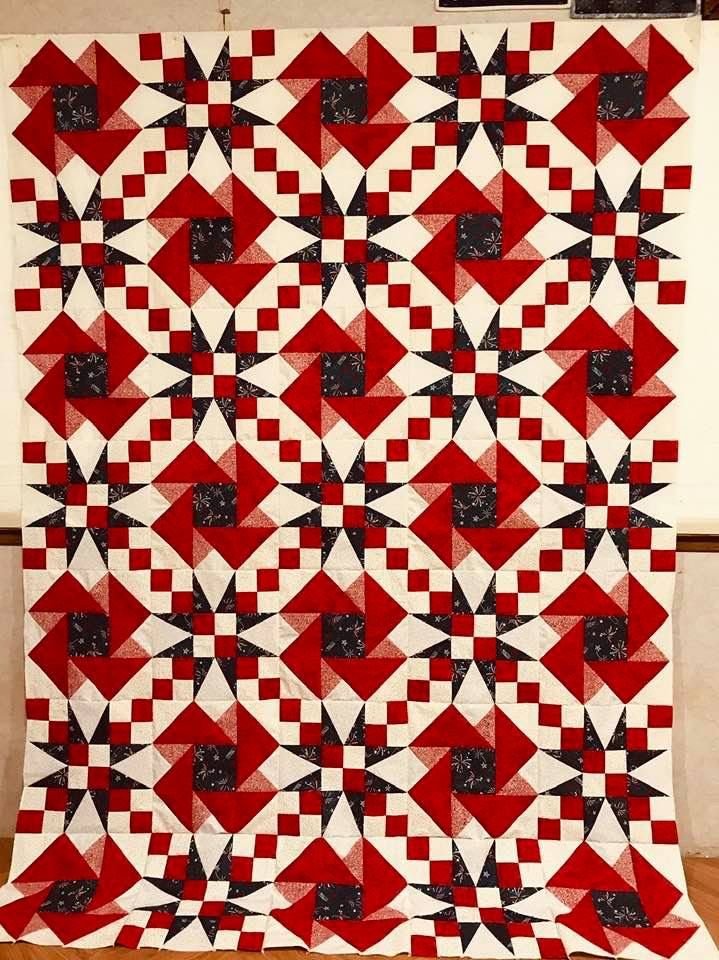
The Pinwheel and Star Block Quilt – Pattern is an exciting and versatile quilt design that combines two classic quilt blocks: the pinwheel and the star.
This quilt pattern brings together dynamic movement and intricate symmetry, making it a popular choice for both beginners and advanced quilters alike.
The pinwheel block adds a sense of rotation and energy, while the star block brings balance and elegance.
Together, they create a visually stunning design that can be used in a variety of quilt projects, from cozy throws to large bed quilts.
Quilting has always been a way to express creativity while also creating functional pieces. The Pinwheel and Star Block Quilt – Pattern takes advantage of these traditional designs to create something truly special. Whether you’re looking to make a quilt for a special occasion, or you’re simply adding a new piece to your quilting collection, this pattern offers endless possibilities for customization.
In this article, we’ll break down the steps of creating the Pinwheel and Star Block Quilt – Pattern. We’ll go over the materials you need, how to piece together the blocks, and some helpful tips to make your quilt even more beautiful. By the end of this guide, you’ll be well on your way to creating a stunning quilt with this charming and timeless design.
1. Materials Needed for the Pinwheel and Star Block Quilt – Pattern
Before you begin working on the Pinwheel and Star Block Quilt – Pattern, it’s important to gather all the necessary materials. Having everything prepared and organized will make your quilting process smoother and more enjoyable. Here’s a list of what you’ll need to get started:
- Fabric – The fabric is the heart of any quilt. For the Pinwheel and Star Block Quilt, you’ll need a variety of fabric colors. Choose fabrics for the star blocks, pinwheel blocks, and background. You’ll need both light and dark-colored fabrics for contrast to make the blocks pop.
- Quilt Block Templates – If you’re new to quilting, templates can help ensure that your blocks are consistent in size and shape. Look for Pinwheel and Star Block Quilt – Pattern templates, or you can create your own templates using quilting software or paper patterns.
- Rotary Cutter and Cutting Mat – A rotary cutter will allow you to make precise cuts, especially when cutting fabric for the pinwheel and star blocks. The cutting mat will protect your work surface and ensure that you cut your fabric evenly.
- Quilt Ruler – A clear quilting ruler is an essential tool for measuring and cutting your fabric strips. This will help you keep your pieces even and precise, ensuring your blocks fit together seamlessly.
- Thread – You’ll need a high-quality quilting thread. The thread color should complement the fabric choices in your quilt.
- Iron and Ironing Board – Pressing your fabric pieces as you go is essential for creating clean, sharp seams. An iron and ironing board are vital tools for ensuring that your quilt blocks are crisp and flat.
By having all of these materials ready, you can focus on the quilting process without interruptions. It’s always best to take your time and ensure that your cuts and pieces are accurate.
2. Cutting Your Fabric for the Pinwheel and Star Blocks
Once you have gathered your materials, it’s time to start cutting your fabric for the Pinwheel and Star Block Quilt – Pattern. Cutting your fabric accurately is crucial to the success of your quilt. If your fabric pieces are too large or too small, they won’t fit together properly, which can lead to uneven seams and an overall unprofessional look. Here’s how to cut your fabric:
Step 1: Prepare Your Fabric
Before cutting, pre-wash and iron your fabric. This will prevent any shrinking after the quilt is finished and ensure that your fabric is smooth and free from wrinkles. Cutting fabric that hasn’t been pre-washed can result in uneven sizing.
Step 2: Cut the Pinwheel and Star Blocks
For the Pinwheel and Star Block Quilt – Pattern, you will need to cut both squares and triangles for the pinwheel and star blocks. The star blocks often use a combination of half-square triangles, and the pinwheel blocks require a combination of triangles and squares. Make sure to use a quilting ruler to measure each piece carefully, and cut them according to the pattern’s instructions.
For the pinwheel block, you’ll need to cut four triangles for each pinwheel unit. For the star block, the cutting will involve creating multiple half-square triangles, which are used to form the points of the star. Depending on the size of the quilt, you may need to cut several blocks at once.
Step 3: Cut the Background Pieces
In addition to the star and pinwheel blocks, you will need fabric for the quilt’s background. This is typically cut into larger squares or strips to frame the individual blocks. The background fabric plays an important role in highlighting the pinwheel and star blocks, so choose a complementary color that will make your blocks stand out.
Once all your fabric is cut, you’re ready to move on to piecing your quilt blocks together.
3. Piecing Together the Pinwheel and Star Blocks
Now that you’ve cut all your fabric pieces, it’s time to start piecing your blocks. This is where the magic happens, as you’ll begin to see your Pinwheel and Star Block Quilt – Pattern come to life.
Step 1: Making the Half-Square Triangles
To create the star block, you’ll need to make half-square triangles. Start by placing two squares of fabric (one light and one dark) right sides together. Draw a diagonal line from one corner to the other, then sew a quarter-inch seam on either side of the line. Cut along the diagonal line, press the seams open, and trim the block to the correct size. Repeat this process for all the star points.
Step 2: Assembling the Star Block
Next, arrange the half-square triangles into the star pattern. Lay out your pieces and make sure the colors and points align properly. Once you’re happy with the layout, sew the pieces together in rows. Press each row before joining them to ensure the seams are flat.
Step 3: Creating the Pinwheel Block
For the pinwheel blocks, sew together the fabric triangles you cut earlier. Arrange the triangles in the pinwheel formation, with the points meeting at the center. Stitch them together and press the seams open to ensure a smooth, flat block.
Step 4: Attaching the Pinwheel and Star Blocks to the Background
Once you’ve finished the individual blocks, sew them into a grid formation. Arrange the Pinwheel and Star Block Quilt – Pattern in any layout you desire. Once your blocks are laid out, join them together in rows. Make sure to press the seams between rows to keep everything neat and even.
Step 5: Assemble the Quilt Top
After your pinwheel and star blocks are sewn together, it’s time to attach the quilt top to the quilt backing and batting. Make sure the layers are aligned properly before sewing them together. Pin the layers in place and stitch them using a quilt basting stitch.
With the quilt top assembled, you’re ready to move on to the quilting and finishing touches.
4. Quilting and Finishing the Pinwheel and Star Quilt
After piecing together the quilt top, it’s time to quilt and finish your Pinwheel and Star Block Quilt – Pattern. This step will add texture and dimension to your quilt, giving it a professional, polished look.
Step 1: Choose Your Quilting Design
The quilting design you choose can greatly affect the final appearance of your quilt. For the Pinwheel and Star Block Quilt, you might want to choose a simple straight-line quilting pattern to keep the focus on the blocks. Alternatively, you could opt for a more intricate design, such as free-motion quilting, to add some texture and interest.
Step 2: Quilting the Layers
With the backing, batting, and quilt top pinned together, it’s time to quilt the layers. If you’re using a sewing machine, be sure to use a walking foot to help feed the layers evenly through the machine. Start from the center and work your way out to avoid any puckering or shifting.
Step 3: Binding the Quilt
Once the quilt is quilted, it’s time to add the binding. Cut strips of fabric for the binding, fold them over the edges of the quilt, and sew them in place. The binding provides a clean and professional finish to your quilt.
Step 4: Final Touches
Give your quilt one final press to remove any wrinkles and give it a crisp, polished appearance. You can also add labels or embroidery for a personalized touch.
FAQ (Frequently Asked Questions)
1. What is a pinwheel block in quilting?
A pinwheel block is a quilt design that features four triangles arranged to form a rotating pinwheel shape. It’s a popular block in traditional quilting due to its simple design and dynamic movement.
2. How do I make half-square triangles for the star block?
To make half-square triangles, sew two squares of fabric together along the edges, then cut along the diagonal. Press the seams open and trim the block to the correct size.
3. Can I use any fabric for the Pinwheel and Star Block Quilt – Pattern?
Yes, you can use any fabric for this pattern. However, it’s recommended to choose fabrics that contrast well with each other to make the pinwheel and star designs stand out.
4. How do I choose a quilting design for this pattern?
The quilting design should complement the Pinwheel and Star Block Quilt – Pattern. Simple straight lines or gentle curves will highlight the blocks, while more intricate patterns can add texture and interest.
Conclusion
The Pinwheel and Star Block Quilt – Pattern is a beautiful and classic design that allows quilters to explore their creativity while creating something both functional and visually striking. From cutting fabric to piecing the blocks and adding quilting, each step is an opportunity to refine your skills and create something unique. With the steps outlined in this guide, you’re now ready to embark on your own quilting project. We’d love to hear your thoughts and suggestions, so feel free to leave a comment below. Happy quilting!