The Quilted Stockings – Pattern has become a cherished part of many handmade holiday traditions. With its nostalgic charm, personal touch, and potential for customization, making your own quilted Christmas stockings is a rewarding and creative project that adds warmth to the holiday season. Whether you’re crafting for your family, making gifts, or even planning to sell at local markets, this pattern opens up endless possibilities.
Unlike store-bought stockings, a handmade Quilted Stockings – Pattern allows you to use your favorite fabrics, holiday-themed prints, and sentimental scraps from past projects. The result is a one-of-a-kind piece that holds both gifts and memories. The process can be simple or as intricate as you’d like, depending on your sewing experience and design preference.
In this comprehensive guide, we’ll explore everything you need to know to create a beautiful stocking from a Quilted Stockings – Pattern. From material choices to cutting and sewing, embellishment ideas, and even troubleshooting tips, you’ll find everything you need to confidently complete your festive masterpiece.
1. Understanding the Quilted Stockings – Pattern
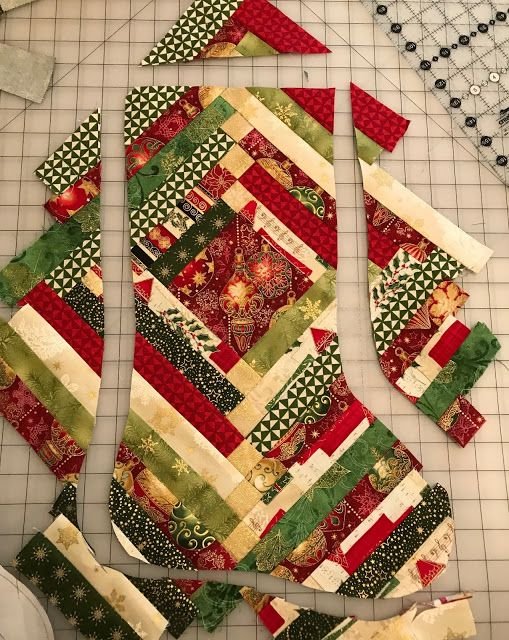
A Quilted Stockings – Pattern is essentially a decorative Christmas stocking constructed using quilted fabric techniques. Rather than using a single layer of fabric, quilting involves stitching together multiple layers—usually a top fabric, batting, and backing—which adds texture, warmth, and durability.
The shape of the stocking is traditionally a boot-style curve, though patterns may vary. You can opt for a classic look or experiment with modern or whimsical shapes. Most patterns include a front and back piece, a cuff, and a lining for a clean finish.
One of the joys of making quilted stockings is the ability to personalize each one. You can choose fabrics that reflect the recipient’s personality or use leftover quilt blocks to give them a cozy, pieced-together charm.
Pre-quilting your fabric before cutting the stocking shape is a common approach. This ensures uniformity and keeps all layers secure during assembly. Many sewists choose simple straight-line quilting, while others enjoy free-motion designs for added flair.
Once the quilted front and back are ready, the stocking is assembled like a basic pouch, turned right-side out, and often finished with a hanging loop and a folded cuff for style.
Whether you follow a downloadable Quilted Stockings – Pattern or create your own template, the process is easy to adapt for all skill levels—from beginner crafters to expert quilters.
2. Choosing Materials for Your Quilted Stocking
Selecting the right materials is key to crafting a successful Quilted Stockings – Pattern. The right fabric, batting, and lining contribute to the overall look and feel of the finished piece.
Start with quilting cotton or other medium-weight fabrics. Choose festive patterns like snowflakes, reindeer, holly, or plaids—or go with more neutral tones for a minimalist winter aesthetic. Using a mix of prints and solids can help create balance.
Batting adds volume and texture. A low-loft cotton or polyester batting works well for stockings. It’s thick enough to create that signature quilted look but not so bulky that it makes sewing difficult.
For the backing and lining, lightweight cotton or muslin is ideal. The lining fabric may not be visible from the outside, but choosing something soft and coordinating can elevate the overall feel when reaching inside the stocking.
You’ll also need thread that matches or contrasts with your fabric, depending on whether you want your quilting stitches to stand out. A neutral thread blends in, while a metallic or colored thread adds holiday sparkle.
Don’t forget embellishments! Ribbons, buttons, embroidery, or even appliqué can be used to personalize each stocking. You might also consider adding names or initials with heat transfer vinyl, hand embroidery, or iron-on patches.
Finally, consider structural details like interfacing if your outer fabrics are particularly soft. This adds shape and durability to your Quilted Stockings – Pattern, ensuring it holds up year after year.
3. How to Sew a Quilted Stocking Step-by-Step
Making a stocking using a Quilted Stockings – Pattern involves several clear steps, each of which brings your holiday creation closer to completion. With a little patience and preparation, you’ll have a finished stocking ready to hang by the fireplace.
Begin by cutting your fabric. If you’re pre-quilting your fabric, cut a rectangle large enough for the stocking shape. Quilt this rectangle by layering your outer fabric, batting, and backing. Pin or spray baste the layers together.
Quilt your layers using your preferred method. Straight-line quilting with a walking foot is beginner-friendly and creates a clean, modern look. Alternatively, try free-motion quilting for a more organic or whimsical design.
Once quilted, trace your stocking template onto the fabric and cut out the front and back pieces. Remember to mirror the shapes so they align properly when sewn together.
Cut out the lining pieces using the same template. Then cut your cuff fabric—usually a wide rectangle folded in half lengthwise—and prep any embellishments or hanging loops.
Assemble the outer stocking by placing the front and back pieces right sides together and stitching around the edges, leaving the top open. Repeat this for the lining, but leave a small gap at the bottom to turn the stocking later.
Attach the cuff and loop, then slide the lining and outer stocking together, right sides facing. Sew around the top, turn the stocking right side out through the gap, then stitch the gap closed. Push the lining inside, and your stocking is ready to hang!
4. Personalization and Styling Ideas
A Quilted Stockings – Pattern is the perfect canvas for creativity and personal expression. Whether you’re making a set for your family or gifts for loved ones, styling your stockings with unique elements can make them truly memorable.
Add names to each stocking for a personalized touch. Use hand embroidery for a traditional feel, or opt for vinyl letters for a clean and modern look. Wooden letter tags are another charming option.
Try mixing and matching fabrics for a patchwork look. You can incorporate old quilt blocks, scraps from favorite fabric collections, or even fabric from meaningful clothing like baby clothes or a loved one’s shirt.
Create themes for your stockings, like a rustic farmhouse vibe with burlap and plaid, or go glamorous with metallics and velvet. The quilted texture adds warmth to any style.
Use decorative stitching or embroidery to add stars, trees, or snowflakes to your stocking front. These small details can transform a simple stocking into a keepsake.
Incorporate felt or fleece into your design. These fabrics add texture and contrast, especially when used for appliqué shapes like holly leaves, snowmen, or reindeer.
Lastly, don’t be afraid to experiment. The beauty of using a Quilted Stockings – Pattern is that no two stockings need to look the same. Let each one reflect the recipient’s personality or your artistic vision.
FAQ – Quilted Stockings – Pattern
Q1: What size should a quilted stocking be?
A standard size is about 16–18 inches long and 7–9 inches wide at the opening. However, you can scale the pattern up or down depending on how much you want to fit inside.
Q2: Can I make a quilted stocking without a sewing machine?
Yes, though it takes longer. Hand quilting and sewing is totally possible with a strong needle, quality thread, and patience. It’s a great option for slow-stitchers or traditional crafters.
Q3: Is this a beginner-friendly sewing project?
Absolutely. If you’ve done basic quilting or bag sewing, you’ll find quilted stockings manageable. Even beginners can achieve great results with simple designs and step-by-step guidance.
Q4: How do I personalize a quilted stocking?
You can personalize by adding names with embroidery, vinyl, appliqué, or even tags. Using meaningful fabrics or themes also adds a personal touch.
Q5: What kind of batting should I use?
Low-loft cotton or polyester batting works best. It gives the stocking structure without being too bulky, making it easier to sew and quilt.
Q6: Can I use leftover quilt blocks for stockings?
Yes! Stockings are the perfect project for repurposing orphan blocks or fabric scraps. Just be sure to reinforce seams and use interfacing if needed.
Conclusion
The Quilted Stockings – Pattern is more than just a holiday craft—it’s a way to create lasting memories, express creativity, and bring warmth to your home during the festive season. With so many ways to personalize and customize, each stocking becomes a cherished keepsake.
In this article, we covered the essence of quilted stockings, materials you’ll need, step-by-step instructions, and ideas for adding your personal touch. Whether you’re making one or a dozen, the process is just as meaningful as the finished product.
Have you made your own quilted stocking? We’d love to hear your thoughts! Leave your honest opinion, share your tips or pattern variations, or let us know what you’d like to see covered in future articles. Your feedback inspires and supports the creative community—thank you for being part of it!