If you’ve ever wondered how to make beautiful quilts with small scraps – pattern ideas are exactly what you need to bring new life to your fabric stash.
Every quilter has a growing pile of leftover fabric, too pretty to throw away, yet often too small for traditional quilt patterns.
Fortunately, scrap quilting is a wonderful way to transform these forgotten pieces into something meaningful and absolutely stunning.
Whether you’re a seasoned quilter or just beginning your journey, small scraps hold endless potential. They’re perfect for experimenting with color, texture, and design—without the pressure of using expensive yardage. The true beauty of quilting with scraps lies in its freedom: no rules, no limits, just creativity guided by your hands and heart.
In this article, you’ll learn how to make beautiful quilts with small scraps – pattern tips, techniques, and layout ideas that bring vibrancy and charm to every project. From choosing the right scraps to arranging eye-catching layouts and finishing your quilt, this guide is packed with inspiration and practical advice. Let’s get started on your next masterpiece.
1. Selecting and Preparing Your Fabric Scraps
Before diving into sewing, it’s essential to properly sort and prepare your fabric pieces. This step makes your quilting process smoother and more enjoyable, setting a strong foundation for a beautiful finished product.
Start by gathering all your small scraps. Look through your stash and pull out pieces that are at least 2” x 2” in size—though even smaller ones can be used for certain designs. Sort by color, print, or fabric type, depending on the look you’re going for.
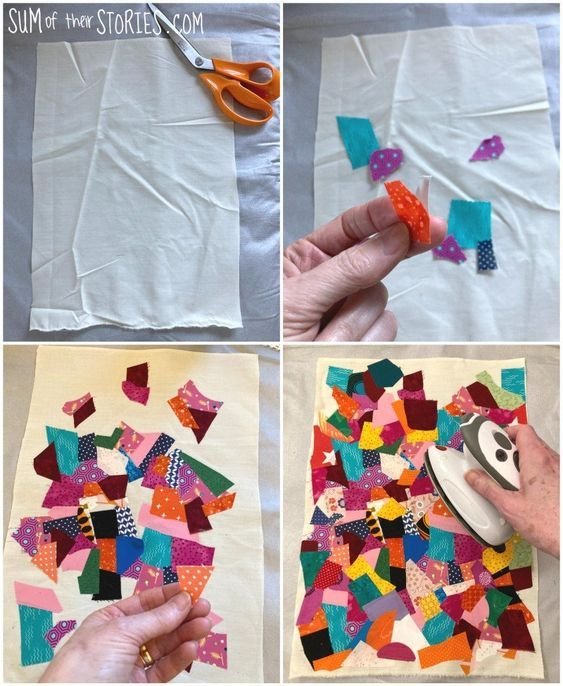
Press all your scraps with a hot iron to flatten wrinkles and ensure clean edges. Ironing also helps reveal the true color and texture of the fabric, making it easier to plan your layout and combinations.
Trim the scraps into consistent shapes. Squares and rectangles are most common, but triangles and hexagons can add a fun twist. You can use a rotary cutter, cutting mat, and ruler for accuracy, especially if you’re aiming for a uniform pattern.
If you’re using very small or oddly shaped pieces, consider adding stabilizer or interfacing to reinforce them. This makes it easier to sew them together and prevents fraying during quilting or washing.
Choose a neutral background fabric to tie your scraps together. Solid white, gray, or beige works well to create contrast and allow your colorful scraps to stand out. If your scraps are more muted, consider a bold background for extra flair.
Finally, group your prepared pieces into piles for easy access as you sew. This helps keep your workspace organized and makes it easier to visualize your quilt pattern as you work through each block or row.
2. Creative Layouts for Scrap Quilts
One of the most exciting parts of how to make beautiful quilts with small scraps – pattern is choosing a layout that brings harmony and visual appeal. Even with random scraps, a thoughtful arrangement creates a cohesive and intentional look.
Try a classic Postage Stamp layout—using uniformly cut squares (usually 2″ x 2″) stitched together in rows. This creates a vibrant, pixelated effect that celebrates the diversity of your scraps while maintaining balance and order.
The Log Cabin block is another great option. Start with a central square and build outward using narrow strips of fabric. This design offers structure while showcasing a variety of colors, making it perfect for scraps of different widths.
Use the Crumb Quilt technique for a more freestyle approach. Sew tiny odd-shaped scraps together to form a larger block, then trim it down to a uniform size. This no-rules method embraces imperfection and creates a charming, patchy aesthetic.
Consider Half-Square Triangles (HSTs) for dynamic patterns. By pairing light and dark fabrics, you can create stars, chevrons, or zigzag motifs. This layout adds energy and movement to your quilt, even when using small pieces.
String Quilts are excellent for using long, narrow scraps. Sew strips diagonally across a foundation square or rectangle, then trim the block into shape. This method is quick, beginner-friendly, and produces eye-catching results.
If you’re feeling adventurous, mix several layouts into one quilt. Combine squares, triangles, and strips for a modern, artistic design that feels fresh and unique. The key is to keep a consistent color palette or repeat key fabrics to tie everything together.
3. Assembling and Sewing Your Quilt
With your pieces cut and layout chosen, it’s time to start assembling your quilt top. This is where your preparation pays off, and your vision begins to take shape.
Begin by sewing small blocks. For a Postage Stamp or Crumb Quilt, stitch pieces into rows or columns first, then sew those rows together. Press seams open or to one side, depending on your preference and fabric bulk.
Be mindful of your seam allowance—¼” is standard in quilting. Consistency is crucial, especially when working with small pieces. Uneven seams can distort the final shape of your quilt blocks.
Work on your quilt in sections. Instead of completing it row by row, try sewing several small blocks or units, then arranging them like a puzzle. This lets you experiment with layout before final assembly and gives you more control over the final look.
Use a design wall or a flat surface to lay out your blocks before sewing them together. This step helps ensure your color distribution feels balanced and avoids unwanted clusters of similar shades or patterns.
Once the top is assembled, prepare your quilt sandwich: backing fabric, batting, and quilt top. Smooth all layers and baste with safety pins or adhesive spray to prevent shifting during quilting.
Choose a quilting style that complements your layout. Straight-line quilting works well for structured blocks, while free-motion quilting adds movement to looser, more abstract designs. Small scrap quilts often benefit from minimal quilting to let the fabrics shine.
4. Finishing Touches and Display Ideas
After all the effort of piecing and quilting, it’s time to add the final touches that make your quilt truly complete and ready to be admired or gifted.
Trim any excess batting and backing fabric so the edges are even. Square up your quilt top to ensure all corners are neat and aligned. This makes the binding process easier and results in a polished finish.
Attach your binding using your preferred method—machine stitch on the front and hand-stitch on the back for a clean look, or machine-stitch both sides for speed. Use a coordinating or contrasting fabric to frame your quilt design.
Add a quilt label! Include your name, the date, and any personal notes about the project. Labels add a personal touch and become a meaningful detail for the recipient or future generations.
If you’re gifting your quilt, consider adding a hand-written note or care instructions. Handmade quilts make heartfelt presents for birthdays, weddings, or simply as a way to say, “I care.”
Display your quilt proudly! Hang it on a wall, drape it over a couch, or fold it at the foot of your bed. Small scrap quilts can also be used as table runners, lap quilts, or baby blankets.
Lastly, photograph your finished piece and share it with the quilting community online. Use social media or quilting forums to inspire others and show off your creativity. It’s a wonderful way to connect and celebrate your accomplishment.
FAQ
Q: Can I make a quilt using only tiny fabric scraps?
A: Yes! With creative layouts like Crumb Quilts or String Quilts, even the smallest pieces can be transformed into a stunning quilt.
Q: What’s the best stitch to use for scrap quilts?
A: A straight stitch with a consistent ¼” seam allowance is standard for quilting. It’s simple, strong, and reliable for piecing small fabrics.
Q: How do I prevent my quilt from looking too chaotic with so many scraps?
A: Use a neutral background or repeat certain fabrics throughout to create visual harmony. Layout planning is also essential for balance.
Q: Can I wash quilts made with scrap fabrics?
A: Absolutely! Just be sure all fabrics are prewashed before quilting to prevent shrinkage or color bleeding. Use gentle detergent and cold water.
Q: Is this a good project for beginner quilters?
A: Yes! Scrap quilting is perfect for beginners. It’s forgiving, economical, and helps build confidence in cutting, piecing, and quilting techniques.
Q: How long does it take to make a scrap quilt?
A: It depends on the size and complexity of your design. A small lap quilt could take a few days, while a full-sized quilt may take several weeks.
Conclusion
Learning how to make beautiful quilts with small scraps – pattern is not only a practical skill but also a joyful, creative experience. By turning leftover fabric into art, you breathe new life into every tiny piece and create something that tells a story. Throughout this guide, we explored how to sort and prepare scraps, choose layouts, sew with confidence, and finish your quilt with pride.
Now it’s your turn to create something beautiful. Whether your quilt is cozy, colorful, or completely improvised, it will be uniquely yours. We’d love to hear your thoughts! Leave a comment with your experiences, favorite patterns, or suggestions for fellow quilters. Let’s inspire one another to keep creating, one scrap at a time.