The Rosebud Quilt Block – Pattern is a timeless and popular design that has been loved by quilters for generations.
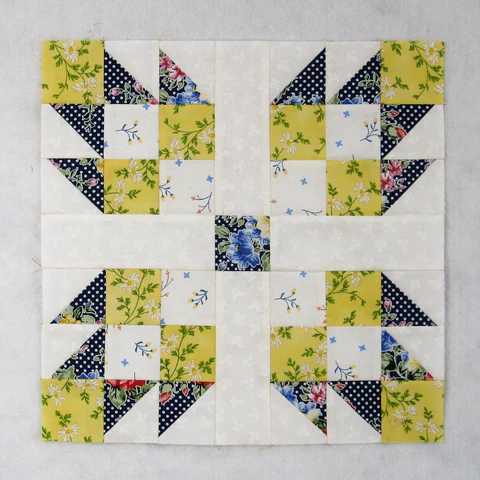
This block is known for its delicate and intricate appearance, often giving the impression of a blooming rose, with its vibrant colors and beautiful geometric symmetry.
Whether you’re a beginner or an experienced quilter, understanding the Rosebud Quilt Block pattern is a great way to enhance your quilting skills.
In this article, we will explore the history of the Rosebud block, step-by-step instructions on how to create the block, and provide tips for perfecting your quilt.
The Rosebud Quilt Block is a charming and versatile block that can be used in a variety of quilt patterns, from traditional to modern designs. Its unique layout allows for creative customization with fabric choices and color schemes. With a bit of practice and patience, quilters can create stunning works of art using this block. From its origins to contemporary interpretations, the Rosebud block offers a wonderful blend of beauty and craftsmanship.
In the following sections, we will break down the Rosebud Quilt Block – Pattern, starting with its history, followed by a detailed guide on how to make the block, and finishing with tips on how to incorporate it into different quilt designs. Let’s dive in!
1. History of the Rosebud Quilt Block
The Rosebud Quilt Block has deep roots in the tradition of quilting, with its origins tracing back to the 19th century. Early quilters often used floral patterns to represent the beauty of nature and the symbolism of growth and new beginnings. The Rosebud pattern was especially popular among quilters in the United States, where it was often featured in a variety of quilts passed down through generations.
During the 1800s, quilt patterns were frequently shared through word of mouth, and later, through quilting pattern books. The Rosebud block emerged as one of the most favored designs, loved for its intricate design that mimicked the appearance of a rosebud just beginning to bloom. This pattern was often constructed with hexagon-shaped pieces and could be combined with other blocks to create larger quilt patterns.
As quilting evolved, so did the Rosebud Quilt Block – Pattern. Today, it can be found in both traditional and contemporary quilts, often made using a variety of fabrics, from vintage cotton to modern prints. The adaptability of this block allows quilters to personalize it with colors and fabrics of their choice, making it a timeless favorite in the quilting community.
2. Materials and Tools for the Rosebud Quilt Block
Before beginning to create your Rosebud Quilt Block, it’s important to gather the necessary materials and tools. Having the right supplies will ensure that your quilting project is smooth and enjoyable.
To create the block, you will need:
- Fabric: Choose several fabric colors that complement each other. Typically, the Rosebud block involves light and dark shades to create contrast, but feel free to experiment with your favorite colors.
- Quilt Batting: You’ll need quilt batting for the quilt’s padding, ensuring that the quilt has enough structure and warmth.
- Rotary Cutter and Mat: These are essential for cutting precise pieces of fabric to the correct size.
- Quilting Ruler: A quilting ruler will help you measure and cut your fabric accurately.
- Needle and Thread: You’ll need sturdy thread that matches your fabric colors. A quilting needle is also recommended for smoother stitching.
- Pins: Use quilting pins to hold your pieces together before sewing them.
Having these materials ready will help streamline the process of creating your Rosebud Quilt Block and keep everything organized.
3. Step-by-Step Instructions for Creating the Rosebud Quilt Block
Now that you have all the necessary materials, let’s walk through the steps of making the Rosebud Quilt Block – Pattern. Whether you’re new to quilting or an experienced quilter, this process can be broken down into manageable steps for success.
Step 1: Cutting the Fabric
Begin by cutting the fabric pieces according to the pattern’s dimensions. The Rosebud block typically uses diamond-shaped and hexagon-shaped pieces. Measure and cut the fabric carefully, ensuring the pieces fit together snugly.
Step 2: Sewing the Pieces Together
Once the fabric pieces are cut, it’s time to start stitching them together. Begin by joining the small diamond pieces around a central hexagon to form the petals of the rosebud. Use a simple quarter-inch seam to join the pieces, and press each seam flat after sewing.
Step 3: Assembling the Block
After completing the petals of the Rosebud, assemble them into the desired pattern. Typically, this involves arranging the petals around a central shape, and then sewing each section together.
Step 4: Adding the Border
Once the main part of the Rosebud Quilt Block is finished, add a border if desired. The border can either be the same fabric as the petals or a contrasting fabric to highlight the design.
Step 5: Press and Trim
After sewing all the pieces together, press the entire block flat. Trim any excess fabric from the edges to ensure your block is the correct size.
Step 6: Repeat for Additional Blocks
If you’re making a larger quilt, repeat these steps for the remaining blocks. Once all the blocks are completed, you can begin assembling them into a full quilt top.
4. Tips for Perfecting Your Rosebud Quilt Block
While creating the Rosebud Quilt Block – Pattern is an enjoyable experience, there are a few tips that can help you perfect your work and achieve professional results.
Tip 1: Use High-Quality Fabric
Using high-quality cotton fabric will make a noticeable difference in your finished quilt. Premium fabric is easier to work with and ensures your quilt has a polished look.
Tip 2: Pay Attention to Seam Allowances
Accurate seam allowances are crucial to ensuring that your Rosebud Quilt Block fits together correctly. Consistently using a quarter-inch seam will prevent any distortion or unevenness in your block.
Tip 3: Press Seams After Each Step
Pressing seams as you go will help eliminate wrinkles and make it easier to assemble the blocks. This is especially important for ensuring that your edges match up perfectly when joining pieces.
Tip 4: Experiment with Colors and Fabrics
The Rosebud Quilt Block is highly customizable, so don’t hesitate to experiment with different color schemes. Play around with light and dark fabrics to create a more dramatic effect, or opt for a softer palette for a more delicate look.
Tip 5: Use a Walking Foot for Even Stitching
A walking foot can help ensure that the fabric layers move evenly through your sewing machine, reducing puckering or shifting.
Tip 6: Take Your Time
The Rosebud Quilt Block may require some patience, especially if you’re new to quilting. Take your time with each step, and don’t rush through the process. The effort will pay off with a beautiful finished block.
FAQ – Frequently Asked Questions
1. What is the Rosebud Quilt Block?
The Rosebud Quilt Block is a quilting pattern that resembles a blooming rose, made with geometric shapes such as hexagons and diamonds. It is loved for its intricate design and can be used in a variety of quilt styles.
2. Can I make the Rosebud Quilt Block in different sizes?
Yes! The Rosebud Quilt Block can be made in various sizes by adjusting the measurements of the fabric pieces. You can create smaller or larger blocks to suit your project.
3. What fabrics are best for the Rosebud Quilt Block?
Cotton fabrics are the most popular choice for the Rosebud Quilt Block, but you can use other fabrics as well. Make sure the fabric is easy to handle and presses well.
4. Is the Rosebud Quilt Block difficult for beginners?
The Rosebud Quilt Block is intermediate in difficulty, but beginners can still tackle it with some patience and practice. Following the step-by-step instructions and using the right tools will help you achieve great results.
5. Can I combine the Rosebud Quilt Block with other quilt patterns?
Absolutely! The Rosebud Quilt Block can be mixed and matched with various other quilt blocks to create larger and more complex quilt designs.
6. How do I ensure my seams are accurate?
Using a quilting ruler and a quarter-inch seam allowance foot on your sewing machine will help ensure accurate seams. Always press your seams flat to avoid any discrepancies in your blocks.
Conclusion
In this article, we’ve explored the Rosebud Quilt Block – Pattern in depth, from its history to a detailed guide on how to create the block. With the right materials, tools, and techniques, you can create beautiful Rosebud quilt blocks that will enhance your quilting projects. Experiment with different fabrics and color schemes to make the pattern your own, and enjoy the creative process. If you have any thoughts or suggestions, feel free to leave a comment below—we’d love to hear your feedback and ideas!