The Scrappy Cross Roads Block – Pattern is a versatile and timeless quilting design that is perfect for using up scrap fabric and creating a visually striking project.
This block is both simple and intricate, combining the charm of traditional quilt patterns with the flexibility to incorporate a variety of fabrics.
Whether you are a seasoned quilter or just starting out, the Scrappy Cross Roads Block offers endless possibilities for customization, making it a popular choice among quilting enthusiasts.
The beauty of the Scrappy Cross Roads Block – Pattern lies in its ability to use different fabric scraps, transforming them into a cohesive and aesthetically pleasing design. This block is an excellent way to upcycle fabric leftovers from other projects, turning them into a beautiful quilt. It’s a great choice for those who want to create something unique and meaningful, all while making use of fabric scraps that might otherwise go to waste.
In this article, we will explore the history of the Scrappy Cross Roads Block, walk you through the steps to create the block, and provide tips for customizing your quilt. Whether you’re planning to make a large quilt or just a few blocks, this guide will help you craft a project that is both visually stunning and functional.
1. The History Behind the Scrappy Cross Roads Block
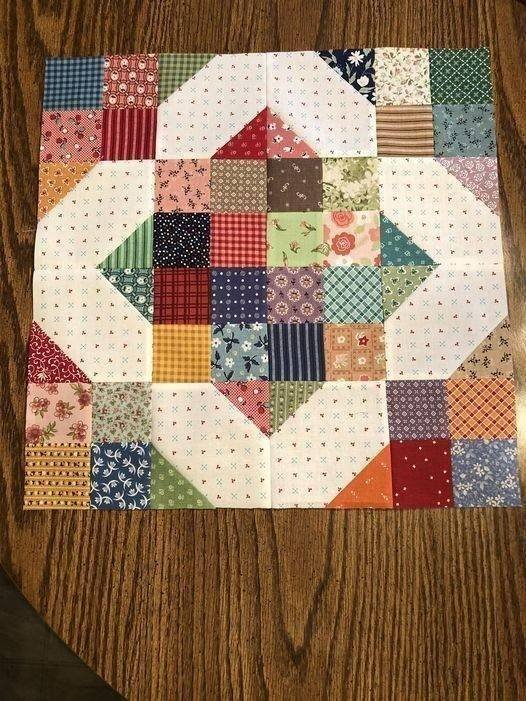
The Scrappy Cross Roads Block is a traditional quilt pattern that has been passed down through generations of quilters. The pattern is often associated with the Scrappy Quilt style, which gained popularity in the early 20th century as a way to use up fabric scraps. The term “cross roads” in the name of the block reflects its design, which features intersecting lines that form a cross-like shape in the center of the block.
Historically, the Scrappy Cross Roads Block was created by quilters who wanted to make use of leftover fabric from other projects. During times of economic hardship, especially during the Great Depression, quilting was a practical and creative way to repurpose fabric from worn-out clothing or household items. As quilting became a popular hobby, the Scrappy Cross Roads Block gained recognition for its ability to create visually appealing designs from scraps of all shapes and sizes.
The pattern itself is quite simple but offers plenty of room for creativity. It typically involves a combination of squares and triangles, arranged in a way that creates the “cross” shape in the center of the block. The use of various colors and fabrics gives each block a unique look, making it an excellent choice for quilters who enjoy experimenting with different styles and color palettes.
Today, the Scrappy Cross Roads Block – Pattern is a beloved design in the quilting community, often used for everything from small decorative quilts to large bedspreads. Its versatility and charm have kept it relevant in modern quilting, and it continues to inspire quilters to explore new ways to incorporate scraps into their projects.
2. How to Create the Scrappy Cross Roads Block
Making a Scrappy Cross Roads Block – Pattern is relatively simple and can be completed in a few steps. Here’s a step-by-step guide on how to create your own block:
Step 1: Gather Your Materials
To make the Scrappy Cross Roads Block, you will need a variety of fabric scraps. The beauty of this pattern is that you can use fabric in different colors and patterns, creating a unique and colorful design. You’ll also need a quilting ruler, rotary cutter, and a sewing machine, along with thread that complements your fabric choices.
Step 2: Cut Your Fabric
Start by cutting your fabric scraps into squares and triangles. For the Scrappy Cross Roads Block, you will need four square pieces for the corners and smaller squares to form the cross in the center. The size of your squares will depend on the finished size of your block, but a typical measurement might be 4 inches for each square. You will also need to cut several triangles for the intersecting lines of the cross.
Step 3: Assemble the Block
Begin by sewing together the four corner squares. These squares will form the outer border of the block. Then, sew the smaller squares and triangles together to create the cross shape in the center of the block. Make sure to align the edges carefully and press the seams flat as you go.
Step 4: Join the Sections
Once you’ve sewn the individual sections of the block, join them together to form the full Scrappy Cross Roads Block. This step involves sewing the corner sections to the cross sections. Use a quarter-inch seam allowance to ensure the block is accurately sized. After you’ve sewn the sections together, press the seams again to flatten them.
Step 5: Trim and Square the Block
After assembling your block, trim the edges to make sure the block is square and the edges are straight. This step ensures that your block will fit perfectly with other blocks in your quilt.
Step 6: Repeat for Additional Blocks
If you’re making a full quilt, repeat the process to create additional blocks. You can experiment with different fabric combinations to add variety and visual interest to your quilt. The more blocks you make, the more creative freedom you have to play with colors, patterns, and fabric choices.
The Scrappy Cross Roads Block – Pattern is simple to make and offers endless possibilities for creativity. Once you’ve mastered the basic steps, you can start incorporating your own design ideas to make each block unique.
3. Tips for Customizing Your Scrappy Cross Roads Block Quilt
The Scrappy Cross Roads Block is highly customizable, allowing you to create a quilt that reflects your personal style. Here are some tips to help you get started on personalizing your quilt:
1. Use a Color Scheme
While the Scrappy Cross Roads Block works well with a variety of fabric scraps, choosing a color scheme can help tie your quilt together. Consider using a theme, such as shades of blue, a rainbow palette, or even a monochromatic design to give your quilt a cohesive look. A well-chosen color scheme can turn your quilt from a simple scrappy project into a visually striking masterpiece.
2. Play with Fabric Textures
In addition to mixing colors, you can also experiment with different fabric textures. Combining cotton with flannel, linen, or even denim can create interesting contrast and depth in your quilt. This can make the quilt feel more dynamic and give it a unique, personalized touch.
3. Create a Focal Point
To add more visual interest to your quilt, consider making certain blocks stand out by using a bold color or pattern in the center of the Scrappy Cross Roads Block. This will draw attention to specific areas of the quilt and create a focal point within the design.
4. Incorporate Sashing
Sashing is the space between quilt blocks that helps define the structure of the quilt. If you want to give your quilt a more formal or organized look, consider adding a solid-colored sashing between each block. This will help the Scrappy Cross Roads Block stand out and allow the colors to pop.
5. Experiment with Block Arrangement
The layout of your blocks can have a huge impact on the overall appearance of the quilt. Experiment with different arrangements, such as a grid pattern, a diagonal layout, or even an offset design. Mixing up the arrangement of the blocks can give your quilt a modern or traditional feel, depending on the look you’re going for.
6. Add Borders
Once your quilt top is complete, adding a border can help frame the design and give it a finished look. You can choose a simple border that complements the colors of the blocks or a more intricate design that contrasts with the quilt top. Borders are a great way to bring everything together and add an extra layer of visual interest.
By using these tips, you can create a Scrappy Cross Roads Block Quilt that is completely unique and tailored to your style.
4. Common Mistakes to Avoid When Making a Scrappy Cross Roads Block
While making a Scrappy Cross Roads Block – Pattern can be a fun and rewarding project, there are some common mistakes that quilters can make. Avoiding these errors will help you achieve a polished and professional-looking quilt.
1. Not Pressing Seams Properly
One of the most important steps in quilting is pressing your seams. Skipping this step or not pressing your seams properly can cause your quilt blocks to become misaligned and uneven. Make sure to press each seam as you go to ensure your blocks remain square and accurate.
2. Inconsistent Seam Allowances
Using an inconsistent seam allowance can result in blocks that don’t fit together properly. Always use a quarter-inch seam allowance, as this is the standard for quilting. A seam gauge or quilting foot can help you maintain a consistent seam width.
3. Choosing Fabrics that Don’t Blend Well
While the Scrappy Cross Roads Block is meant to incorporate a variety of fabrics, it’s important to make sure your fabric choices complement each other. Avoid using too many high-contrast fabrics in a way that creates a chaotic or disjointed look. Instead, choose fabrics that have a harmonious feel or create a balance of light and dark tones.
4. Skipping the Cutting Step
Accurate cutting is essential to the success of your quilt. Skipping the cutting step or eyeballing measurements can lead to uneven blocks and incorrect sizing. Always use a ruler, rotary cutter, and mat for precise cutting.
5. Not Securing the Ends of the Thread
Make sure to secure the ends of your thread when starting and finishing seams. Failing to do so can cause your stitches to unravel over time, especially in the more heavily used sections of the quilt.
6. Rushing Through the Project
Quilting takes time, and rushing through the steps can result in mistakes. Take your time to carefully follow each step, and don’t be afraid to take breaks to assess your progress. Patience and attention to detail are key to creating a beautiful quilt.
FAQ – Frequently Asked Questions
1. What size should I cut the fabric for the Scrappy Cross Roads Block?
The size of the fabric pieces depends on the finished size of your quilt block. A common size for each square is 4 inches, but you can adjust this based on your design preferences.
2. Can I use pre-cut fabric for the Scrappy Cross Roads Block?
Yes, you can use pre-cut fabric, such as charm squares or jelly rolls, to make the process faster and easier. Pre-cuts are especially useful for creating a scrappy look.
3. How do I arrange the blocks in a quilt?
There are many ways to arrange the blocks, including grid patterns, diagonal layouts, or an offset design. Experiment with different arrangements to see what works best for your quilt.
4. Can I use this pattern for other quilting projects?
Absolutely! The Scrappy Cross Roads Block is versatile and can be used for anything from a small table runner to a large bed quilt. You can also use it for pillow covers, wall hangings, or other decorative items.
5. How can I make my quilt more interesting?
Consider using a variety of fabrics, adding borders, or experimenting with different block arrangements. You can also incorporate sashing to separate the blocks and create a more structured look.
Conclusion
The Scrappy Cross Roads Block – Pattern is a versatile and fun project
that allows you to use fabric scraps in creative and visually striking ways. By following the steps outlined in this article and customizing your quilt with different colors, fabrics, and techniques, you can create a beautiful and personalized quilt. Remember to take your time, avoid common mistakes, and enjoy the quilting process. We’d love to hear your thoughts and suggestions, so feel free to leave a comment below!