The Seesaw Traditional Quilt Block – pattern is one of the most beloved designs in the quilting world.
Known for its dynamic pattern that alternates between light and dark fabric, this block showcases a unique aesthetic that brings depth and contrast to any quilt.
Whether you’re a beginner or an experienced quilter, mastering the Seesaw Quilt Block can elevate your quilting projects, adding both sophistication and tradition to your work.
In this article, we will dive into everything you need to know about the Seesaw Traditional Quilt Block pattern, from the basics to step-by-step instructions on how to make it, along with some tips and tricks for success.
The beauty of the Seesaw Quilt Block lies in its simplicity and versatility. It can be used to create stunning designs for both modern and classic quilts. By following a few simple guidelines, you can create a quilt that is not only visually striking but also a true testament to your quilting skills. This guide will explore the history of the Seesaw Traditional Quilt Block, how to make it, and various ways to incorporate it into your quilt designs. By the end of this article, you will be equipped with all the knowledge you need to create a beautiful quilt using this iconic pattern.
Before we dive into the details of the Seesaw Traditional Quilt Block pattern, it’s important to understand the general structure of quilt blocks. A quilt block is a basic unit in quilt design, usually measuring 12 inches by 12 inches, though it can vary in size. Quilt blocks are typically pieced together to create a larger quilt top. Each block can feature different patterns and shapes, with the Seesaw Quilt Block being one of the most popular choices due to its distinctive look and ease of construction. Now, let’s get into the details of this block’s design.
1. Understanding the Seesaw Traditional Quilt Block
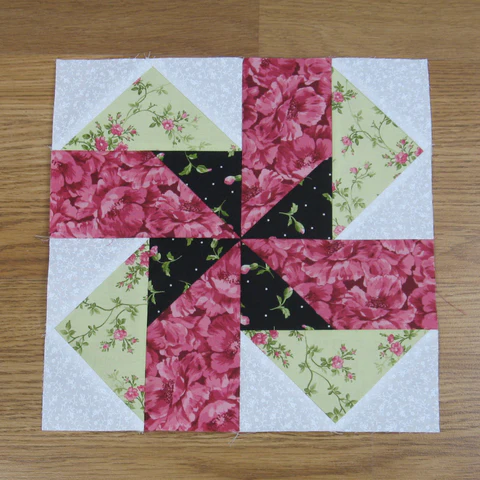
The Seesaw Traditional Quilt Block consists of a series of squares and triangles, alternating between light and dark fabrics to create a visually appealing, diagonal effect. The block is traditionally made up of four equal-sized squares arranged in a 2×2 grid, with each square divided into two triangles. The design creates a back-and-forth motion, similar to the seesaw movement, which is how the block got its name.
This block is ideal for showcasing contrasting fabrics. You can use solid fabrics for a bold, clean look, or opt for patterned fabrics for a more intricate appearance. The beauty of the Seesaw Quilt Block is its versatility—whether you’re making a small wall hanging or a large bed quilt, this block fits seamlessly into any project.
One of the key features of the Seesaw Traditional Quilt Block is its simplicity. Despite its striking visual impact, the block is relatively easy to assemble, making it perfect for both beginners and experienced quilters. By mastering this block, you’ll unlock a wide range of design possibilities, including more complex layouts and intricate quilt patterns.
To create the Seesaw Quilt Block, you’ll need to cut fabric into equal-sized squares, then cut each square diagonally to create triangles. The triangles are then sewn together to form the block. The process is straightforward but requires careful attention to detail to ensure precise cuts and accurate stitching.
2. Materials Needed to Create the Seesaw Traditional Quilt Block
Creating the Seesaw Traditional Quilt Block requires only a few basic quilting supplies. Before you start piecing together your block, gather the following materials:
- Fabric: Choose fabrics for the light and dark portions of the block. You’ll need fabric for both the background (light) and the accent (dark). The fabric should be 100% cotton for ease of sewing and durability.
- Quilt Block Template or Ruler: A square ruler and a diagonal cutting tool are recommended to ensure precise measurements when cutting your fabric pieces. You can also use a pre-made Seesaw Quilt Block pattern if you prefer.
- Rotary Cutter: A rotary cutter will help you cut the fabric accurately and efficiently. Be sure to use a cutting mat to protect your work surface.
- Thread: Select a thread that matches your fabric colors. Cotton thread is often preferred for quilt blocks because it provides a neat finish and strong stitching.
- Sewing Machine: While hand-piecing is an option, a sewing machine speeds up the process and provides a more consistent stitch.
- Iron and Ironing Board: Pressing the seams of your block is crucial for achieving clean lines and a professional finish.
With these materials, you’ll be ready to start making your Seesaw Traditional Quilt Block. The process is simple but requires precision, so make sure you have everything ready before you begin.
3. Step-by-Step Instructions to Create the Seesaw Quilt Block
Now that you’re familiar with the materials needed, let’s break down the steps involved in creating the Seesaw Traditional Quilt Block. Follow these instructions carefully to ensure your block turns out perfectly.
- Cut the Fabric: Start by cutting your fabric into equal-sized squares. Typically, 6-inch squares work well, but you can adjust the size based on your quilt design. Cut each square diagonally into two triangles.
- Arrange the Pieces: Take the triangles and arrange them on your design board or work surface. Place the light-colored triangles in one direction and the dark-colored triangles in the opposite direction. This will create the alternating pattern characteristic of the Seesaw Quilt Block.
- Sew the Triangles Together: Begin by sewing two triangles together along the diagonal edge, right sides together. Repeat this step for all pieces. Once you have pairs of triangles, sew them together to form a square.
- Press the Seams: After sewing each seam, press the fabric with an iron to set the stitches. Press the seams open or to one side, depending on your preference.
- Assemble the Block: Once all the pieces are sewn together, assemble the four squares into one Seesaw Quilt Block. Ensure the light and dark fabrics alternate to create the desired effect.
- Trim and Square Up: Finally, trim any excess fabric from the edges to square up your block. Use a ruler to ensure the block is the correct size.
By following these steps, you’ll have completed the Seesaw Traditional Quilt Block. It’s a fun and easy design that can be used in various quilting projects.
4. Creative Ways to Use the Seesaw Quilt Block in Your Projects
The Seesaw Traditional Quilt Block is incredibly versatile and can be used in many different ways to create beautiful quilts. Here are some creative ideas for incorporating this block into your quilting projects:
- Combine with Other Blocks: You can mix the Seesaw Quilt Block with other traditional blocks to create unique quilt patterns. Pair it with stars, pinwheels, or simple nine-patch blocks to create an eclectic design.
- Use as a Border: The Seesaw Quilt Block makes a great border for a larger quilt. Its clean lines and geometric shape can frame your quilt beautifully.
- Create a Modern Twist: While the Seesaw Traditional Quilt Block is often used in classic quilt designs, you can also give it a modern twist by using bold, contemporary fabrics. Experiment with bright colors or minimalist designs for a more modern look.
- Add Variation: Experiment with the size of your blocks. You can create a quilt with alternating sizes of the Seesaw Quilt Block for added visual interest and movement.
- Use in Table Runners: The Seesaw Quilt Block can be used in smaller projects like table runners or wall hangings. The block’s visual impact makes it perfect for adding a decorative touch to any space.
- Make Quilted Pillows: Small Seesaw Quilt Blocks can be used to create beautiful quilted pillows. These make great gifts and can be customized to match your home’s décor.
The Seesaw Traditional Quilt Block can be adapted in countless ways, so let your creativity guide you as you experiment with different patterns and layouts.
FAQ – Frequently Asked Questions
- What is a Seesaw Traditional Quilt Block? The Seesaw Traditional Quilt Block is a quilt pattern that features alternating light and dark triangles arranged in a back-and-forth motion, similar to the movement of a seesaw. It’s made up of four squares, each divided diagonally into two triangles.
- Can I use any fabric for the Seesaw Quilt Block? Yes, you can use any fabric for the Seesaw Quilt Block, but 100% cotton is preferred for quilting because it’s easy to sew and holds up well over time.
- How do I make the Seesaw Quilt Block? To make the Seesaw Quilt Block, cut equal-sized squares, then cut each square diagonally into two triangles. Sew the triangles together to form squares, then assemble the squares into the block.
- What size should the Seesaw Quilt Block be? The Seesaw Quilt Block is typically 12 inches by 12 inches, but you can adjust the size based on your quilt design.
- Can I use the Seesaw Quilt Block in modern quilts? Yes, the Seesaw Quilt Block is versatile and can be used in both traditional and modern quilt designs. Experiment with bold colors and unique fabric choices for a contemporary twist.
Conclusion
In this guide, we explored the Seesaw Traditional Quilt Block – pattern, from its history to step-by-step instructions on how to make it. This block is perfect for quilters of all skill levels and can be used in a variety of projects, from classic quilts to modern designs. Whether you are a beginner or an experienced quilter, the Seesaw Quilt Block offers endless creative possibilities.
We hope this guide has inspired you to start your own Seesaw Quilt Block project. Please leave a sincere opinion and any suggestions for future articles. Happy quilting!