If you’re a sewing enthusiast looking to bring both function and style to your workspace, a Sewing Machine Mat – Pattern is a game changer. Not only does it add personality to your craft table, but it also serves as a practical tool to help keep your materials organized, reduce machine vibration, and protect your surfaces.
Using a Sewing Machine Mat – Pattern allows you to create a custom accessory that matches your sewing room’s vibe and fits your needs exactly. Whether you want extra storage for threads and tools, or simply need a protective base under your machine, a handmade mat is the ideal solution.
In this guide, we’ll walk you through everything you need to know about creating your own Sewing Machine Mat – Pattern. From fabric choices and step-by-step instructions to creative design ideas and common questions, this article is your go-to resource for starting this rewarding project.
1. Why You Need a Sewing Machine Mat – Pattern in Your Sewing Space
A Sewing Machine Mat – Pattern may seem like a small addition, but it can have a big impact on your sewing experience. These mats are designed not only to provide a stable surface for your machine but also to improve your organization and workflow.
First, a mat helps reduce vibrations and noise caused by the movement of the sewing machine during use. This makes sewing quieter and more comfortable, especially when working for long hours or in shared spaces.
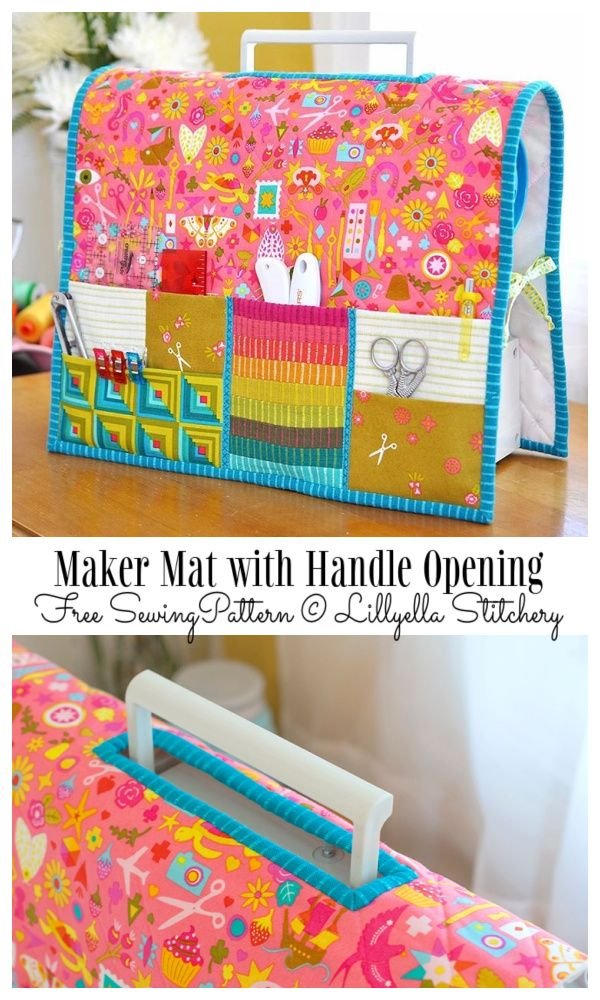
Second, many Sewing Machine Mat – Pattern designs include pockets or compartments at the front or sides. These allow you to keep your most-used tools—like scissors, seam rippers, and measuring tape—within easy reach while sewing.
Third, the mat acts as a protective layer between your table and the machine, preventing scratches, dents, or heat marks, especially if you’re using vintage machines or delicate surfaces.
Aesthetically, the mat adds a personal touch to your workspace. You can match it to the rest of your sewing room décor, choose fabrics that inspire you, or even coordinate it with other handmade accessories.
From a practical standpoint, having a designated mat also makes it easier to move your sewing machine if needed. Simply lift the machine with the mat underneath and carry it to a different location without scratching the table or dropping accessories.
Finally, making a Sewing Machine Mat – Pattern is a rewarding and simple project. It’s a great way to use up fabric scraps, experiment with quilting techniques, or gift something special to a fellow crafter.
2. Step-by-Step Guide to Making a Sewing Machine Mat – Pattern
Creating your own Sewing Machine Mat – Pattern doesn’t require advanced sewing skills. With basic materials and some creativity, you can design a mat that’s both functional and beautiful.
Start by measuring your sewing machine. Add about 4–6 inches on each side to determine the finished size of your mat. This gives you enough space for storage pockets and ensures the machine sits securely on the mat.
Choose your fabric and materials. Quilting cotton works well for the outer layer, while fusible fleece or batting adds padding and stability. You’ll also need coordinating thread, bias tape (if desired), and optional interfacing for structure.
Cut your fabric: one piece for the top, one for the back, and one piece of batting. If you’re adding pockets, cut extra pieces accordingly. You can quilt the top fabric to the batting for added texture and durability.
To make the pocket section, fold a strip of fabric in half lengthwise, press, and topstitch the folded edge. Then sew vertical lines down the fabric to create pockets. Vary the pocket widths to fit different tools like rulers, snips, and pens.
Layer the mat like a quilt sandwich—back fabric face down, batting in the middle, and quilted top on top. Pin or clip the layers together. If you’re including the pocket piece, align it at the bottom edge before sewing.
Sew around the mat, leaving a small opening for turning it right side out. Once turned, press the edges and topstitch all around to finish the mat neatly. Add binding if you prefer a more decorative edge.
3. Design Variations and Fabric Ideas for Your Sewing Machine Mat
One of the most enjoyable parts of working with a Sewing Machine Mat – Pattern is the freedom to design it to your own taste. Whether you love minimalist aesthetics or vibrant patchwork, there’s a mat style for every personality.
If you enjoy quilting, consider making a pieced top using fabric scraps or charm squares. This not only adds visual interest but also gives your mat an extra layer of texture and warmth.
For a modern, clean look, go for solid colors or linen blends. Choose neutral shades or pastel tones that complement your sewing room décor. Simple straight-line quilting adds elegance without distraction.
Want to add functionality? Create removable pockets using Velcro or snaps, so you can detach them when not needed or customize the layout based on the project you’re working on.
Try adding elastic bands or loops to hold spools of thread, rotary cutters, or bobbin cases. This makes your mat a multi-purpose organizer without needing extra storage containers on your desk.
You can also personalize your Sewing Machine Mat – Pattern with embroidery or appliqué. Stitch your name, favorite quote, or sewing-themed motifs to add charm and character.
Don’t forget to experiment with texture and structure—use faux leather or canvas for a durable base, or layer your mat with foam interfacing for extra cushioning under your machine.
4. Tips for Maintaining and Enhancing Your Sewing Machine Mat
After you’ve completed your Sewing Machine Mat – Pattern, a few care tips and maintenance practices will keep it looking great and functioning well for years to come.
Regularly clean your mat by gently vacuuming or lint rolling the surface to remove thread bits, fabric scraps, and dust. Spot clean with mild detergent and cold water as needed.
If your mat has quilting or patchwork, press it occasionally with a warm iron to keep it smooth and neat. Avoid using steam if your fabric is sensitive or if there’s interfacing inside.
Rotate your mat periodically if your sewing machine stays in the same place all the time. This helps avoid permanent indentations in the padding and extends its lifespan.
Consider adding non-slip backing (like rubber shelf liner) to prevent the mat from sliding on smooth surfaces. This is especially helpful if your sewing table is slick or your machine vibrates heavily.
Upgrade your mat over time. You might find that after using it for a while, you want more pockets or a different layout. Since it’s handmade, it’s easy to modify or sew a new version using your favorite improvements.
Lastly, treat your mat like part of your creative journey. Let it evolve with your skills, your projects, and your space. Each stitch holds your personal touch, and it’s a beautiful representation of your crafting story.
FAQ – Sewing Machine Mat – Pattern
Q1: What is the ideal size for a sewing machine mat?
The ideal size depends on your sewing machine. A good rule is to add 4–6 inches around your machine’s base to allow space for pockets and stability.
Q2: Do I need special fabric for a sewing machine mat?
Not necessarily. Quilting cotton works well, but you can also use canvas, denim, or upholstery fabric for added durability.
Q3: Can I wash my sewing machine mat?
Yes, but spot cleaning is usually best. If fully washable, use a gentle cycle and air dry to avoid shrinking or damaging the structure.
Q4: Is this a good beginner sewing project?
Absolutely. The Sewing Machine Mat – Pattern is perfect for beginners. It involves basic sewing techniques and allows for creative design choices.
Q5: What kind of padding should I use?
Fusible fleece, cotton batting, or foam interfacing work well. Choose based on the thickness and support level you want.
Q6: How do I keep my mat from sliding?
Add non-slip material to the back, such as rubber shelf liner or silicone grip fabric, to hold it in place on smooth tables.
Conclusion
Creating your own Sewing Machine Mat – Pattern is a fun, practical, and rewarding sewing project. From organizing your tools to adding beauty to your workspace, it’s a small detail that makes a big difference in your crafting life.
We’ve covered everything from why you should make one, how to do it step by step, fabric and design ideas, and care tips. Whether you’re making your first mat or upgrading an old one, the process is as enjoyable as the result.
Now we’d love to hear from you! Have you made a sewing machine mat before? What fabrics and features did you use? Share your experiences, ideas, or questions in the comments. Your feedback helps us grow a stronger, more creative community.