The Spool Quilt Block – Pattern is a wonderful and traditional design that’s both visually striking and relatively simple to make.
Perfect for quilters of all skill levels, this pattern has a rich history and can be used to create stunning quilts for both beginners and advanced quilters.
The spool block is reminiscent of vintage sewing notions, giving your quilt an elegant and timeless touch.
In this article, we will dive deep into how to create the Spool Quilt Block – Pattern, explore its history, and offer creative tips on how to incorporate it into your projects.
Whether you are planning to make a cozy quilt for your home, a thoughtful gift, or simply want to practice your quilting skills, the Spool Quilt Block – Pattern provides a great base. It can be customized with a variety of fabrics and colors to match your personal style or the theme of your quilt. This article is designed to give you all the tools, techniques, and tips you need to master this beautiful block, so let’s get started!
By the end of this article, you will be ready to make a Spool Quilt Block of your own. We’ll walk you through every step of the process, from selecting fabrics to piecing the block together. Let’s explore this pattern in detail and uncover the possibilities it brings to your quilting journey.
1. What is the Spool Quilt Block?
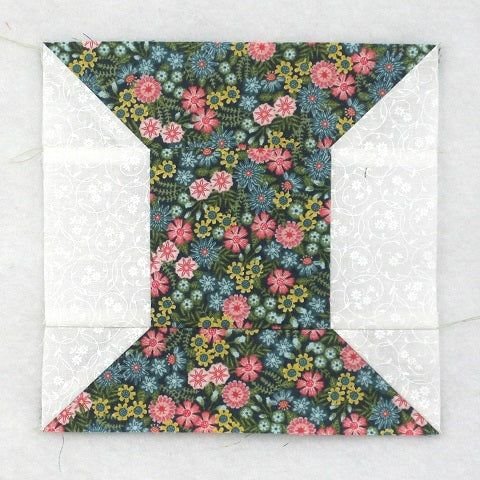
The Spool Quilt Block – Pattern is a design that resembles a sewing spool, making it a great choice for quilters who enjoy traditional motifs and classic patterns. The block typically features a central “spool” design with a cylindrical shape, surrounded by other elements that complete the pattern. It’s often used in quilting projects that have a vintage or retro feel, but it can also be updated with modern fabrics for a contemporary look.
In its simplest form, the block is made up of two main components: the spool and the surrounding patchwork. The spool is typically made using a combination of strips and squares of fabric, while the surrounding patches may feature geometric shapes or other traditional quilt block designs. The beauty of the Spool Quilt Block – Pattern lies in its versatility, as it can be combined with other blocks to create larger quilt designs.
This block is perfect for showcasing a variety of fabrics, whether you prefer solid colors, florals, or prints. It’s an ideal choice for quilters who want a pattern that’s easy to construct yet has plenty of visual impact. Additionally, because of its simple construction, it is often used in beginner-friendly quilt patterns, making it accessible to a wide range of quilters.
2. Materials Needed for the Spool Quilt Block
Before you begin making the Spool Quilt Block – Pattern, it’s important to gather the necessary materials to ensure your project goes smoothly. Here’s a list of the items you will need:
- Fabric: Choose two or three different fabrics for your Spool Quilt Block. You will need a fabric for the spool, a contrasting fabric for the background, and possibly a fabric for any additional accents. Cotton quilting fabric is a popular choice due to its durability and ease of use.
- Quilt Batting: Batting is the layer of material between the top quilt fabric and the backing. Select a batting that is appropriate for your project. For a cozy quilt, opt for a medium-weight batting.
- Quilting Ruler and Mat: These tools are essential for cutting accurate pieces of fabric to ensure that your block fits together properly.
- Rotary Cutter or Scissors: A rotary cutter will provide a clean and precise cut, while fabric scissors can also be used if you prefer.
- Thread: Choose a strong quilting thread that matches or contrasts with your fabrics. Cotton thread is commonly used for quilting projects.
- Sewing Machine: While hand-piecing is an option, a sewing machine makes the process faster and more efficient. Ensure your machine is set up with the appropriate needle for quilting.
With these materials on hand, you’re ready to start piecing together the Spool Quilt Block – Pattern. Make sure to measure accurately and follow the cutting instructions to achieve the best results.
3. Step-by-Step Instructions for Creating the Spool Quilt Block
Now that you have your materials ready, let’s dive into the step-by-step instructions for making the Spool Quilt Block – Pattern. This process involves cutting your fabric pieces, sewing them together, and adding the finishing touches. Follow these simple steps to create a beautiful block:
- Cut Your Fabric:
- Start by cutting your fabrics into the necessary sizes. You will need fabric for the spool (typically in a solid or neutral color) and fabric for the background and accents.
- The spool is usually made up of two rectangular pieces and a small square for the base. The background pieces should be cut into squares or rectangles, depending on your design.
- Make sure to cut your pieces according to the pattern instructions to ensure that everything fits together properly.
- Sew the Spool:
- Begin by sewing together the fabric pieces for the spool. Start by attaching the two rectangles for the body of the spool, then add the square to the bottom as the base.
- Press the seams flat after each step to ensure your block lies flat and the stitches are neat.
- Attach the Background:
- Next, sew the background pieces around the spool. This will form the overall shape of your block. You can add additional fabric pieces to create an interesting design around the spool, or simply use solid background fabric for a clean look.
- Ensure the seams are aligned properly and that the background fabric is attached securely to the spool.
- Add the Final Touches:
- Once the spool and background are sewn together, take a moment to assess the block. If needed, trim any excess fabric to ensure the block is square and even.
- You may want to add decorative stitching or embroidery to enhance the design and give your block a personalized touch.
- Press the Block:
- Once you’ve finished sewing the Spool Quilt Block – Pattern, press the entire block with an iron to flatten the seams and remove any wrinkles. This will help your block look neat and professional.
- Repeat for More Blocks:
- If you’re making a larger quilt, repeat the process to create multiple spool blocks. These blocks can be arranged in various ways to create a stunning quilt design.
By following these instructions, you’ll be able to create a perfectly pieced Spool Quilt Block – Pattern that can be used in your quilting projects.
4. Creative Ways to Use the Spool Quilt Block
The Spool Quilt Block – Pattern is not only beautiful but also versatile. Here are a few creative ideas for incorporating this block into different projects:
- Quilted Wall Hanging: Create a stunning wall hanging by arranging the blocks in a symmetrical or asymmetrical pattern. You can mix and match different fabrics for a bold, colorful design.
- Table Runner: Use the spool blocks to make a festive table runner that will brighten up your dining table during the holidays or at family gatherings.
- Throw Blanket: Combine multiple blocks to create a cozy throw blanket for your living room. The spool design adds charm and character to any space.
- Pillow Covers: Make a set of pillow covers featuring the Spool Quilt Block – Pattern for a decorative and coordinated look in your living room or bedroom.
- Gift Items: Use the blocks to create custom-made gifts, such as quilted tote bags or aprons, for friends and family.
- Add a Personal Touch: Experiment with different color schemes, prints, and embellishments to make the design uniquely yours. You could even incorporate embroidery or applique to further personalize each block.
With the Spool Quilt Block – Pattern, the possibilities for creative projects are endless.
FAQ: Frequently Asked Questions About the Spool Quilt Block
Q1: Can I make the Spool Quilt Block in different sizes?
Yes, you can adjust the size of the block by altering the measurements of the fabric pieces. Make sure to maintain the proportions to achieve the desired look.
Q2: What type of fabric is best for this block?
Cotton quilting fabric is ideal because it’s easy to work with and holds up well over time. However, you can experiment with other fabric types depending on your project’s needs.
Q3: How do I ensure my blocks are all the same size?
Accuracy is key. Use a quilting ruler and rotary cutter to ensure your fabric pieces are cut to the correct size. Press your seams flat as you go to maintain consistent sizing.
Q4: Can I hand-piece the Spool Quilt Block?
While using a sewing machine is faster, you can certainly hand-piece the blocks if you prefer. Just be sure to use small, even stitches for a neat finish.
Q5: How do I join the blocks together?
Once you have several blocks completed, you can sew them together by aligning the edges and matching the seams. Press the seams as you go to keep everything flat.
Conclusion
The Spool Quilt Block – Pattern is a timeless and versatile design that’s perfect for quilters of all experience levels. Whether you’re making a full quilt, a small project, or simply enjoying the art of quilting, this pattern offers endless possibilities. By following the step-by-step instructions and utilizing the creative ideas shared in this article, you’ll be well on your way to creating beautiful quilt blocks.
We hope this guide has inspired you to start your next quilting project. If you have any questions or suggestions, feel free to leave a comment below. We’d love to hear your thoughts and experiences with the Spool Quilt Block – Pattern! Happy quilting!