The Strawberry Quilt Block and Pillow – Pattern is one of the most delightful and charming DIY projects for quilters and sewing enthusiasts of all levels.
Combining the vibrant look of fresh strawberries with the comfort of handmade home décor, this pattern is perfect for brightening up any room or gifting to someone special.
Its simple shapes and cheerful colors make it both beginner-friendly and creatively fulfilling.
Whether you’re making a full quilt with strawberry blocks or just a single strawberry-themed pillow, this pattern lets you celebrate the beauty of seasonal fruit in fabric form. With endless ways to personalize your blocks using color choices, fabric textures, and quilting techniques, you can create a project that truly reflects your style. It’s an excellent choice for spring and summer crafting or for anyone who simply loves a pop of playful color.
In this article, you’ll discover everything you need to know about working with a Strawberry Quilt Block and Pillow – Pattern—from materials and construction to customization and assembly. We’ll also answer common questions from fellow makers and help you finish your project with confidence and creativity.
1. What Is the Strawberry Quilt Block and Pillow – Pattern?
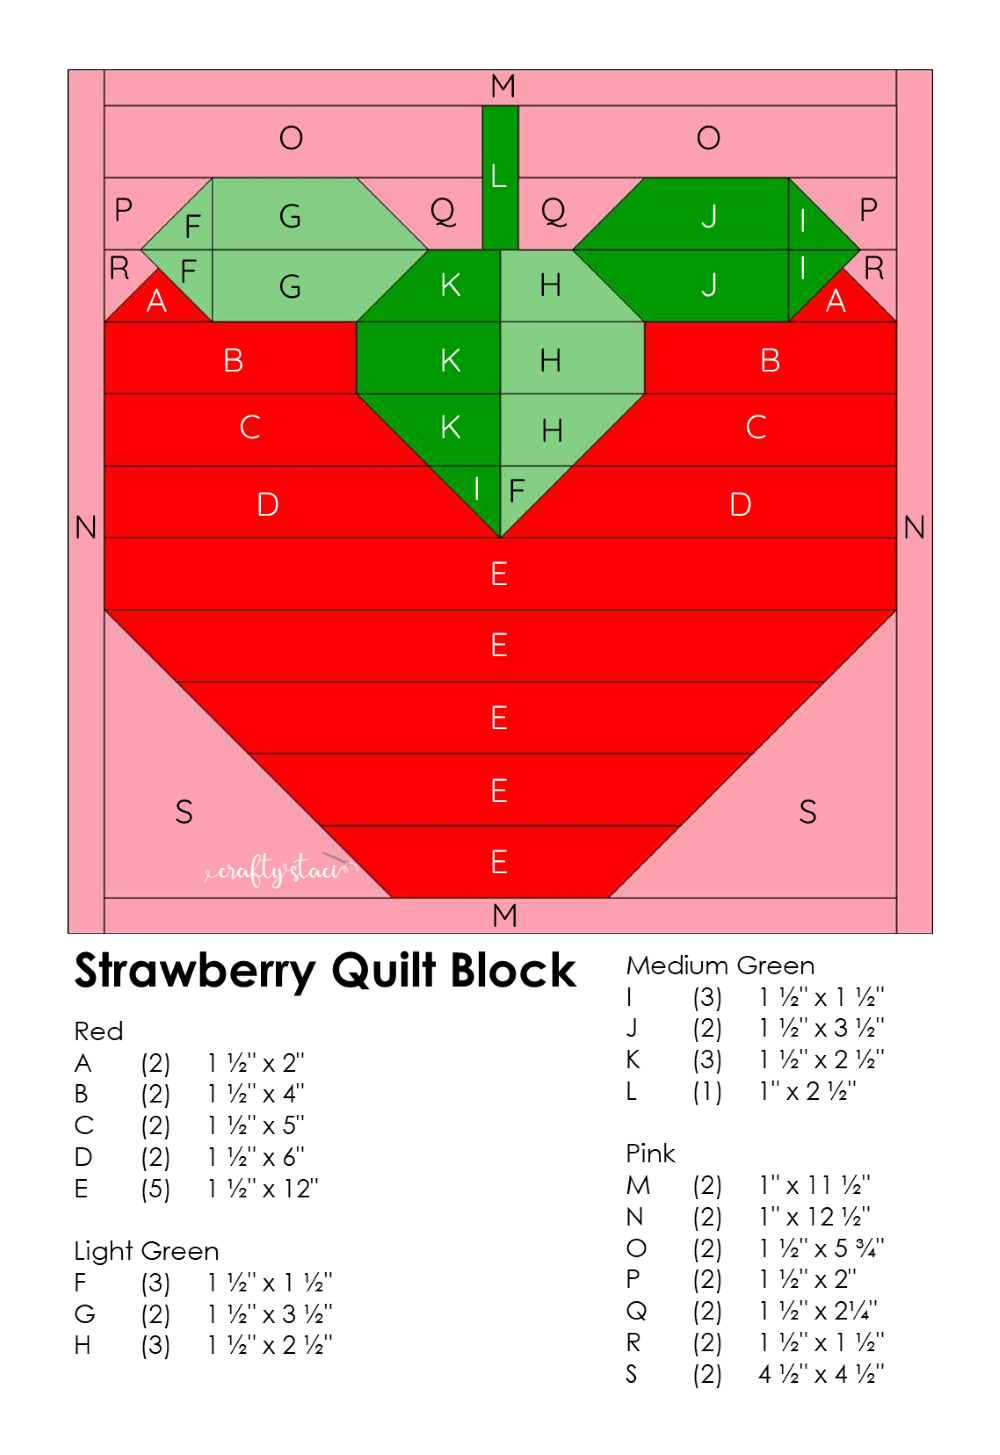
The Strawberry Quilt Block and Pillow – Pattern is a quilting design that features a strawberry motif, often formed by piecing together fabric squares and triangles to resemble the shape and texture of a strawberry fruit. It typically includes a red or pink body with green leaves at the top, and is stitched into a square block that can be used in various home décor projects.
This pattern is commonly used to make quilt blocks that are later joined into larger quilts, but it’s also perfect for standalone items like pillows, tote bags, wall hangings, or placemats. It’s versatile, visually engaging, and can be tailored to many styles—from modern minimalism to rustic farmhouse charm.
One of the best features of this design is its modular simplicity. Most strawberry blocks are made using straightforward patchwork techniques, including half-square triangles and basic rectangles. This makes the pattern approachable for beginners, while still offering room for creativity through fabric and color choices.
A single strawberry quilt block is usually 8 to 12 inches square, though the size can vary depending on your project. For pillows, a single block is often enlarged slightly and paired with a border or sashing to match standard pillow sizes.
While the classic strawberry block uses red or pink fabrics for the berry and green for the leafy top, some quilters get creative with unexpected fabric combinations—like polka dots for a whimsical look or vintage florals for a nostalgic feel.
No matter your quilting skill level, this pattern provides a charming and rewarding way to explore fabric art. Whether you’re sewing your first pillow or adding strawberry blocks to a bed quilt, the result is sure to be as sweet as the fruit itself.
2. Materials and Supplies for Your Strawberry Quilt Block and Pillow
To create a beautiful Strawberry Quilt Block and Pillow – Pattern, you’ll need a few essential quilting and sewing supplies. While most materials are readily available at craft stores or online, choosing the right combinations will enhance both the look and feel of your finished project.
Start with fabric selection. For the strawberry body, red or pink quilting cottons work best—solids, small prints, or tone-on-tone textures all help replicate the natural look of strawberries. For the leaves, choose bright or medium greens, and for background fabric, white or low-volume prints create nice contrast.
If you’re making a pillow, you’ll also need fabric for the pillow back—either a coordinating solid or print that complements your strawberry design. You may also want a border or binding fabric if you’re adding a frame around the block.
You’ll need batting if you’re quilting your block before turning it into a pillow. A lightweight cotton batting is perfect for pillows, adding softness without bulk. If you’re skipping quilting, you can just use interfacing to give the block some structure.
Don’t forget your basic quilting tools: rotary cutter, quilting ruler, self-healing cutting mat, iron, and sewing machine. These will help you cut and assemble your pieces accurately.
For assembly, you’ll need thread that matches your fabrics, pins or clips for holding layers together, and a zipper or envelope closure material if you’re finishing your pillow professionally.
Finally, if you’re planning to quilt your block before making it into a pillow, consider a walking foot attachment for your sewing machine—it helps feed the layers evenly and keeps your stitches straight and neat.
3. Step-by-Step: Making a Strawberry Quilt Block and Pillow
Once you’ve gathered your materials, it’s time to bring your Strawberry Quilt Block and Pillow – Pattern to life. This step-by-step guide offers a general outline of the process, though specific patterns may vary slightly depending on style and size.
Begin by cutting your fabric pieces according to your pattern. You’ll need squares and triangles in red/pink for the berry, green for the leaves, and white or background fabric. Label or organize your pieces by color to keep the assembly process smooth.
Sew the half-square triangles (HSTs) for the berry and leaf sections. These create the pointed shapes that mimic the strawberry’s natural contours. Press seams as directed, usually toward the darker fabric to avoid shadows showing through.
Assemble the top “leaf” section by sewing together the green triangles and rectangles. Then piece together the red berry body using squares and HSTs. You’ll often construct the block row-by-row and then join the rows together.
Once the strawberry and background sections are complete, you can square up the block using a rotary cutter and ruler. This ensures clean edges and an even final shape—especially important if you’re adding borders or quilting.
If you’re making a quilted pillow, layer the block with batting and a fabric backing, then quilt through all layers using straight-line or echo quilting. This adds dimension and keeps the block sturdy for use as a pillow.
Finish the pillow by adding a backing piece—using either a zipper closure or an envelope-style fold. Sew around all edges, turn the pillow right-side-out, and insert your pillow form. Fluff it up, and enjoy your handmade creation!
4. Customizing and Styling Your Strawberry Pillow
The beauty of the Strawberry Quilt Block and Pillow – Pattern is how easy it is to customize. Whether you want a modern look or a vintage vibe, small changes in color, fabric, and embellishment can make a big difference.
Experiment with non-traditional colors. Try deep burgundy or coral for the strawberry body, or mint green and teal for the leaves. These variations still suggest a fruit-like form while adding personal flair.
Play with fabric prints for a whimsical touch. Polka dots, gingham, florals, or even strawberry-themed fabric can add visual interest and a sense of fun. Using different textures, like linen or chambray, gives your piece a tactile feel.
Add a border or sashing around your block for a framed effect. This is especially useful for enlarging the block to fit standard pillow sizes like 16×16″ or 18×18″. Choose complementary colors or use scrappy fabric strips for a patchwork vibe.
Incorporate hand embroidery or appliqué for extra detail. Stitch on little seeds or vines, or even add text like “Berry Sweet” or “Home Grown” to personalize the design.
If you’re making multiple pillows, create a coordinated set by using different background colors or alternating strawberry sizes. A trio of fruit-themed pillows makes a great seasonal décor update for spring or summer.
Lastly, don’t forget about labeling your work. Add a handmade label with the date or the recipient’s name—especially if it’s a gift. It adds sentimental value and makes your pillow a cherished keepsake.
FAQ – Frequently Asked Questions
Q: Is the Strawberry Quilt Block and Pillow – Pattern good for beginners?
A: Absolutely! The basic block involves simple piecing and common quilting techniques. With a little guidance, beginners can confidently complete this project.
Q: How big is a typical strawberry block?
A: Most patterns range from 8″ to 12″ square, but you can scale them up or down to fit your pillow or quilt design.
Q: Can I make this pattern by hand, or do I need a sewing machine?
A: You can hand-sew the blocks if you prefer, but a sewing machine makes the process much faster and gives more consistent results—especially for piecing and quilting.
Q: What type of batting is best for a quilted pillow?
A: A lightweight cotton or polyester batting works best. It provides softness without making the pillow too bulky.
Q: Can I wash my finished pillow?
A: Yes, if you’ve used washable fabrics and thread. Machine wash on a gentle cycle and air dry or tumble dry low. Hand-washing is ideal to preserve details.
Q: Where can I find a Strawberry Quilt Block and Pillow – Pattern?
A: Many free and paid patterns are available online on websites like Etsy, Pinterest, and independent quilting blogs. Look for ones with detailed diagrams and clear cutting instructions.
Conclusion
The Strawberry Quilt Block and Pillow – Pattern is a heartwarming project that blends charm, creativity, and simplicity. Whether you’re sewing a single pillow or creating an entire quilt of berry blocks, this pattern invites joy into your crafting experience. With customizable color palettes, beginner-friendly construction, and endless design potential, it’s a sweet addition to any maker’s repertoire.
We hope this guide helped you understand how to create your own strawberry block and pillow from start to finish. If you’ve tried this pattern, please leave your honest opinion, share tips that worked for you, or suggest ideas to enhance the design. Your feedback can inspire fellow quilters around the world!